Wednesday, August 31, 2022

Winter Deer CAS Card

This pretty card was inspired by one made by Chris Stokes. 

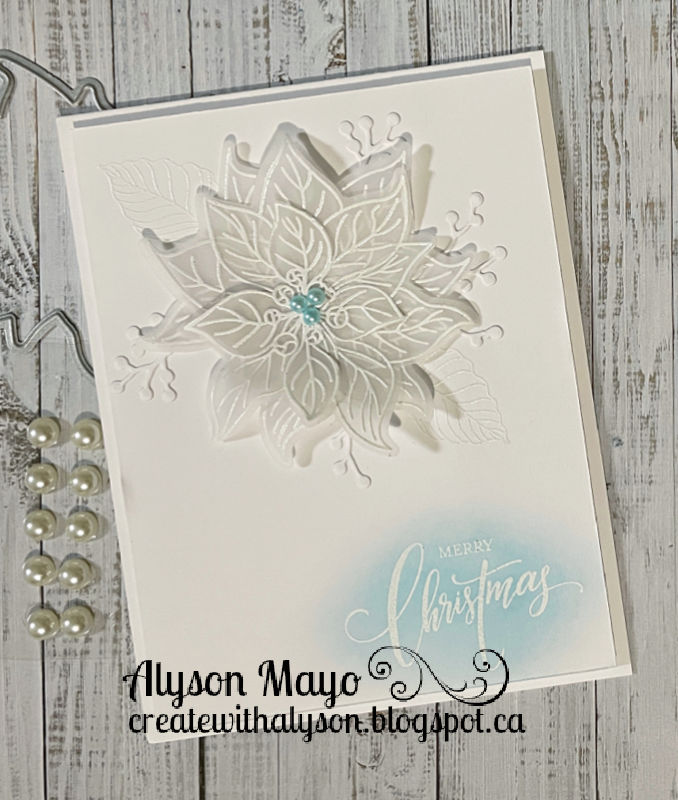
Sometimes clean and simple cards take more effort than detailed ones... this was definitely one of those times!

The circle background piece took me a couple of tries. I traced a circle from a die and used that for the placement of my torn paper pieces and the stamping of the trees. The paper placement had to be figured out first so the trees would show and look somewhat natural. I also inked the snowbanks with a light grey ink. Once the torn pieces and the trees were finished, I die cut a circle from that piece. The deer was cut on my Cricut and stacked twice. The sentiment was die cut three times and stacked for added dimension. All of these pieces were adhered to white card base. 

Enjoy,

Alyson

Tuesday, August 30, 2022

TSOT 571 - Crocus Stems

 Welcome to Try Stampin' on Tuesday Challenge 571!

The optional theme in addition to the sketch is Clean and Simple. 

CAS cards are hard for me... it's just not a style that comes easily. I wanted to try that concept with this sketch and I chose to dry emboss the two corners on my card front.  I simply marked the halfway point on each side and lined up the marks in my trimmer and used a stylus to draw the lines. I did this on the back so the lines would be raised on the front. 

The crocus stems were die cut in three colours and I added the same colour of ink to darken sections of each piece before adding them to the card front. I also white embossed a sentiment for the bottom corner. The card front was adhered to the base using craft foam. No embellishments were added. 

Come and join us at Try Stampin' on Tuesday and show us how you interpret the sketch shown above. 

You have two weeks to link up your project. 

We can’t wait to see what you create! 

Enjoy,

Alyson

Monday, August 29, 2022

DT 119 and AH 488 - Three Little Piggies


Welcome to Double Trouble Challenge 119 and Atlantic Hearts Challenge 488!

Since this is the fifth Monday in the month, the Double Trouble challenge is Something, Anything, Everything. The optional theme is to use piggies and a pun on your project. We also encourage you to link up with one of our partner challenges and since I am a member of the Design Team at Atlantic Hearts, it made sense to link up with that challenge and do one project for both challenges. 

The small graphic for Double Trouble is below, along with the sketch for Atlantic Hearts. Please visit the sites for more information. 


I chose pink and green papers for the background of my card and die cut them, along with an outline rectangle using stitched dies. The piggies were stamped and coloured and I added the clouds and grass behind them. The sentiment runs across the top. The main piece was adhered using craft foam and I added some clear gems to finish off the card. 

Come and join us at both Double Trouble and Atlantic Hearts and show us how you interpret these challenges. 

You have two weeks to link up with Double Trouble and one week for Atlantic Hearts. 

We can’t wait to see what you create! 

Enjoy,

Alyson

Sunday, August 28, 2022

Three Peaks Birthday Card

I watched a neat tutorial by Sam Calcott on how to make this Three Peaks Card. Accuracy of measurements is very important for this to work correctly. 

I decided to make a masculine birthday card - seems I always have to pull one together at the last minute when the occasion arises. 

A blue base and blue patterned papers, along with some holographic paper were used for my card. There are two panels on the back where messages can be written. Aside from the sentiment, I didn't add anything else to this card as it works well already. I did colour the word YOU in a blue ombre colour scheme before adding the sentiment to the front of the card. 

Enjoy,

Alyson

Saturday, August 27, 2022

Hexagon Flowers Card

 I wanted to try a twist on the standard Triple Time Stamping concept - I did this with hexagon dies. 

Three sizes of hexagons were die cut from white cardstock and I arranged them on the card front with removable adhesive. The flowers and leaves were masked and stamped (there are three stamps for each image). The hexagons were removed and adhered to the next largest size cut from black cardstock. I did make an error here - I should have spaced the bottom hexagon further to the left so the edges of the borders didn't touch - c'est la vie! 

The card front was adhered to a black base with craft foam and I added some dew drops around the images and some silver Stickles in the centres of the flowers. 

Enjoy,

Alyson

Friday, August 26, 2022

CD 511 - Thinking of You

 Welcome to Colour Dare Challenge 511!

We have an inspiration photo for you this week - use at least two colours from the photo. Black, white and gold are free to use. 

I really struggled with this challenge... this card was my fifth attempt to make something work! These colours are definitely are not ones that I would use together - but challenges are designed to make us stretch our creative limits, right? 

I used shades of orange, purple, yellow, dark green plus black, white and gold. 

I cut three panels of black and white patterned paper and adhered them to a white card base. The flowers were stamped on white cardstock and coloured. I also stamped, coloured and die cut a single flower and two leaves for the upper corner. I added thin strips of gold glitter cardstock on each side of the floral border and the sentiment. Gold Stickles were added to some of the flowers. 

Come and join us at Colour Dare and show us how you interpret the challenge shown above. 

You have two weeks to link up your project.

We can’t wait to see what you create! 

Just for interest sake, the card below was the fourth card I made for this challenge and one I decided not to use... the herringbone pattern provided the background for the sentiment. 

Enjoy,

Alyson

Thursday, August 25, 2022

Vellum Poinsettias

 This pretty card was inspired by one I saw on Pinterest. 

The leaves and sentiment were embossed in white on the card front. The flowers were embossed in white on vellum and die cut. I also die cut some white berries. I offset the large flowers and adhered them together in the centre. The third poinsettia was cut around the centre four leaves and adhered on top of the other two flowers. The sentiment didn't show up well so I lightly inked over it with blue ink. The card front was adhered to a white base with craft foam. I added some blue coloured pearls to the centre of the poinsettia. 

Enjoy,

Alyson

Wednesday, August 24, 2022

Make the Cards 62 - Dr. Seuss and Books

 Welcome to Make the Cards Challenge 62! 

The theme this week is school or teacher. 

I struggled with this challenge as I don't have any products related to school or teachers so I went to my Cricut for ideas. I cut the book and butterfly image and then found a terrific quote from Dr. Seuss that fit this challenge perfectly. I printed the quote on white cardstock, inked clouds on the entire background and placed the assembled book image at the bottom. A few blue enamel gems were added and the butterfly was brushed with a clear shimmer brush. 

Come and join us at Make the Cards and show us how you interpret this challenge. 

You have two weeks to link up your project. 

We can’t wait to see what you create! 

Enjoy,

Alyson

Tuesday, August 23, 2022

Merry Christmas Poinsettia Card

 This neat Christmas card was inspired by one I found on Pinterest, created by Roseanne Mulhern. I really liked the thin strips and wanted to try this myself. 

The flower was stamped in two shades of red ink and the leaves were stamped in two shades of green. I die cut all the pieces and glued the flower together. I used black glitter paper for the strips and cut them into quarter inch wide pieces. They were arranged on the card front and I stamped the sentiment before adding the flower and berry branches. The card front was adhered to a black card base and I added some gold Stickles to the centre of the flower and red Stickles on the berries. 

Enjoy,

Alyson

Monday, August 22, 2022

Block Fold Out Autumn Card

 I saw this card design online and someone was kind enough to post the scoring diagram for it - unfortunately, no name was attached to it.

The finished folded card is slightly larger than 5" x 5".

I used autumn themed papers for this project - one paper pack had several patterns and that worked out perfectly. This card needs to remain flat inside for it to fold back in place so I used a cardstock panel and a piece of patterned paper for each inside section. I didn't add anything else to the panels. The outside panels show in the corners when the card is completely open. For the centre panel, I die cut some leaves in white and used several Distress Oxide inks to ink them in autumn colours. They were placed behind the stamped sentiment. I stamped the sentiment in brown and used three markers to blend an ombre colour scheme on each letter. There is a spot on the back of the card to write a message. 


Enjoy,

Alyson

Sunday, August 21, 2022

Peace with Red Poinsettias

 I send an enormous number of cards for Christmas - close to 200 - so I have to get working on them early!! 

This is a classic Christmas colour scheme - red and gold (with green leaves for the poinsettias). I die cut the poinsettia pieces, shaped them and added some vellum layers before adhering the pieces together. The background was stamped with a few ink blot images and then splattered with a dark green shimmer brush. The gold grid was placed top and the flowers were added along with a die cut sentiment. I added some red metallic thread behind the flowers and brushed the vellum leaves with a gold shimmer brush. Gold Stickles were also added to the centres of the flowers. 


Enjoy,

Alyson

Saturday, August 20, 2022

Layered Strips Christmas Tree Card

 This neat but simple idea was inspired by Mary Fish, a SU Demo in the US.

I chose three shades each of red and green cardstock and cut them into quarter inch strips. They were adhered to the card front, just tall enough to fit the die cut tree. The tree was adhered and I added a small twine bow under the sentiment. A few red gems were added and the card front was adhered to the base with foam tape. Easy! 

Enjoy,

Alyson

Friday, August 19, 2022

Watercolour Stamped Flowers

 This was an unusual technique for me - I have a hard time with "organic" looking elements on my cards but I did want to try this. 

The flowers were stamped with a watercolour- safe black ink and I stamped the colours using Distess Oxide and Catherine Pooler inks with water spritzed on the stamp before pressing it down. The water causes the ink to separate, leaving a watercolored appearance. I stamped a second, slightly darker colour on a few flowers and leaves and also stamped the centre of each flower in yellow ink. The CP inks gave more depth of colour whereas the DO inks left a chalky appearance. The flowers and leaves were fussy cut as I don't have a set of dies for this very old stamp set. 

I cut three pieces of decorative paper for the left side of my card and stamped the stems in green before adding the leaves and flowers. As an afterthought, I splattered the card with a black shimmer brush - really should have done that before adding the paper and flowers. A small sentiment was added and I placed some purple holographic sequins around the flowers. 

Enjoy,

Alyson

Thursday, August 18, 2022

Slimline Fuchsias Birthday Card

Slimline shaker cards are easy and fun to create, especially when you have a die with openings already built into it. 

The base piece was die cut in a light teal colour which was chosen after I stamped, stencilled and die cut the flowers. I die cut a second background in white and used circle dies to cut just the patterned circles. A piece of white cardstock was used for the back of each shaker and I lightly inked half of each circle with purple ink. The shaker was created with clear sequins, silver stars and some "snow" and adhered together. The entire front was placed on a purple background. I added a silver hot foiled sentiment with some silver metallic thread. The last step was to add silver Liquid Pearls around the flowers. 


Enjoy, 

Alyson

Wednesday, August 17, 2022

AH 486 - Christmas Poinsettia

 Welcome to Atlantic Hearts Sketch Challenge 486!

The sketch this week has a lot of detail... please remember that it is a starting point. As long as we can see the sketch in your project, all is well. 

I stamped, stencilled and die cut some poinsettia images and used one of them at the side. The background was stencilled with a light green ink and the black stitched border die cut was adhered on top. The diamond was hot foiled and I also cut a gold foil piece to fit inside. The sentiment pieces are all from a collection from Gina K. Designs and I cut out five different sayings and arranged them just under the floral image. I added some red metallic thread, gold gems and brushed the flowers with a gold shimmer brush before adding both red and gold Stickles. 


Come and join us at Atlantic Hearts and show us how you interpret the sketch shown above. 

You have until Sunday evening to link up your project. 

We can’t wait to see what you create! 

Enjoy,

Alyson

Tuesday, August 16, 2022

TSOT 569 - Bold Butterflies

 Welcome to Try Stampin' on Tuesday Challenge 569!

You have a choice this week - use the inspiration photos, use the sketch or use both! 

I chose to use only the sketch. 

The background for my card was created using alcohol inks. The middle panel was created using a foil plate on stamping foam - that was trimmed and a scalloped border was added at the side. The front panel was lightly inked behind the butterflies and the stencilled butterflies were adhered in place. The sentiment was white embossed and added at the bottom. I coloured several clear sparkles to add to the butterflies and around the card. There are lots of techniques on this card! 

Come and join us at Try Stampin' on Tuesday and show us how you interpret this week's challenge. 

You have two weeks to link up your project. 

We can’t wait to see what you create! 

Enjoy,

Alyson


Monday, August 15, 2022

Double Trouble 118 - Relax and Enjoy

 Welcome to this week's challenge at Double Trouble!

It's all about relaxation this week. The small graphic is below - please visit the Double Trouble Challenge Blog for detailed information. 

I really struggled with this challenge... I don't have any stamped images that reflect relaxation. I turned to my Cricut this time and cut a silhouette of a girl reading as I find reading to be very relaxing. 

The flowers were stamped along the bottom and they were coloured. I added clouds in the sky using a stencil and drew a few birds in the distance. The reading girl image was placed on top of the flowers and I also cut a sentiment in yellow. The card front was adhered to a black border and then a turquoise stitched card base. 


Come and join us at Double Trouble and show us how you interpret this week's challenge. 

You have two weeks to link up your project. 

I am also entering my card in the Crafter's Cafe Challenge (celebrate National Relaxation Day). 

We can't wait to see what you create! 

Enjoy,

Alyson

Sunday, August 14, 2022

Simply... Just Simply...

I loved this tree stamp since the first time I saw it... I have created cards with the Northern Lights as the central focus but this time, I went with a late afternoon/evening feel. 

The background was ink blended with four shades of Distress Oxide inks and splattered with white paint. Once that piece was dry, I embossed the trees in black since stamping on a Distress Oxide ink background often doesn't give a pure black result. The trees were adhered to a blue cardstock background. I stamped the sentiment in black and die cut that piece plus a border and attached them at the side. Easy! 

Enjoy,

Alyson

Saturday, August 13, 2022

Sunflowers with Woven Background

 This pretty card was made with a few dies and the Sunflower washi tape from Pinkfresh Studio. 

The background was die cut with a stitched leaf die and then a hexagon was cut from the centre. I also die cut a thin border of the same hexagon shape from gold glitter paper and that was adhered to the leafy front. Inside the frame, a basket weave die was cut and I wove pieces of lilac cardstock through the openings. The front was adhered on top with foam tape and I also added a stitched rectangle. The sunflower pieces were adhered on top of the open frame, along with a foiled sentiment. The last step was to add some champagne gems around the card. 


Enjoy,

Alyson

Friday, August 12, 2022

CD 509 - Birthday Tulip Arrangement

Welcome to Colour Dare Challenge 509!

Choose your greys and add ONE colour - black, white and gold are free to use. 

This was my third attempt at this challenge - I had to walk away after two failed attempts and even this is not what I had in mind. I suppose we all have those days, right? 

I stamped and die cut several tulips (shades of grey on the stems/leaves and shades of pink for the bulbs). I also die cut several leaf shapes from both white cardstock and vellum as well as two doilies from white cardstock. All of that was arranged on a piece of black embossed cardstock. The black cardstock was adhered with craft foam to a grey brick paper piece and then to a white card base. I added a birthday sentiment on the left side and arranged a ribbon and gold and pink metallic thread at the bottom. A few white enamel gems were added and I brushed the darkest parts of the flowers with a gold shimmer brush.


Come and join us at Colour Dare and show us how you interpret the challenge shown above. 

You have two weeks to link up your project. 

We can't wait to see what you create! 

Enjoy,

Alyson

Thursday, August 11, 2022

Hand Stitched JOY

A friend was kind enough to send me a new Spellbinders stitching die... the concept is really neat but WOW - the amount of time to create these cards was crazy! 

I die cut the image from white cardstock twice and decided to make two cards in different colour schemes. I prefer non-traditional colours for Christmas so that explains the teal card but I also wanted to do a traditional red and green card. 

The stitching isn't hard to do but it is very time consuming. The embroidery floss had to be adhered to the back of the die cut and it wasn't possible in most cases to just continue with the same colour and move to the next section as the floss would cross over other sections and be visible from the front. I stitched two colour schemes. 

The backgrounds are silver and gold foil paper and I embossed both of those panels. They were adhered to glitter paper backgrounds and then to top folding card bases. I added either silver or gold gems to the centres of the small flowers, depending on the colour scheme. 


Enjoy,

Alyson


Wednesday, August 10, 2022

Make the Cards 61 - Friends Mini Slimline

 Welcome to Make the Cards Challenge 61!

It's colour challenge this week... please see the graphic below. 

I used a stamp, stencil and die set that I received as part of a recent virtual event. I stamped the images in black and used shades of pink, orange and green to stencil the layers before everything was die cut. I also die cut a stitched scalloped rectangle and stacked it three times. I inked the corners of the card base using the same dark green ink I used for the stencilling. The sentiment was embossed on vellum and placed across the images (which I had to lift as I had adhered them down before deciding I wanted them on top of the vellum...) I added some iridescent gems and brushed the flower centres and the butterflies with a clear shimmer brush to finish off the card. 


Come and join us at Make the Cards and show us how you interpret this colour challenge. 

You have two weeks to link up your project.

We can't wait to see what you create! 

Enjoy,

Alyson

Tuesday, August 9, 2022

Polar Bear Rocker Card

I have made rocker cards before - the inspiration for this one came from a friend of mine, Melanie Hungerford

I also wanted to be able to share this design with others and since I created the base for this card using my Cricut, that is hard to share unless others have a Cricut machine. My friend, Trina Wirihana of Scrap'nSeason Designs created an SVG file for me! 

Using the SVG file, I cut the blue circle plus the two snowbank pieces. The front snow bank was aligned with the folded circle to stamp the sentiment on a straight line. The polar bear and the trees were stamped, inked or coloured and fussy cut as I don't have dies for them. I also embossed the snowbank pieces before adhering them to the half circle. The trees and the bear(s) were arranged so the card was relatively even on both sides. The card can be opened to write a message inside. 


Enjoy,

Alyson

Monday, August 8, 2022

Fold Back Gatefold Card

 This gatefold card with a bit of a twist is very easy to create... I decided to do one with a rainbow theme. 

The outside of the card has a belly band to hold it together. I used a star shaker to hold the band together and filled it with the same colour sequins as in the rainbow papers.

Inside the card, each panel was decorated and I created a circle using stamped stars. Some were stamped inside with the full shape and others were stamped with a half star shape. I stamped the sentiment in black and fussy cut it and also added "the best" inside the star circle to complete the sentiment. No other embellishments were added to this card as it won't sit flat if anything is on the inside. 


Enjoy,

Alyson

Sunday, August 7, 2022

Celebrate Everything Slimline Card Set

 When I go to day crops, I plan carefully ahead of time so I take only the items that I need. Taking the "kitchen sink" and deciding later what to do simply doesn't work for me as I can't take everything and I inevitably end up forgetting something.

This set of cards was stamped ahead of time and I just coloured them while talking with others. I made the box and added envelopes when I got home. The inside of each card is also decorated with a coloured panel but I didn't photographs that. There are eight cards - four oriented vertically and four oriented horizontally. I used eight different colour schemes. This will make a nice gift! 


Enjoy,

Alyson