Thursday, March 31, 2022

Sending You a Rainbow

This was an easy card to create but I love the rainbow effect. 

The white floral die was cut three times and stacked. I cut strips of cardstock all the same width and arranged them on a base piece of white cardstock, leaving a small space between each strip. The stacked floral die cut was adhered over the rainbow strips. The sentiment was embossed in white and the large word was die cut in black with a white shadow. No other embellishments were added. 

Enjoy,

Alyson

Wednesday, March 30, 2022

Sweet Friend Purple Roses

I recently purchased a gorgeous stamp set from Gina K. Designs that has a super large rose image. There was no die for that image so I had to find a way to use it without fussy cutting. I decided to create a 6x6 card to accommodate the complete image. 

The image was stamped and coloured on a separate panel so any ink that bled through the cardstock wouldn't be visible on the back side. I trimmed down that panel and added it to a green base with both a pink and black border. A thin piece of patterned paper, silver glitter paper and a thin strip of purple ribbon were added at the side. The sentiment was die cut three times and stacked on a shadow and I stamped the "sweet friend" phrase underneath. Some clear gems were added around the flowers and I brushed the flowers with a clear shimmer brush. 


Enjoy,

Alyson

Tuesday, March 29, 2022

TSOT 549 - Mixed Up Scraps Card

Welcome to Try Stampin' on Tuesday Challenge 549!

The optional theme (in addition to the sketch) is to use your scraps. 

This sketch is perfect for scraps and we all have lots of them! I pulled some blue and green patterned papers to use for the strips on the card. I cut them in varying widths and dovetailed the end of each piece. They were layered unevenly onto the card base. I added two strips of silver shimmer trim and the sentiment was placed on the bottom piece. Some silver hearts were die cut and added around the card. 


Come and join us at TSOT and show us how you interpret the sketch shown above. 

You have two weeks to link up your project. 

We can't wait to see what you create! 

Enjoy,

Alyson

Monday, March 28, 2022

AH 466 - Citrus Blooms

Welcome to Atlantic Hearts Sketch Challenge 466!

I used the sketch pretty much as shown this week. 

The background is pink patterned paper with gold elements and I aded green glitter paper, gold foil and green cardstock for the strips along the side. The main image shape was Circut cut so I was able to create a thin border in both gold and green. The citrus blooms were stamped, stencilled and die cut and adhered to vellum to create a softer appearance. Those pieces were arranged in the centre of the circle and a gold foiled sentiment was added at the bottom. You're the Sweetest works perfectly with the lemons and oranges within the blooms. I added some gold metallic thread and clear gems around the card. Elements on the blooms were brushed with a clear shimmer brush. 


Come and join us at Atlantic Hearts and show us how you interpret the sketch shown above. 

You have until Sunday evening to link up your project. 

We can't wait to see what you create! 

Enjoy,

Alyson


Sunday, March 27, 2022

Friendly Poppies

I am loving this set of poppy stamps and dies - I posted a different card yesterday using the same set. 

This one was inspired by a card on the Sunny Studio website. 

The plaid paper and grey cardstock were cut into the shape of a tag and adhered with craft foam to the card base. The poppies and leaves were arranged around the tag and a die cut "hello" was added on top. The rest of the sentiment was embossed on black cardstock. I added some clear gems around the floral clusters. Easy yet so elegant! 

Enjoy,

Alyson

Saturday, March 26, 2022

Smiling Poppies

This card was CASEd from one made by Jennifer McGuire. I have wanted this poppy stamp and die set for ages and recently, a wonderful friend of mine sent me the stamp. What better time to use it?

The poppies, leaves and branches were stamped using various colours. I didn't realize that the poppies have FIVE layering stamps in addition to three more stamps for the centre of the flower. I had to change the inks I was using midway as I didn't have enough shades in the colours I had selected. The depth that the various inks provide is quite remarkable. 

The stems and flowers were arranged directly on the card front and adhered. A sentiment was embossed on black cardstock and adhered near the bottom. A strip of gold glitter paper was placed underneath the sentiment. The last step was to add some Platinum Stickles to the centres of the flowers. 

Enjoy,

Alyson

Friday, March 25, 2022

CD 489 - Pretty Little Flowers

Welcome to Colour Dare Challenge 489! 

It's a tic-tac-toe board this week - choose at least one row, column or diagonal line. You can use other colours but they must be from the grid. 

I used the diagonal line containing Desert Rose, Sage and Gold plus Ballerina and Rosemary. 

The flowers were stencilled using the four colours listed above (minus gold) and die cut. I decided on a Rosemary card base as it wasn't a competing colour with the leaves. I die cut a scalloped mini slimline outline from Desert Rose glitter paper and adhered the flowers at the top and bottom. I added a second piece of Rosemary cardstock over the centre section of the card on which the gold foiled sentiment was placed. I brushed the flower centres with a clear shimmer brush and added gold gems to each flower. Some gold metallic thread was added under some flowers as well. 


Come and join us at Colour Dare and show us how you use the tic-tac-toe board shown above. 

You have two weeks to link up your project. 

We can’t wait to see what you create! 

Enjoy,

Alyson

Thursday, March 24, 2022

Concertina Gatefold Card

This unique fun fold card is a Concertina Gatefold Card. Instructions can be found here.

I chose to create this card with holographic cardstock along the sides. Photographs don't pick up the shades in that paper - here, it just looks pinky-orange. It turns from pink to blue and various shades in between when moved around. 

The folds on this card determined the size and placement of the inside image as they still allow the complete image to be seen when the sides are folded down. The center image was stamped. It is designed to look like a watercolored image and I used shades of pink and emerald green. The sentiment was stamped in dark blue to match the background cardstock. There is a panel on the back of the card to write a message. 


Enjoy,

Alyson


Wednesday, March 23, 2022

Birthday Trees Half Z-Fold Card

This card style was created by (as far as I know) Lauren Moore and Gail Gross. For lack of a better title, I have called it a Half Z-Fold Card. 

I didn't use any dies or electronic cuts for this card - the pieces were all cut with a paper trimmer. 

The front panel and the inside writing panel were cut from a light grey cardstock so I could stamp tree images. I used a few different stamps with first and second generation stamping to create an outdoor scene. The sentiment was stamped at the top of the front panel. The inside panel has enough room to write a message. 


The patterned papers are from Kaisercraft's Morning Dew collection - I loved the rock paper and the colourful Northern Lights paper. 

Enjoy,

Alyson


Tuesday, March 22, 2022

Pink Friend Flowers

This card was fairly easy to create with the help of the wreath builder from Gina K. Designs. 

The wreath builder template was used to create the circular shape at the top left. A small sentiment was stamped with Mink ink and I added a heart between each section. The floral image was stamped over that circle and coloured with markers. The main sentiment was stamped at the bottom and the card front was adhered to the card base with craft foam. Some white liquid pearls were added around the flowers. 

Enjoy,

Alyson

Monday, March 21, 2022

DT 106 - Clean and Simple

Welcome to Double Trouble Challenge 106!

This week, it's a clean and simple challenge. The small graphic is below - please visit the Double Trouble Challenge Blog for detailed information. 

Clean and simple is not my usual choice of design... I prefer many layers and colours. This was tough... I decided on some leaf dies and Distress Oxide inks to create the colourful leaves. 

One set of leaves was inked with three shades of blue and the second set with multiple colours to create a rainbow. I die cut circles and adhered them with thin foam tape so the leaves could be adhered to the edge of each circle. Both card designs are the same except I splattered coordinating colours diagonally across the blue card and I focused only on the circle for the rainbow card. The splattering was done with shimmer brushes so there is a bit of shine in those areas. I stamped a sentiment in the bottom right of each card with black ink and the last step was to adhere the top panel to the card base with a piece of thin craft foam. 


Come and join us at Double Trouble and show us how you interpret this challenge. 

I am also linking up my blue card with the Use Your Stuff challenge. 

You have two weeks to link up your project. 

We can't wait to see what you create!

Enjoy,

Alyson

Sunday, March 20, 2022

Rainbow Pop-Up Slimline Box Card

Wow - that title is a mouthful! 

This pop-up box card was designed by Trina Wirihana from Scrap 'n Season Designs. The SVG file for the project can be found on the linked website. 

I chose to cut my card in the same colours that Trina used, just because they worked so well. I added some lines with a white gel pen on the sun and clouds. The rainbow image on the front was inked in the same colours as the pop-up rainbow and then it was die cut along with a black shadow. I stamped the smaller sentiment in black and adhered it under the rainbow piece. A few sequins in the same colours were added around the front of the card. 


Enjoy,

Alyson

Saturday, March 19, 2022

CAS Open Butterfly Card

This card was easier to create than I anticipated... there is no acetate over the opening but just the images underneath. 

The butterfly was die cut from a card front that was slightly smaller than the base. I traced the butterfly onto the base to help with the placement of the images. All the floral and leaf images are washi tape die cuts. They were arranged so the edges of the butterfly would be covered. I drew on the antennae and then adhered the front to the card base with foam tape. A black embossed sentiment was added at the bottom. 

I am no longer listing the products I used for each project. If you have any questions, please feel free to contact me using the form at the top right of my blog. 

Enjoy,

Alyson

Friday, March 18, 2022

You are Beautiful Anemones

Another card with anemone washi tape... I am loving this product! 

The base was created by die cutting a chevron shape from white cardstock and adhering every other piece to the card base. The scalloped rectangle was die cut and inked with Fossilized Amber Distress Oxide ink and attached to the chevron base. The washi tape flowers were places around the frame and I die cut the sentiment from gold foil and white cardstock. I also embossed the words "you are" and placed them above the large word. Gold gems were added to finish off the card. 

I am no longer listing the products I used for each project. If you have any questions, please feel free to contact me using the form at the top right side of my blog. 

Enjoy,

Alyson

Thursday, March 17, 2022

Your Light Anemone Card

This card was inspired by one I saw on the Pinkfresh Studio website. The anemone flowers are all washi tape - yup - washi tape! 

I die cut the flowers and also a white diamond grid and some leaves. The card background was masked around the edges where the diamond grid wouldn't cover, inked with two colours of Distress Oxide inks and splattered with water. The grid was adhered on top. The leaves were adhered under the flowers and a sentiment was embossed in gold on vellum. The vellum was adhered to the back of the grid so no adhesive would show. I added some gold liquid pearls around the card as well. 

I am no longer listing the products that I used. If you have any questions, please feel free to contact me using the form at the top right side of my blog.

Enjoy,

Alyson

Wednesday, March 16, 2022

White Pigment Ink Flowers

White pigment ink can be used for many things but one of the easiest techniques is to simply rub it over an embossed image on dark cardstock. It highlights the raised images. 

I used Peacock cardstock and embossed a floral image. The white ink pad was lightly dragged and tapped on the embossed image so as not to get a lot of ink in the recessed areas. I die cut a sentiment and shadow and offset the shadow slightly. The small sentiment was heat embossed on the same Peacock cardstock. I added a few gems around the sentiment as well. 

I am no longer listing the products I used - if you have questions, please feel free to contact me using the form at the top right side of my blog. 

Enjoy,

Alyson

Tuesday, March 15, 2022

TSOT 547 - Thinking of You Butterflies

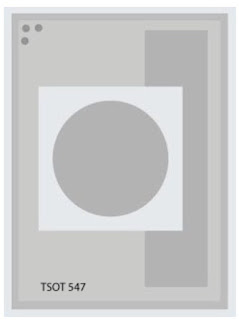
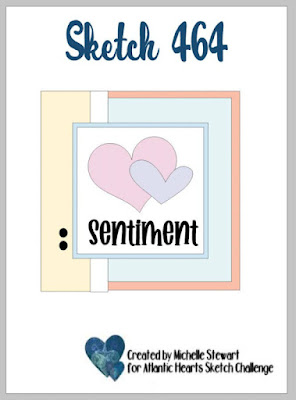
Welcome to Try Stampin' on Tuesday Challenge 547!

The optional theme (in addition to the sketch) is to use metallics. 

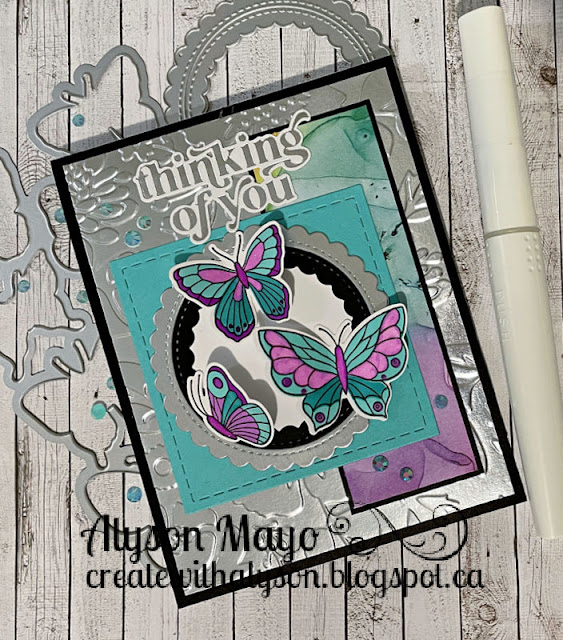
I chose to create a butterfly themed card - after all, spring is around the corner! I used silver metallics as well. 

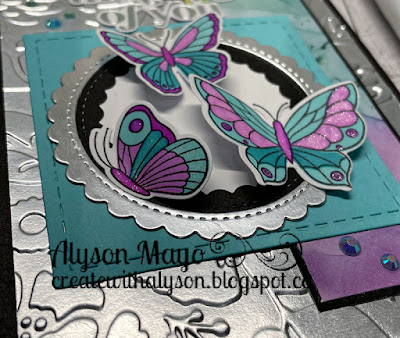
The butterflies were stamped, stencilled and die cut. The silver background was embossed with a floral embossing folder and the sentiment was hot foiled in silver. The square and circles were die cut from black, white and turquoise cardstock and arranged to the left of a piece of patterned paper. The butteries were adhered only by the bodies so the wings could lift. I added some shimmer to parts of the wings and also placed a few turquoise gems around the card. 


Come and join us at TSOT and show us how you interpret the sketch shown above. 

You have two weeks to link up your project. 

We can’t wait to see what you create! 

Products used are as follows: 

Paper: Ink Drops - Candy Patterned Paper (Craft Consortium), White Daisy Cardstock, Black Cardstock, Silver Foil (CTMH), Turquoise Cardstock (Gina K. Designs), Neenah Solar White Cardstock

Stamps: Small Butterflies plus stencils and die (Pinkfresh Studio)

Inks: Intense Black (Hero Arts), Flirty Fuschia, Pixie Dust, All that Jazz, Cummerbund (Catherine Pooler) 

Accessories: Stitched Square Dies (GMD), Scalloped Stitched Circles Dies, Celebrating You Foil Plate and Die, Ocean Breeze Gems (Pinkfresh Studio), Silver Foil, Clear Shimmer Brush, Floral Embossing Folder (CTMH)

Enjoy,

Alyson

Monday, March 14, 2022

AH 464 - Gold Branches Friend Card

Welcome to Atlantic Hearts Sketch Challenge 464!

The sketch is a square although that could certainly be changed. I chose to create a square card. 

Two patterned papers were used to create the background - in hindsight, I would use a darker paper for the left panel as I realized after photographing it, that panel is very light. It looks fine in person - photographs often don't pick up the small details. 

The circle was die cut using gold foil and a second time with dark green cardstock. I also cut a white circle and inked that to match the colour of the paper. I stamped a branch image and embossed it in gold. The large sentiment was die cut and the smaller one was stamped and adhered to the same dark green cardstock. I added a few gold gems along the side as per the sketch. 

Come and join us at Atlantic Hearts and show us how you interpret the sketch shown above. 

You have until Sunday evening to link up your project. 

We can’t wait to see what you create! 

Products used are as follows: 

Paper: Ever Eden Collection, Evening Evergreen Cardstock, Soft Succulent Cardstock (SU), White Daisy Cardstock, Gold Foil (CTMH)

Stamps: A Little Hello, Friendly Silhouettes (Gina K. Designs) 

Inks: Evergreen, Versamark (CTMH)

Accessories: Friend and Shadow Dies (Gina K. Designs), Stitched Scalloped Circle Dies, Gold Gems  (Pinkfresh Studio), Circle Dies (Spellbinders), Gold Embossing Powder, Heat Tool, Thin Foam Tape

Enjoy,

Alyson

Sunday, March 13, 2022

Front Fold-Out Card

I saw this card style on Pinterest and figured out the measurements to make it work. 

The base is a standard A2 card base but there is an additional panel on the front that folds open. 

The front was embossed with a floral pattern and I chose three coordinating patterned papers for the folded sections. Once that is opened up, there is a sentiment stamped inside. The sentiment was stamped using three coordinating colours. The front is held together with a die that is adhered only on the left side and a sort of buckle closure underneath.


A panel on the inside of the card was stamped and allows a place to write a message. 

Products used are as follows:

Paper: Bold and Blooming Patterned Paper (Gina K. Designs), Cardstock - White Daisy, Black, Lagoon, Candy Apple (CTMH)

Stamps: Greetings Mix 2 (SSS), Mixed Flowers (SCT/Photoplay)

Inks: Fern, Canary (CTMH), Be Mine, Rockin' Red, All that Jazz (Catherine Pooler), Black (Gina K. Designs) 

Accessories: Friend plus Shadow die (Gina K. Designs), Floral Embossing Folder (Darice), Red Enamel Gems (CTMH), Sharpie Markers 

Enjoy,

Alyson

Saturday, March 12, 2022

Double Sided Flower Shaker

This pair of cards was inspired by a card created by Laura Rumble. She used a triangle shape along the right side of the card but I wanted to try something a little different. 

For each card, the card front and base were adhered together with temporary adhesive and the opening was die cut though both pieces. I used different shapes for each card. The blue card was my second attempt and I decided to also die cut a silver foil border. 

I stamped several rose and leaf images and decorated the front panel of each card. The acetate was added to the back of the front panel and the front of the card base (I know that's confusing) so the acetate pieces are back to back and the outside pieces are clean from any adhesive. After placing foam adhesive on one side of the acetate, the sequins and stars were added and the cards were sealed. I added a sentiment to the top left and placed some sequins around the cards to finish them off. 


Products used are as follows: 

Paper: Silver Foil (CTMH), Hammermill White Cardstock 

Stamps: Rose Labels plus die, Easy Expressions plus die (The Ton)

Inks: Lime Rickey, Grass Skirt, Tiara, Sauna, Tiki Torch, Oh Boy, Something Borrowed, Suede Shoes (Catherine Pooler), Black, Versamark 

Accessories: Pointed Circle dies, Flower dies (Spellbinders), Acetate, Blue, Silver and Gold Sequins, Silver and Gold Confetti Stars (CTMH), Silver Embossing Powder, Gold Embossing Powder, Heat Tool, Foam Tape

Enjoy,

Alyson

Friday, March 11, 2022

CD 487 - Lovely Leaves

 Welcome to Colour Dare Challenge 487! 

This week, it's greens with metallics. Please see the graphic for detailed information. 

I started by inking an ombre background using Distress Oxide inks. I die cut a stitched leaf background in white and also cut out a circle from the top section. The inked panel was placed behind the opening and I added a gold die cut branch while pulling out the leaves that overlapped the circle. A black scalloped circle was also added around the circle opening. The sentiment was foiled with gold and adhered with thin foam tape. The front panel was adhered to black cardstock and then to a white card base with craft foam. I added a few gold and green sequins around the card. 

Come and join us at Colour Dare and show us how you use greens and metallics on your project. 

You have two weeks to link up with this challenge. 

We can’t wait to see what you create! 

Products used are as follows: 

Paper: White Daisy Cardstock, Black Cardstock, Gold Foil (CTMH), Hammermill White Cardstock

Stamps: none

Inks: DO Inks - Twisted Citron, Mowed Lawn, Lucky Clover

Accessories: Stitched Leaf Background Die (misc.), Stitched Scalloped Circle Dies, Celebrating You Foil Plate and Die (Pinkfresh Studio), Fresh Foliage Die (Memory Box), Gold Foil, Gold Loose Sequins (CTMH), Green Sequins (Misc.), Craft Foam, Thin Foam Tape 

Enjoy,

Alyson

Thursday, March 10, 2022

Box Card with Flowers

This adorable box card was designed by my friend, Trina Wirihana. She has the file available for subscribers on her website. It is worth being a subscriber, especially if you have any sort of electronic cutting machine. She creates all sorts of SVG files and everything is included in the monthly subscription ($10 NZ).

I started by cutting the base pieces and assembling the box itself. It folds down to fit in a standard A2 envelope. Once the box was assembled, I stamped, stencilled and die cut several floral images. I used two different images on this card but multiples of each. Some of the smaller flowers were fussy cut to use them in spots where the full image was too large. I stamped the sentiment with the same four inks that I used on the flowers and die cut it. A handful of extra flowers were placed behind that piece and on the sides. The last step was to add some teal Stickles to the centres of the flowers. 


Products used are as follows: 

Paper: Ink Drops - Candy (Craft Consortium), White Daisy Cardstock, Wild Berry Cardstock, Lagoon Cardstock (CTMH)

Stamps: Beautiful Blooms plus stencils and dies (Pink Fresh Studio), Inside Kindness plus dies (Honey Bee Stamps) 

Inks: Black (Gina K. Designs), Pucker Up, Flirty Fuchsia, Cummerbund, All That Bass (Catherine Pooler)

Accessories: Cayman Stickles, Foam Tape 

Enjoy,

Alyson

Wednesday, March 9, 2022

Blue Floral Side Border Card

This card has a shaped opening along the right side. It was die cut using the floral image die. 

The floral piece was foiled in gold and then inked using stencils. That piece was die cut and adhered to a side folding notecard with a section cut away from the side opening. I splattered the front of the card with two shimmer brushes and added a gold foiled sentiment plus some gold gems. 

Products used are as follows: 

Paper: White Daisy Cardstock, White Cards and Envelopes (CTMH)

Stamps: none

Inks: Lime Rickey, Grass Skirt, Something Borrowed, Suede Shoes (Catherine Pooler) 

Accessories: Charming Floral Border Layering Stencils, Foil Plate and Die, Celebrating You Foil Plate and Die, Gold Gems (Pinkfresh Studio), Green Apple Shimmer Brush, Bluebird Shimmer Brush (CTMH),  Gold Foil 

Enjoy,

Alyson

Tuesday, March 8, 2022

Teal Flower Mini Slimline

My friend, Trina Wirihana, has a website where she posts a wide variety of items. There are colouring sheets, SVG files, stencils, card patterns, etc. I printed some of the flower sheets and used them for the card below. 

The flowers were coloured and fussy cut. I added white dots with a white gel pen. The patterned paper barely shows on the card but it is an alcohol ink pattern. I die cut three scalloped stitched frames and stacked them before adding them to the patterned paper. The flowers were arranged along with gold metallic thread around a foiled sentiment close to the bottom. I added some gold gems to the centres of the flowers and also brushed around the flower centres with a gold shimmer brush. 


Products used are as follows: 

Paper: Ink Drops - Candy Paper (Craft Consortium), White Daisy Cardstock, Black Cardstock (CTMH), Hammermill White Cardstock 

Stamps: none

Inks: none

Accessories: Celebrating You Foil Plate and Die, Scalloped Stitched Mini Slimline Die, Gold Gems (Pinkfresh Studio), Colouring Sheets (Trina Wirihana Designs), Tri-Blend Markers, Gold Metallic Thread, Gold Shimmer Brush (CTMH), Foam Tape, Thin Foam Tape, Gold Foil, White Gel Pen

Enjoy,

Alyson

Monday, March 7, 2022

DT 105 - All Smiles

Welcome to Double Trouble Challenge 105!

St. Patrick's Day is around the corner and it's all about green and plaid this week. The small graphic is below - please visit the Double Trouble Challenge Blog for detailed information. 

I used a pair of stencils to create the background for my card. I used the same ink for both parts but a slightly darker hand for the second layer. The leaves were stamped, coloured and die cut and I added a layer of vellum slightly offset behind each. The gold leaves were die cut from gold foil and all the leaves were arranged facing down on the card. The sentiment was die cut from gold foil and adhered to a vellum background. I added a pair of white ribbons and some white enamel gems to finish off the card.

Come and join us at Double Trouble and show us how you interpret this challenge. 

I am also linking up my card with Heart 2 Heart for their challenge. 

The Double Trouble challenge ends in two weeks. 

We can’t wait to see what you create!

Products used are as follows: 

Paper: White Daisy Cardstock, Black Cardstock, Gold Foil, Vellum (CTMH), Green Cardstock (Gina K. Designs), Hammermill White Cardstock

Stamps: Blossoming Friendship plus dies (CTMH)

Inks: Intense Black (Hero Arts), Lucky Clover DO Ink

Accessories: Curvy Leaf Dies, Phrase Builder Dies, Diamond Plaid Layering Stencils (Pinkfresh Studio), White Ribbons (SU), Tri-Blend Markers, White Enamel Dots (CTMH), Craft Foam, Gold Liquid Pearls 

Enjoy,

Alyson

Sunday, March 6, 2022

Holographic Butterfly Card

This clean and simple card was inspired by an entrant in the Colour Dare challenge - her online name is Ma-Mi. 

The black and white rectangles were die cut using stitched rectangles. The butterflies were die cut from a rainbow holographic paper in varying shades so they represent the colours of the rainbow. I added a few holographic sequins (the last in my stash) to finish off the card. 

Products used are as follows: 

Paper: White Daisy Cardstock, Black Cardstock (CTMH), Rainbow Holographic Cardstock (SSS), Neenah Solar White Cardstock

Stamps: Greetings Mix 1 (SSS)

Inks: Black (Gina K. Designs) 

Accessories: Rectangle Stitched Dies (SSS), Layered Butterflies Dies, Dot Embossing Folder, Holographic Sequins (CTMH)

Enjoy,

Alyson