Sunday, July 31, 2022

Gatefold Card with Slider

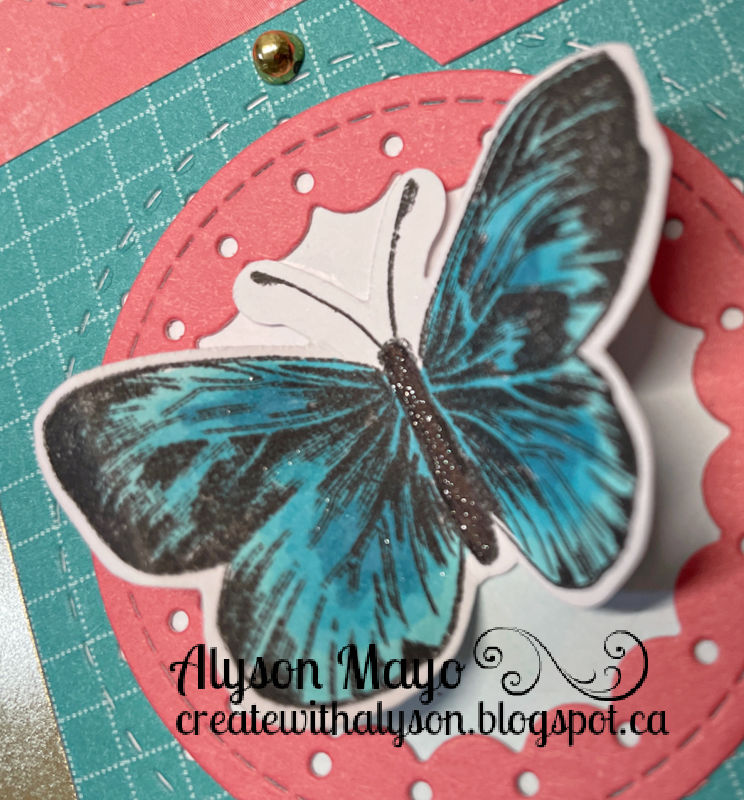
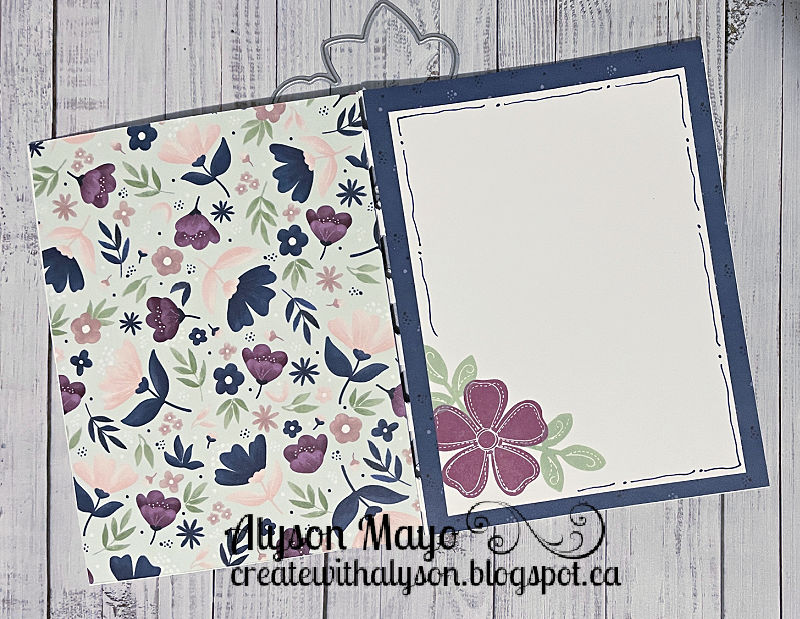
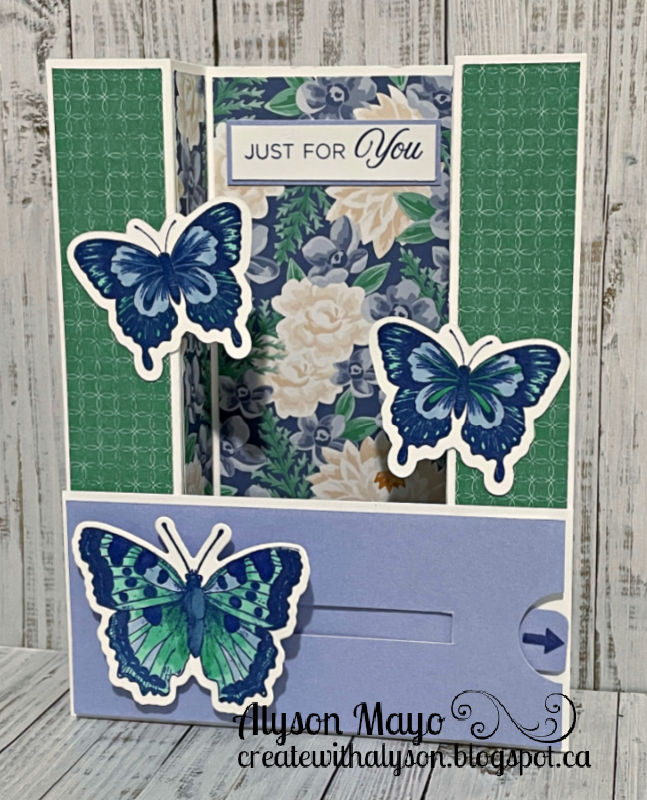
 I saw this cool card on a blogger website and figured out how to recreate the same idea - there is a slider component along the bottom. 

The base card is a gatefold and it has been sized to fold flat for a standard A2 card. I chose old floral paper that I had in my stash and used both the front and back patterns. The slider on the front has a butterfly attached to it and that can slide back and forth using the tab on the right side. I only added a simple sentiment as I wanted this card to be able to fold flat for mailing. There is a panel on the back to write a message. 


Enjoy,

Alyson

Saturday, July 30, 2022

Rainbow Hello Tulips

 This pretty card was inspired by one made for a Simon Says Stamp product release. 

A panel of white cardstock was inked wth three Distress Oxide inks and adhered to a white card base. The top and bottom panels were die cut with stitched border dies and then cut to create a card front. The tulips and sentiment were die cut and added to the front. The smaller sentiment was stamped in black and added to a black cardstock strip before being placed on the card. Some clear gems were placed around the flowers and the sentiment. 

Enjoy,

Alyson

Friday, July 29, 2022

CD 507 - Sending Smiles with Hearts

 Welcome to Colour Dare Challenge 507!

This week, it is a triple play challenge - you must use all three colours. Black, white and gold are free to use as desired.

I created a background on vellum using three alcohol markers in the designated colours. Rubbing alcohol was splattered on the background to make the colours move around. I die cut a black open background piece and adhered it on top of the vellum and then that entire piece was adhered to a white card base. The hearts were die cut with red base and a yellow stitched front. Tiny hearts were die cut in Papaya and added to the centres of the larger hearts. The sentiments were die cut from gold glitter paper and black cardstock, stacked and added to the front of the card. I brushed the centres of the yellow hearts with a Lemonade shimmer brush and used a clear shimmer brush for the tiny hearts. 


Come and join us at Colour Dare and show us how you interpret this week's challenge. 

You have two weeks to link up your project. 

We can’t wait to see what you create! 

Enjoy,

Alyson


Thursday, July 28, 2022

Leaf Stencilled Hugs

 I love rainbow colour schemes so I decided to use a two-part leaf stencil to create this card. 

The first leaf layer was inked using seven Distress Oxide inks. I used the same number of inks for the detail on the leaves in seven darker shades of the original colours. I added two ribbon cross pieces before adhering the card front to a black base with craft foam. The sentiment was die cut and added to the bottom left and I placed some gold glitter gems around the leaves. 

Enjoy,

Alyson

Wednesday, July 27, 2022

Make the Cards 60 - Bold Blooms on Black

 Welcome to Make the Cards Challenge #60!

This week, it is a technique challenge - use a black cardstock background. 

Black can be overwhelming so I decided to offset it with very bold colours. I chose bright pink and green shades.

The black cardstock was embossed with a floral embossing folder. I die cut all the floral and greenery pieces and inked many of the pink ones for additional interest. They were all assembled and adhered to the embossed base. I stamped a sentiment in the same shade of bold pink and added a strip of coordinating glitter paper underneath. The last step was to brush the lines of the flowers with a clear shimmer brush and add Stickles to the centres of the flowers. 


Come and join us at Make the Cards Challenge and show us how you interpret this week's challenge. 

You have two weeks to link up your project. 

We can't wait to see what you create!

Enjoy,

Alyson

Tuesday, July 26, 2022

Triple Diamond Card - Version 2

 I posted one of these cards a couple of weeks ago - it is not a difficult card to make and this time, I didn't use stamped image but ephemera for the images. 

The paper is all from a recent Gina K. Designs release and the patterns are gorgeous. I used several patterns along with dark grey cardstock. The sentiment was stamped on the right side of the first diamond and the images were arranged around that. The only embellishment added was Twinkle Stickles in the centres of the flowers. 


Enjoy,

Alyson

Monday, July 25, 2022

Floral Frame Card

 This card is based on a reel I watched on Instagram - it's quick and easy but the effect is so pretty. 

The floral images were stamped, stencilled and die cut and then arranged on a flat surface. They were picked up using low tack tape and die cut using an oval die. The tape held all the pieces in place as foam dots were added on each piece. The oval was then adhered to the front of the card. The sentiment was stamped in black and the card front was adhered to the base using craft foam. I added some green gems around the card to finish it off.

Enjoy,

Alyson

Sunday, July 24, 2022

Top Fold Over Card

This is a very simple fun fold card - much easier than it appears. 

The base is white and I used some older SU paper with flowers for the patterned paper. I selectively coloured the flowers on the front panel in the same colours as the floral images. The large floral images were stamped, stencilled and die cut. Those images were added to the front panel, extending past the edges of the narrow panel. I stamped and die cut a sentiment (stacked it) and added it to the front. A few clear gems were added on the striped panel and the centres of the flowers were brushed with a clear shimmer brush. 


Enjoy,

Alyson 

Saturday, July 23, 2022

Rainbow Sunburst Card

 This card was created for a stencil challenge. 

The card front was stencilled with a set of three sunburst layering stencils. I used 24 (yes, 24!) Distress Oxide ink colours for the sunburst - three shades each of eight different colours. The sentiment was purposely kept clean and simple to allow the focus to remain on the rainbow background. I coloured several clear sparkles with markers to match the ink colours and adhered them around the card. The card front was adhered to a black base with craft foam. 

I em entering this card in the Design Team call at Happy Little Stampers (stencil team). 

Enjoy,

Alyson

Circles and Feathers Card

 This appears to be a clean and simple card but sometimes those cards take more time and effort than the detailed ones! 

I started by die cutting three medium size circles from cardstock and used those as my stencils.  I also die cut a smaller rectangle from a piece of Masking Magic and adhered that piece to the card front to mask off the edges. I used blending brushes and the circles to create circular lines in four colours that overlapped each other. Once that was finished, I left only the Masking Magic piece adhered to the bottom but removed the rest of it. The feathers were stamped in black and the Masking Magic allowed me to keep the bottom edge of the feathers even with the design. I also stamped a sentiment and then adhered the card front to a black mat and finally to the card base. No embellishments were added to this card. 

Enjoy,

Alyson

Friday, July 22, 2022

Poinsettias in Blue

 I created this card for an application for a design team (Happy Little Stampers).

The background was die cut using a stitched lattice die and adhered to a piece of dark blue cardstock. I cut the flowers and branches on my Cricut and added a vellum layer on each flower. They also had some glass shimmer added to the front layer. The sentiment was also die cut and placed on a piece of vellum. Once all the flowers and branches were in place, I added gold gems to the centres of the flower and gold Stickles to the berries on the stems. 


This card is being entered for the design team call at Happy Little Stampers (Christmas team). 

Enjoy,

Alyson


Smiles and Hugs Card

 This is a card design I found Pinterest and I love the multiple layers.

The first thing was to stamp a text image in grey ink lightly across the lower card front - that ended up not showing up much as most of it was covered. The circles were die cut from the card front and I placed patterned paper images under each one. I also die cut a stitched circle and an open circle plus some leaf images. Those pieces were adhered to the card front and I cut that entire piece on an angle before adding a strip of patterned paper at the bottom. Once the card front was adhered with foam tape, the coloured butterfly was added along with a sentiment in the left corner. I added some clear gems around the card and brushed the butterfly with a clear shimmer brush. 


Enjoy,

Alyson

Thursday, July 21, 2022

Birthday Card with Alcohol Inks and Hot Foiling

 I made this card for a design team call at Happy Little Stampers... it is for their Birthday challenge team. 

The background for my card was created with alcohol inks and I added a white stitched frame around the outside. I hot foiled the diamonds in silver, die cut them and placed them around the card front. The flowers were stamped, stencilled and die cut and the sentiment was placed over the stems of the flowers with some silver metallic thread added underneath. The small 'happy" was stamped and added at the side. I brushed the darkest parts of the flowers with a clear shimmer brush and added some iridescent gems around the card to finish it off. 


A mentioned above, I am entering this card at Happy Little Stampers for the Birthday Design Team call. 

Enjoy,

Alyson

Rainbow Leaves Card

 I saw this beautiful card on scrapbook.com's website and wanted to recreate it. 

The white card front has an opening cut in the lower half of the piece. Several leaf images were die cut in a series of rainbow colours. I arranged them so the bottom of each piece slid into the opening. Once the yellow piece was adhered, I used that as a guide to stamp the sentiment. The other pieces were arranged after that. I adhered the front onto a card base using craft foam and added some clear gems to finish off the card. 


Enjoy,

Alyson

Wednesday, July 20, 2022

Atlantic Hearts 482 - Christmas Poinsettia


Welcome to Atlantic Hearts Sketch Challenge 482!

The sketch shows a plaid pattern for the background but you can interpret that in many ways. I used a die cut geometric pattern for my card. 

The geometric background was die cut three times and stacked before being adhered to grey cardstock and then the white card base. I stamped, coloured and die cut a poinsettia and two leaves. A strip of grey patterned paper was adhered to a black border and then adhered across the card. The poinsettia was placed on top of that and the sentiment was placed below the flower. I added some red enamel gems around the card and the yellow centres and the lines of the poinsettia were brushed with appropriate coloured shimmer brushes.


Come and join us at Atlantic Hearts and show us how you interpret the sketch shown above. 

You have until Sunday evening to link up your project. 

We can’t wait to see what you create! 

Enjoy,

Alyson

Tuesday, July 19, 2022

TSOT 565 - Butterfly Slimline

 Welcome to Try Stampin' on Tuesday Challenge 565!

The optional theme (in addition to the sketch) is sweet treats. 

I used only the sketch and chose a butterfly theme for my card. 

I rotated the sketch and created a slimline card to accommodate the three openings. The front was die cut using a stitched slimline die with circular openings. I used a smaller circle of the the shape to die cut circles to go on top of the base openings. The white cardstock behind the circles was ink blended very lightly into each circle. I extended the height and width of the card (from the original slimline die) to make it a 4" x 9" card to accommodate the panels along the sides. 

The butterflies were stamped, coloured and die cut. I added some shimmer with black and clear shimmer brushes. The sentiment was adhered at the right side and the final step wa to add some gold gems around the card. 


Come and join us at TSOT and show us how you interpret the sketch shown above. 

You have two weeks to link up your project. 

We can’t wait to see what you create! 

Enjoy,

Alyson

Monday, July 18, 2022

Lattice Fold Cards - Front and Side

 I have made lattice fold cards the past but I have never done a front lattice fold before. 

The dark pink cardstock was cut and scored and a lattice template was attached to the side to cut the lines. Those templates can be found all over the internet - just search for braided card or lattice card templates. I folded down the largest cuts and adhered them in place and the attached that piece to a blue patterned piece of paper. I die cut several flowers and leaves and wove them into the lattice section. The sentiment was stamped and die cut with a stitched scalloped frame. That piece was adhered under a few leaves. I added some iridescent gems offset in the centres of the flowers and placed some white Liquid Pearls around the card. 

A standard lattice fold is usually along the left side of a card and that is what the second card is all about. I used a white card base and after the lattice was cut and assembled, I adhered a piece of blue patterned paper on the inside. The back side of that paper shows on the inside (flowers) and I cut another piece of the same paper for the right inside panel. A stitched floral image was stamped and coloured for the front of the card and I used some other images from the stamp set for the inside panel. Sage Liquid Pearls were added and the flowers were brushed with a clear shimmer brush. 


Enjoy,

Alyson

Sunday, July 17, 2022

Peace on Earth Christmas Challenge - Season of Wonder Wreath Card

 This is the first time I have entered the Peace on Earth Christmas Challenge - I figured it would make me start working on Christmas cards sooner rather than later!

I used the traditional red, green and white as well as a plaid background from the inspiration collage for my card. 

The wreath was stencilled in shades of green with red berries. I splattered the background with three shimmer brushes (black, red and green) and die cut it with a stitched rectangle die. I added some vellum leaves and a gold embossed sentiment before adhering the front to a thin green border, then a black plaid border and finally a red card base. Some gold metallic thread was added under the sentiment and I also added white pearls around the wreath. The red berries were brushed with a clear shimmer brush to finish off the card. 

I am entering my card in the Peace on Earth Christmas Challenge #20.

Enjoy,

Alyson

Single Step Card - Version 2

 I posted this type of card a while ago - this was the one that I taught to others. I like this one much better as it has lighter colours and the images stand out more.

The sign was stamped and fussy cut. I used a stylus to raise the woodgrain images and then dragged an ink pad over the top to enhance the lines. The flowers were added and the banner sentiment was placed on the front with a floral stem. A few Liquid Pearls were added around the card. 


Enjoy,

Alyson

Saturday, July 16, 2022

Rainbow Butterfly Circle Card

 I was looking through photos of cards I have made in previous years and I saw one that really piqued my interest... I decided to make it again with a few minor changes. 

The butterflies were stamped in a series of rainbow colours and die cut. The top black cardstock piece had two circles die cut from the centre and I used the outside and the centre piece. The sentiment was white embossed on the centre black piece. A white cardstock piece was inked using Distress Oxide inks that coordinated with the inks used on the butterflies - the inside sections AND the outside edges of the cardstock were inked to match the colours of the butterflies. Once the pieces were adhered together, the border cardstock matched each of the butterflies! I brushed the wings of the butterflies with a clear shimmer brush to finish off the card. 

Enjoy,

Alyson

Friday, July 15, 2022

DT 116 - Blue Poinsettia Mini Slimline

 Welcome to Double Trouble Challenge 116!

July for crafters often means Christmas - and yes, it is a second challenge of Christmas in July. The small graphic is below - please visit the Double Trouble Challenge Blog for detailed information. 

I love non-traditional colours for Christmas and blue is one of my favourites. These poinsettia images are from a layered stamp set with a coordinating die. I stamped the flowers in shades of blue. The card base was inked in two opposite corners with a light blue ink and I die cut the scalloped frame twice to add to the front. A small sentiment was placed across the frame and the flowers were arranged on either side. Since bling is a requirement for Thing 3, I added some silver glitter gems and also brushed the darkest blue sections of the flowers with a clear shimmer brush. 


Come and join us at Double Trouble and show us how you interpret this week's challenge. 

I am also linking up my card with the Jingle Belles Challenge for their "Bling on the Holidays" challenge.

We can’t wait to see what you create!

Enjoy,

Alyson


CD 505 - Kind People Maple Leaf Card

 Welcome to Colour Dare Challenge 505!

It's another tic-tac-toe grid this week. Choose a row, column or diagonal line of colours. You can add other colours but they must be on the grid. 

I chose the centre column of Capri, Gold and Clover and I also used Bluebird. 

I started by creating a background of mixed colours using Distress Oxide inks. I placed a sunburst stencil on top and inked over that with black ink and then spread gold glitter gel on top. Once that piece was dry, I added it to card base with two thin strips of gold glitter cardstock on either side. The maple leaf was die cut in Bluebird cardstock for the base and gold glitter paper for the outline. I also cut a second inside piece from Capri cardstock and placed those pieces into the gold outline. The sentiment was embossed in white and added at the bottom. 

Come and join us at Colour Dare and show us how you interpret this week's challenge.

You have two weeks to link up your project. 

We can’t wait to see what you create! 

Enjoy, 

Alyson

Thursday, July 14, 2022

Large Flower Friendship Cards

 I often stencil when I don't feel much like crafting as stencilling is an easy thing to do. I stencilled these flowers quite some time ago and just pulled them out now. 

Each of the floral images was stamped and stencilled using different ink colour combinations. I used the same shades of green on each so the green background cardstock is the same on each card. I used different stitched borders for each card and the sentiments were stamped and added to the fronts. The only embellishment I added was Stickles and the colour varied depending on the colours on the card. 

Which one is your favourite? 


Enjoy,

Alyson