Sunday, December 27, 2020

Birthday Shaker - Glitter Alcohol Ink Background

It's that time... time to create cards for the birthdays that are coming this year. 

Although this one appears simple, it's the background that took some time. It was created using white glitter paper and alcohol inks. Alcohol inks will generally move around a fair bit but they sit in one spot on glitter paper unless a lot of blending solution is used. Even then, working quickly is required as the inks don't move around nearly as much as they do on other types of paper. This background was created using turquoise and blue inks along with a silver mixative. 

I wanted to focus on the background so I chose a simple card design - just the birthday shaker with coordinating sequins and a few simple embellishments. The shaker was cut from holographic paper.

Products used are Close To My Heart unless otherwise indicated: 

Paper: Clover Cardstock, Lagoon Cardstock, White Glitter Paper, Oasis Holographic Paper, Neenah Solar White Cardstock

Stamps: none

Inks: Alcohol Inks (Ranger)

Accessories: Happy Birthday Shaker Window Thin Cut, Silver Loose Sequins, Iridescent Sequins, Turquoise Sequins (not CTMH), Shaker Foam and Acetate

Enjoy,

Alyson

Wednesday, December 23, 2020

Serenity Book Card

I will be so sorry to see the Serenity paper collection retire at the end of December. This collection has become one of my all-time favourites.

This is a book card - it opens to look very much like a book. I stayed with the blue and gold theme in the Serenity collection as it worked perfectly for what I wanted. 

The wreath on the front actually has little sections that are raised. The wreath shape was die cut and then stamped in three colours and adhered to a solid colour on the back. A glitter bow was also die cut and added to the wreath after the leaves were lifted. 

Inside there are two layers on top of the cardstock base along the sides - some Blue Belle glitter paper and then the patterned flowers. The main panels were stamped and coloured and sections of the flowers were brushed with the Gold Shimmer Brush. I stamped some images on the back panel where the message will be written to the recipient. No embellishments were added to this card as it is already thick on the inside.


Close up of the gold shimmer on the flowers


This is a collage of some of the photos... 

I am linking up this card with Tuesday Morning Sketch Challenge - the theme is Anything Goes. 

Products used are Close To My Heart unless otherwise indicated: 

Paper: Serenity Paper Pack, French Vanilla Cardstock, Blue Belle Cardstock, Sapphire Cardstock, Gold Foil Cardstock, Blue Belle Glitter Paper, Sapphire Glitter Paper 

Stamps: Serenity Cardmaking, Serenity Cardmaking Workshop

Inks: Versamark, Sapphire, Blue Belle, Toffee

Accessories: Serenity Cardmaking Thin Cuts, Gold Embossing Powder, Heat Tool, Tri-Blend Markers, Touch Markers (not CTMH), Sharpie Marker (not CTMH), Gold Shimmer Brush 

Enjoy,

Alyson

Tuesday, December 22, 2020

Double Accordion Display Card

Now that my Christmas cards are all done, I have some time to play! My favourite types of cards are those that are interactive or multi-panel cards and this is another one. 

This accordion display card was created using the Every Little Thing paper collection. The card itself isn't difficult to create but it's all the little squares and rectangles with mats that take a long time to cut. I also did a lot of colouring on this card and that alone is a time consuming task. A video that shows how to create this card can be found here

There is a belly band that goes around the card to hold it together. The closed size is 6" x 6" but when it is open, it spreads apart to measure 20" long! 

I started with a black base and used Wisteria and Julep cardstock as the other cardstock colours. Many of the Every Little Thing floral images are partially coloured so I filled in most of those and stamped and coloured the main page. The back panel was splattered with the Mint Shimmer Brush and coordinating images were stamped and coloured. A zip strip from the paper pack was added along the sides and across the belly band. The front panels were embossed before I added the belly band and the fussy cut image.


I am linking up with the Tuesday Morning Sketch Challenge as the theme is Anything Goes. 

Products used are Close To My Heart unless otherwise indicated: 

Paper: Every Little Thing Paper Pack, Black Cardstock, White Daisy Cardstock, Wisteria Cardstock, Julep Cardstock 

Stamps: Serenity Cardmaking, Every Little Thing Scrapbooking

Inks: Intense Black

Accessories: Tri-Blend Markers, Touch Markers (not CTMH), Rose Embossing Folder, Clear Shimmer Brush, Wisteria Shimmer Brush, Mint Shimmer Brush

Enjoy,

Alyson


Monday, December 21, 2020

AH 400 - Butterflies for a Friend


Welcome to Atlantic Hearts Sketch Challenge #400!

This week, the sketch looks like a present wrapped up with ribbon... 

I honestly am really glad to be long finished my Christmas cards and moving back to regular projects. For this one, I chose some older papers and a coordinating stamp set.

The flowers were stamped and die cut and the centres are little white floral sequins that I coloured using alcohol markers to match the flowers. The bitty sparkles inside the flowers were coloured using a Sharpie marker. The sentiment was stamped and die cut as I felt something was needed at the lower right. I brushed the Sapphire parts of the flower using the Clear Shimmer Brush. 


Come and join us at Atlantic Hearts and show us how you interpret the sketch shown above. 

You have until Sunday evening to link up your project. 

We can’t wait to see what you create! 

Products used are Close To My Heart unless otherwise indicated: 

Paper: Needlepoint Nook patterned paper (SU), Sapphire Cardstock, Carolina Cardstock, White Daisy Cardstock, Almond Cardstock, Neenah Solar White Cardstock 

Stamps: Needle and Thread (SU)

Inks: Sapphire, Carolina, Almond

Accessories: Needlepoint Elements Thinlets (SU), Decorative Borders Thin Cuts, Fancy Borders Thin Cuts, White Floral Sequins, Bitty Sparkles, Clear Shimmer Brush, Tri-Blend Markers, Sharpie Marker, Craft Foam (not CTMH)

Enjoy,

Alyson

DT 73 Part 2 - Double Tag Christmas Card

Welcome to Double Trouble Challenge 73 (part 2)!

It's all about die cutting and wrapping it up this week. The small image is below - please check the Double Trouble Challenge Site for detailed information. 

I created a card wth two tags inserted in the front. The tags could be used to attach to a gift or just on their own. 

The background was created using Distress Oxide inks with water droplets. I mounted the front onto a card base of Sapphire cardstock. One tag was created using the same inks and I die cut the tag outline. A stocking was coloured and die cut to go with it. The second tag was die cut from Sapphire patterned paper and I fussy cut some presents and then stamped a sentiment and embossed it with white embossing powder. The front of the card has a white snowbank, a stamped sentiment and a few winter images. 


Come and join us at Double Trouble and show us your creations! 

You have until the first Sunday in January to link up your project. 

I am also linking my card with the Bitten By The Bug challenge as I used several die cuts on my card and tags. 

We can't wait to see what you create! 

Products used are Close To My Heart unless otherwise indicated:

Paper: Mix-In Paper Pack, White Daisy Cardstock, Carolina Cardstock, Sapphire Cardstock, White Glitter Paper, Neenah Solar White Cardstock 

Stamps: The Jubilee Crew

Inks: Tumbled Glass DO (not CTMH), Salty Ocean DO (not CTMH), Chipped Sapphire DO, Espresso, Sapphire, Versamark

Accessories: Stitched Bracket Thin Cuts, Fancy Tags Thin Cuts, Fancy Borders Thin Cuts, The Jubilee Crew Thin Cuts, White Embossing Powder, Heat Tool, Tri-Blend Markers, White Ribbon 

Enjoy,

Alyson

Saturday, December 19, 2020

Diamond Interlock Card

Trying new ideas is always something I enjoy and this is one of those ideas! 

The diamonds are squares turned sideways and interlocked with a piece of cardstock though the centres. I created the diamonds using my Cricut. I had a hard time deciding what I wanted to do to decorate the diamonds as I wanted a detailed pattern. I knew I was going to need to emboss a pattern onto each of them. I chose a flourish stamp but the stamp wasn't large enough to cover the entire diamond so I had to do each diamond in four separate sections by masking off areas as I stamped and embossed. 

Once the diamonds were in place, the edge of each piece was completely lost so I went back to my Cricut and created a very thin border to go around the outside of each diamond. That helped to separate the diamonds a little better. A piece of white cardstock with coordinating ribbon attached was thread through the diamonds and the whole piece was attached to a white embossed card front. A three loop bow was attached to the top of the card. 

Products used are Close To My Heart unless otherwise indicated:

Paper: White Daisy Cardstock, Peacock Cardstock

Stamps: Flourishing Details and Background 

Inks: Versamark

Accessories: Cricut Basic Shapes, Floral Lace Embossing Folder, White Detail Embossing Powder, Heat Tool, Craft Foam (not CTMH), Teal Ribbon (not CTMH)

Enjoy,

Alyson 

Tuesday, December 15, 2020

December Technique Blog Hop - Blissful Brackets

Welcome to the December Technique Blog Hop! 

This month, the featured technique/product is "Blissful Brackets". 

You should have arrived here from Haley Dyer's blog.

I wanted to do something unusual for this blog hop and not just use common brackets as they were intended. I lost a night of sleep thinking about how various brackets might fit together and decided to use the smallest Stitched Bracket to form the front of my cards. 

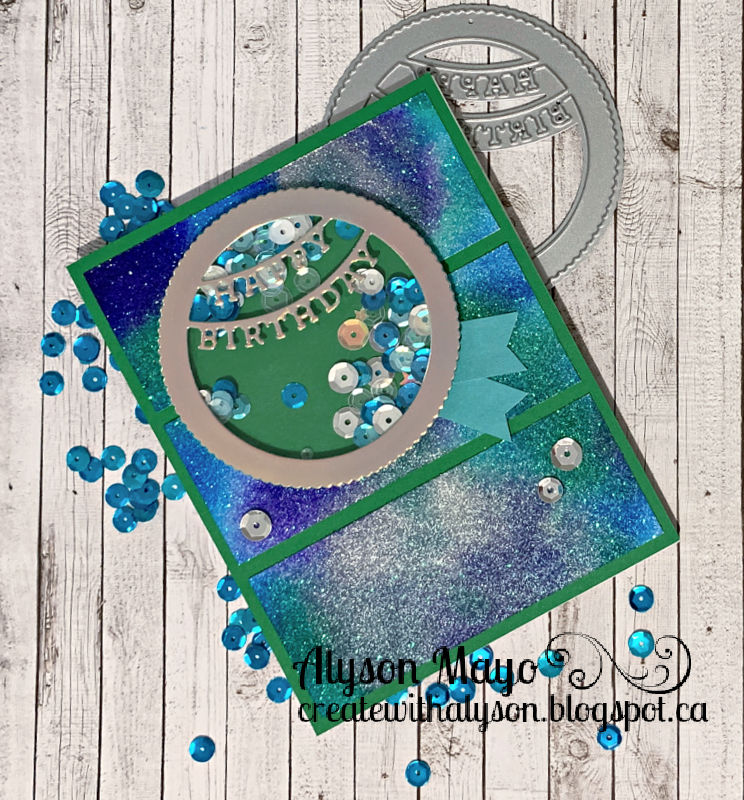
Lagoon, Peacock and Mint were my colours of choice. I die cut several of the smallest bracket and fit them together on a piece of White Daisy Cardstock. There is a tiny bit of overlap going left to right but they fit together perfectly going up and down. The card front was mounted on white, Mint and finally Peacock. I stamped the sentiment in both Lagoon and Peacock ink and splattered that piece with the Mint Shimmer Brush. Two of the largest brackets were cut in Mint and Peacock and some Silver Embellishing Thread was added along with a few Silver Glitter Gems. 

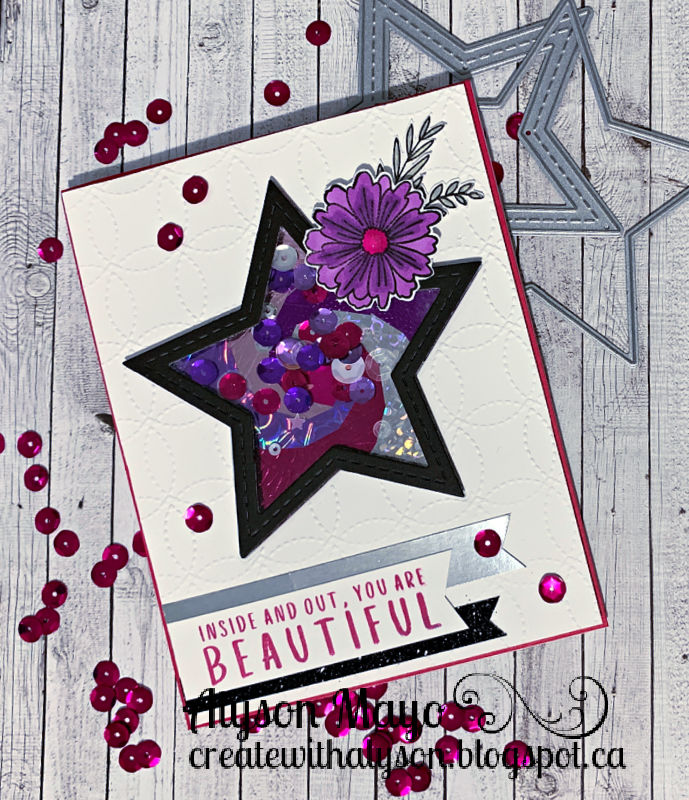
I wanted to do a second card using the same colour scheme but use patterned paper instead of cardstock. That was a challenge - and I realize some of these papers are retired. I used the Animated Stack for the Lagoon and Mint patterns and the Aurora paper pack for the Peacock pattern. This card is the same idea except the sentiment brackets were cut a little differently (two medium size and one large).


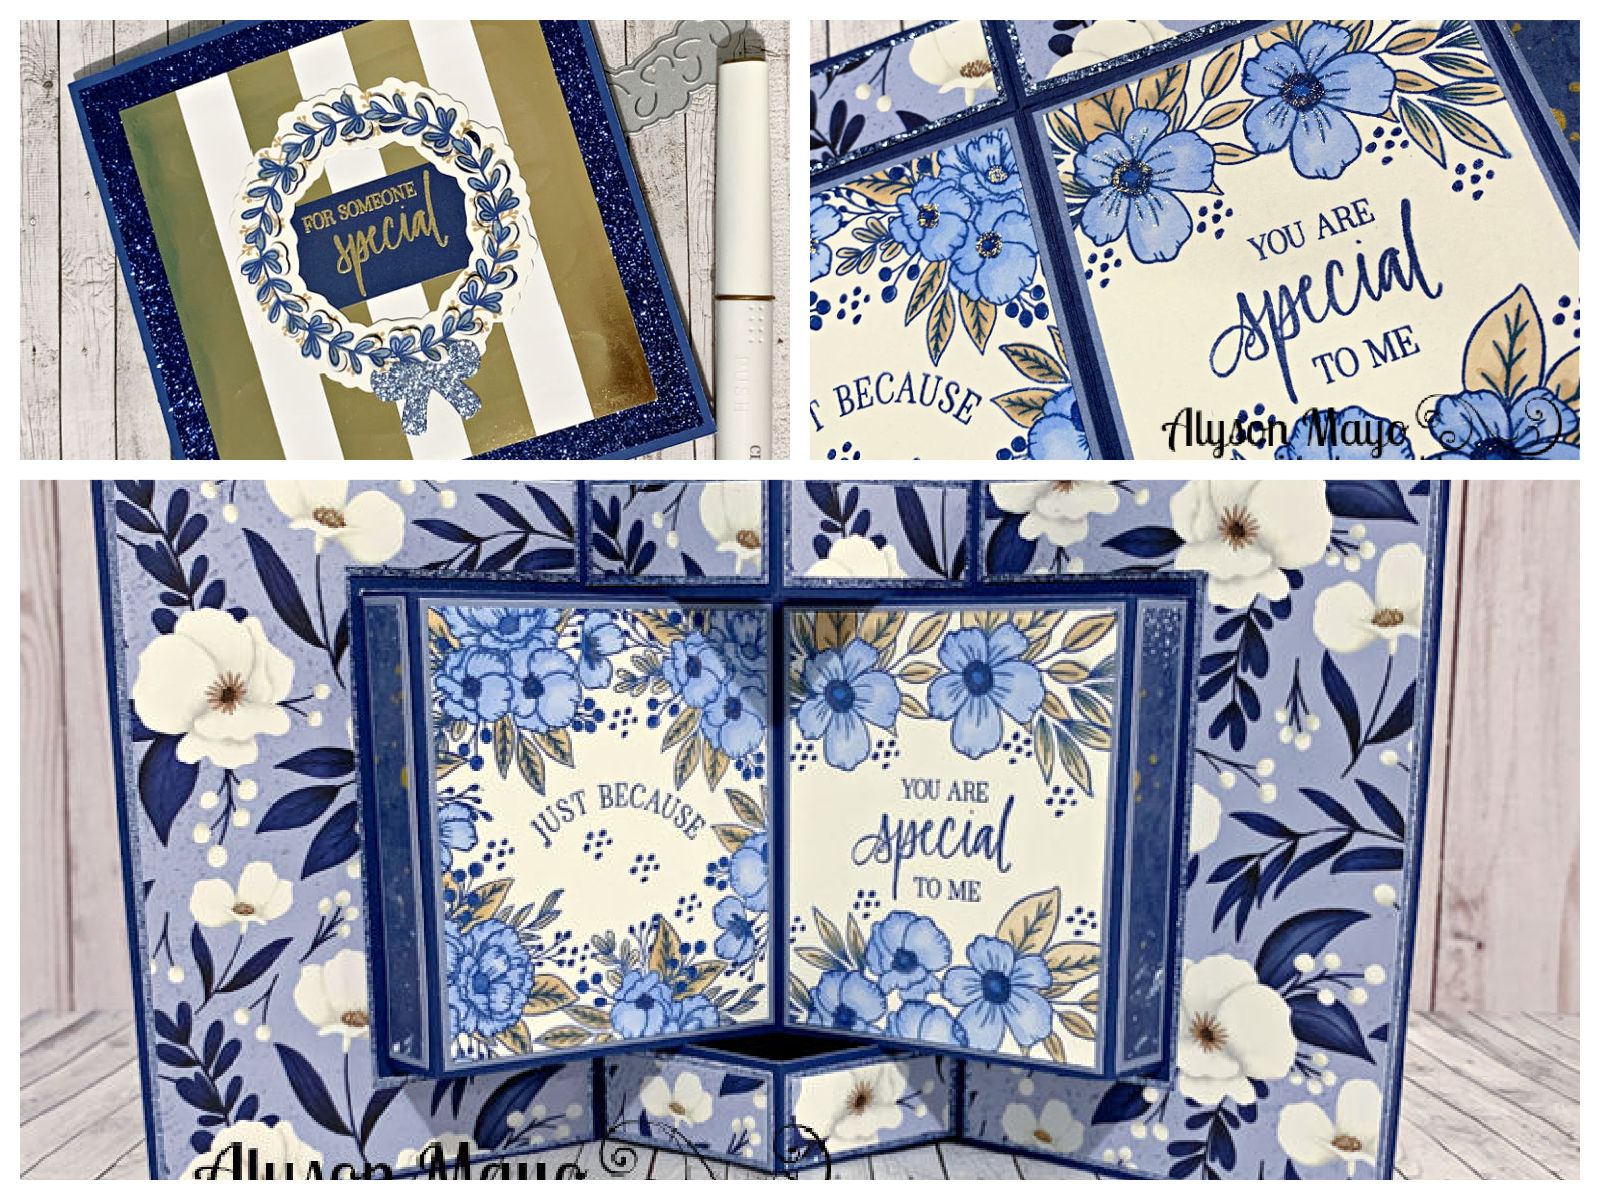
After the two cards above were completed, I was playing around last night with an interactive card (I call it an Interactive Panel Card) and decided to use some of the brackets to decorate the front of that card. I cut the Simple Stitched Bracket nine times in various patterns and placed them so they lined up in the centre of the card. The sentiment was cut using the Stitched Brackets. This card is so much prettier in real life than in the photos... 


I hope you enjoyed these unusual ways of using these bracket thin cuts. 

The next visit on this hop is Darlys Recker's blog.

I know she has something amazing to share with you!

Products used are all Close To My Heart 

(First two cards only)

Paper: Animated Stack, Aurora Paper Pack, White Daisy Cardstock, Mint Cardstock, Lagoon Cardstock, Peacock Cardstock

Stamps; Serenity Cardmaking

Inks: Lagoon, Peacock 

Accessories: Stitched Brackets Thin Cuts, Silver Embellishing Thread, Silver Glitter Gems, Mint Shimmer Brush, Thin Foam Tape 

-------------

(Interactive Panel Card only): 

Paper: Serenity Paper Pack, French Vanilla Cardstock, Sapphire Cardstock

Stamps: Serenity Cardmaking, Serenity Cardmaking Workshop

Inks: Sapphire, Sapphire Pigment Ink, Blue Belle, Toffee

Accessories: Stitched Brackets, Stitched Simple Brackets, Serenity Cardmaking Workshop Thin Cuts, Clear Detail Embossing Powder, Heat Tool, Tri-Blend Markers, Sharpie Marker (not CTMH), Gold Embellishing Thread, Gold Glitter Gems

Enjoy,

Alyson


IRIS Shaker Cards

IRIS folding has been a long time favourite technique - I love the way the folds look when they are finished. 

I recently pulled out some old patterned origami paper that has a holographic element to it and used that to create some IRIS folds. I used the Close To My Heart shaker thin cuts (circle, star and heart) for the size and shape of the designs. 

The holographic paper really makes a difference! I added various sequins in coordinating colours to each shaker and then added sentiments and other little details to each card. 


Products used are Close To My Heart unless otherwise indicated:

Paper: White Daisy Cardstock, Black Cardstock, Charcoal Cardstock, Pewter Cardstock, Raspberry Cardstock, Ballerina Cardstock, Lagoon Cardstock, Silver Foil Paper, Neenah Solar White Cardstock, Holographic Origami Paper (not CTMH)

Stamps: On Your Birthday, Every Bit of Wonderful

Inks: Intense Black, Charcoal, Raspberry

Accessories: Circle Shaker Window Thin Cuts, Heart Shaker Window Thin Cuts, Star Shaker Window Thin Cuts, Star Shaker Window Foam and Acetate, Circle Shaker Window Foam and Acetate, Heart Shaker Window Foam and Acetate, Happy Birthday Window Thin Cut, Floral Lace Embossing Folder, Stitched Circles Embossing Folder, Spring Blossoms Embossing Folder, Tri-Blend Markers, Sharpie Markers (not CTMH), Loose Silver Sequins, Coloured Sequins (misc.), Clear Shimmer Brush, Craft Foam (not CTMH) 

Enjoy,

Alyson

Monday, December 14, 2020

H2H - Gifts from the Heart

Welcome to this week's Heart 2 Heart challenge. 

The theme this week is Gifts from the Heart. 

I create a LOT of card sets and I give them all away as gifts. I do this for a variety of friends, acquaintances and often for the fellow patients at the hospital that I visit every few weeks. Everyone is always so appreciative of receiving handmade cards as they aren't something that can be easily purchased.

This set was created using the Serenity paper pack which contains gorgeous shades of blue combined with gold. I used the same basic pattern on each card, just changing it up a bit. The cards are each 6x6 in size and there is a set of eight cards. I love how these turned out! 


Come and join us at Heart 2 Heart and show us your gifts from the heart. 

You have until the end of December to link up your project. 

We can't wait to see what you create! 

Products used are Close To My Heart unless otherwise indicated: 

Paper: Serenity Paper Pack, Mix-In Paper Pack, French Vanilla Cardstock, Blue Belle Cardstock, Sapphire Cardstock, Toffee Cardstock, Sapphire Glitter Paper, Blue Belle Glitter Paper 

Stamps: Serenity Cardmaking Workshop, Serenity Cardmaking, Bloom with Grace Cardmaking, With All My Love, Happiness Never Grows Old, Every Bit of Wonderful, Dearest Friend (Altenew)

Inks; Sapphire, Blue Belle, Intense Black, Toffee 

Accessories: Serenity Cardmaking Workshop Thin Cuts, Decorative Borders Thin Cuts, Lace Border Thin Cut, Scalloped Borders Thin Cuts, Stitched Rectangle Thin Cuts, Stitched Simple Brackets Thin Cuts, Stitched Fancy Brackets Thin Cuts, Stitched Brackets Thin Cuts, Petals and More Thinlets (SU), Dearest Friend Dies (Altenew), Corner Rounder, Gold Glitter Gems, Gold Embellishing Thread, Tri-Blend Markers, Copic Markers (not CTMH), ShinHan Markers (not CTMH), Thin Foam Tape

Enjoy,

Alyson


Saturday, December 12, 2020

Friend Lilies

I am enjoying creating something other than Christmas cards - I think I am Christmas carded-out after mailing 114 in total! 

I spent some time today working on some new techniques and these cards represent one of those techniques. I inked some backgrounds with Distress Oxide inks and then stamped a background stamp on them while they were still wet. The stamp was spritzed with water mixed wth Liquid Pearls. It gave such a pretty shine to the background when it dried. The two backgrounds for these cards were created using that technique. 

A beautiful lily stamp was embossed in black and coloured. A large frame was cut from the inked paper and then a smaller frame was cut from black so they could be attached. The lily was placed underneath and the frames were mounted on craft foam so they form a sort of window. I stamped a small sentiment in versamark and embossed it in white (on black cardstock). The main word - friend - was die cut and layered. I added a few coordinating gems to each card and then brushed parts of the flowers with the Clear Shimmer Brush. 


I am happy with how these turned out - the black and white helps to bring out the bold colours in both the background and the lilies.

Products used are Close To My Heart unless otherwise indicated: 

Paper: White Daisy Cardstock, Black Cardstock, Neenah Solar White Cardstock 

Stamps: Thank You Friend (Gina K. Designs), Friend (Photoplay), Stripe Jungle Background (SSS)

Inks: Versamark, Black Pigment Ink, Picked Raspberry DO Ink, Spun Sugar DO Ink (not CMTH), Pine Needles DO Ink (not CTMH), Peacock Feathers DO Ink

Accessories: Friend Dies (Photoplay), Stitched Fancy Brackets Thin Cuts, White Detail Embossing Powder, Clear Detail Embossing Powder, Heat Tool, Liquid Pearls, Tri-Blend Markers, Touch Markers (not CMTH), Sharpie Markers (not CTMH), Clear Shimmer Brush, Pink Gems, Turquoise Gems, Craft Foam (not CTMH)

Enjoy,

Alyson

Friday, December 11, 2020

Colour Dare 424 - Birthday Cards

Welcome to Colour Dare Challenge 424!


This week, it's a non-traditional (Christmas) colour scheme - no red and green. However, a Christmas project is NOT required. 

I have a lot of birthdays coming up in the new year so this was a great opportunity to create some birthday cards.

I used two of the CTMH background thin cuts - Olive Branches Background and Floral Background. 

The Olive Branches die was cut using Bluebird cardstock and backed with Twinkle Toes holographic paper. That paper can take on yellow and pink tones although it looks gold in the photo. I turned that card into a shaker and placed foam tape across the middle to allow the shaker elements to remain in two separate sections. The sentiment was stamped and heat embossed in white and layered with the light side of Sundance cardstock. I added some white ribbon and a few loose gold sequins. 

The second card was die cut using the Floral Background thin cut and then inked in two colours with Distress Oxide inks. Since the yellow and pink overlapped, it created orange in the centre. That card front was also backed with holographic paper - this time Dreamy holographic paper - which takes on tones of pink and blue. I stamped a sentiment in both Bluebird and Pixie. That was die cut along with a pink glitter border and some white ribbon was added.

Come and join us at Colour Dare and show us your non-traditional coloured projects. 

You have until the end of December to link up your projects. 

We can’t wait to see what you create! 

Products used are Close To My Heart unless otherwise indicated: 

Paper: White Daisy Cardstock, Bluebird Cardstock, Sundance Cardstock, Pink Glitter Paper, Twinkle Toes Holographic Paper, Dreamy Holographic Paper, Neenah Solar White Cardstock 

Stamps: Calligraphy Birthday, Handmade Essentials (misc.) 

Inks: Pixie, Bluebird, Versamark, Mustard Seed DO Ink, Raspberry DO Ink

Accessories: Olive Branches Background Thin Cut, Floral Background Thin Cut, Basic Ovals Thin Cuts, Stitched Ovals Thin Cuts, Stitched Scalloped Brackets Thin Cuts, White Embossing Powder, Heat Tool, Gold Loose Sequins, Gold Confetti, Blue Sequins (misc.), White Ribbon, White Dotted Ribbon (misc.), Foam Tape, Thin Foam Tape, Acetate (misc.) 

Enjoy,

Alyson

Tuesday, December 8, 2020

TSOT 487 - Beautiful Inside and Out

Welcome to this week's Try Stampin' on Tuesday challenge!

In addition to the sketch, the extra theme is to create a get well card. 

I chose to use just the sketch and stayed almost true to that except for the placement of the ribbon. 

I chose two large floral clusters from the December Stamp of the Month (Happiness Never Grows Old) and created a mask with one of them. Those images were stamped along the side and coloured. I embossed a piece of Lagoon cardstock and die cut two scalloped borders. The sentiment was stamped in three colours and die cut, along with a coordinating border. I added the ribbon behind the sentiment and mounted the sentiment piece on foam tape. Aside from the colouring, this card came together pretty easily. 

Come and join us at TSOT and show us how you interpret the sketch shown above. 

You have two weeks to link up your project. 

We can’t wait to see what you create!

Products used are Close To My Heart unless otherwise indicated: 

Paper: White Daisy Cardstock, Lagoon Cardstock, Black Cardstock, Teal Glitter Paper, Neenah Solar White Cardstock 

Stamps: Happiness Never Grows Old, Every Bit of Wonderful 

Inks: Intense Black, Lagoon, Peacock, Raspberry

Accessories: Scalloped Border Thin Cuts, Stitched Scallop Brackets Thin Cuts, Floral Lace Embossing Folder, White Ribbon, Tri-Blend Markers, Foam Tape 

Enjoy,

Alyson 

Monday, December 7, 2020

AH 398 - A Floral Hello

Welcome to Atlantic Hearts Sketch Challenge 498!

The sketch this week is very straightforward and I stayed true to the sketch.

Since there is only the offset sentiment on the sketch, I wanted the paper to take centre stage. I selected some Kaisercraft  patterned paper for the background. It was really difficult to find coordinating colours to go with this paper as the dark background is somewhere in between navy and black. Some retired CTMH cardstock - Bashful - was a close match to the pink. I die cut two frames and splattered the white piece using the Sapphire Shimmer Brush. The sentiment was die cut 3x - once in Bashful Glitter Paper and twice in white so I could stack them. A white ribbon was added and the card front was adhered using craft foam. 


Come and join us at Atlantic Hearts and show us how you interpret the sketch shown above. 

You have until Sunday evening to link up your project. 

We can’t wait to see what you create! 

Products used are Close To My Heart unless otherwise indicated: 

Paper: Kaisercraft Breathe Paper, White Daisy Cardstock, Bashful Cardstock, Bashful Glitter Paper, White Cards and Envelopes 

Stamps: none

Inks: none

Accessories: Hello Die (PPP), Stitched Nested Label Dies (SU), White Organdy Ribbon (misc.),  Sapphire Shimmer Brush, Craft Foam (misc.)

Enjoy,

Alyson

Double Trouble 73 - Christmas in Glitter Shaker Form

Welcome to Double Trouble Challenge 73!

This week, we are winding down our challenges for the year so this is the final challenge of 2020. The quick details are to create a holiday project using electronic cuts or die cuts and to use either patterned paper or some sort of ribbon or twine. The mini image is below - please visit the Double Trouble website for detailed information. 

I was playing with alcohol inks recently and used them on glitter paper. The effect is amazing! Not only do you get the movement with the inks but the glitter makes the background so awesome! I decided to use that paper as my patterned paper for this challenge (even though I created it myself). 

I designed two oval frames on my Cricut to provide a cabin setting in the woods. A moose is peeking out from the left side. I attached the inner frame directly to the background and also added a shadow cut of Santa and a reindeer. I then added foam tape and sequins, fake snow and silver confetti stars inside the shaker. A long thin sentiment was stamped on the front as well as a handful of stars. This card is so much prettier in person than in the photograph. 

Come and join us at Double Trouble and show us your interpretation of the expectations for Challenge 73. 

I am also linking up my card with the Bitten By the Bug challenge

You have until Jan. 3 to link up your projects! 

We can’t wait to see what you create!

Products used are Close To My Heart unless otherwise indicated: 

Paper: White Daisy Cardstock, Black Cardstock, Ballerina Glitter Paper, Neenah Solar White Cardstock

Stamps: Very Merry, Wishing you Everything

Inks: Archival Black, Lagoon, Bluebird, Alcohol Inks (but and green hues) 

Accessories: Cricut - Basic Shapes, Complete Creativity, You are Here, Flower Market, Teresa Collins Dec.25 (not CTMH), BHG Woodland (not CTMH), Fake Snow (not CTMH), Blue Sequins (not CTMH), Silver Confetti Stars, Foam Tape, Black Journaling Pen, Sharpie Marker (not CTMH) 

Enjoy,

Alyson

Sunday, December 6, 2020

Kitty Cuddles Slider Flip Card

I really enjoy creating interactive cards and this is a flip slider card. The font flap is opened and a second image appears in the circle. 

Since my cat images are limited, I used some hearts as embellishments for the card. The patterned paper is so cute - it is little fish bones!


I have a few friends who are huge cat lovers - I know that one of them will appreciate receiving this card! 

Products used are Close To My Heart unless otherwise indicated: 

Paper: Fur-Ever Friends Paper Pack, White Daisy Cardstock, Ballerina Cardstock, Pixie Cardstock, Raspberry Cardstock, Pink Glitter Paper

Stamps: Kitty Cuddles, Friends Furever

Inks: Intense Black, Raspberry, Pixie, Pewter

Accessories: Nestabilities Circle Dies (not CTMH), Stitched Simple Bracket Thin Cuts, Basic Hearts Thin Cuts, Stitched Hearts Thin Cuts, Heart Thin Cuts, White Acrylic Hearts, Tri-Blend Markers, Pewter Journaling Pen, Black Journaling Pen

Enjoy,

Alyson

Saturday, December 5, 2020

Operation Smile Blog Hop

Welcome to the Operation Smile Blog Hop! 

We are featuring the current Operation Smile stamp set for this blog hop. It is such an awesome stamp set with four sentiments that can be used for so many occasions plus medium and small size floral and leaf clusters. It is one of my favourite stamp sets.

You should have arrived here from Gina Brandstetter's blog.

If you get lost, there is a list of all participants on Melinda Everitt's blog

I have done a lot of fussy cutting with this stamp set and I really didn't want to do that again. I chose to use the Multi-Square Window Thin Cut and create a partial shaker card using some of the images. 

I stamped three of the images using Intense Black and then coloured them. The sentiment was masked so I could stamp it in two colours. Some of the papers from the Jingle Joy paper pack are useable for any occasion and I chose two of those patterns (checkerboard and hearts) for the backings of the shaker sections. The stamped sections are raised but there is no acetate in front of them. I added a few Gold Glitter Gems to the centres of the flowers and brushed some of the lines with the Gold Shimmer Brush. In the shaker sections, I added some Gold Confetti Stars. The window front was mounted on Lagoon cardstock and then on Black cardstock to complete the card. 

I also created this card a few months ago using this stamp set and distress oxide inks... just added here for interest (supplies not listed).

I hope you enjoyed my projects. 

Your next stop is Darlys Recker's blog. I'm sure she will have something terrific to share. 

Products used are Close To My Heart unless otherwise indicated: 

Paper: Jingle Joy Paper Pack, White Daisy Cardstock, Mint Cardstock, Lagoon Cardstock, Black Cardstock, Neenah Solar White Cardstock

Stamps: Every Bit of Wonderful 

Inks: Intense Black, Lagoon, Black 

Accessories: Multi-Square Window Thin Cut, Foam Tape, Gold Confetti Stars, Acetate (not CTMH), Gold Glitter Gems, Gold Shimmer Brush, Tri-Blend Markers

Enjoy,

Alyson