Sunday, March 31, 2024

Special Friend Hedgehog

 I just love this little hedgehog image - had to use it to create a card! 

The background was embossed and I added a gold frame on top. The hedgehog was stamped and coloured and I lightly blended yellow ink around the image. The sentiment was gold heat embossed (top line) and then stamped with dark brown ink. Both those pieces were die cut using oval dies and adhered to the card. Some gold metallic thread and gold gems finished off this cute card. 

Enjoy,

Alyson

Saturday, March 30, 2024

Woven Floral Card

 My friend, Monica, posts a sketch every Saturday. Some are scrapbook sketches and others are card sketches. This one is actually a scrapbook sketch but I turned it into a card instead. 

The background was inked with Distress Oxide inks and splattered with water. I cut several strips of patterned paper from the same pack and arranged them according to the sketch. The main panel was used for the flowers and I added a sentiment on the left side to accommodate the journal piece shown on the sketch. The card front was placed on a blue mat and then a white card base. There are some extra flowers on the inside of the card as well. 

Enjoy, 

Alyson

Friday, March 29, 2024

MTTCC 83 - SNOW!

 Welcome to My Time to Craft Christmas Challenge 83!

The theme for this challenge is snowmen.

I knew right away what I wanted to do for this challenge. I embossed a piece of white cardstock with a snowflake embossing folder and added a white glitter "ground" piece at the bottom. The letters were die cut x3 and one of each letter was lightly inked with grey and green ink. The letters were stacked and I stamped, coloured and die cut the snowman image. That was stacked x3 as well. The snowman forms the letter O in the word SNOW. I added some clear Stickles to several of the snowflakes and adhered the card front to the base using craft foam. 

Come and join us at MTTCC and show us how you interpret this week's theme. 

You have two weeks to link up your project. 

We can't wait to see what you create!

Enjoy,

Alyson

Thursday, March 28, 2024

Special Birthday Card

 A friend of mine asked me to create a card for her grand-daughter's birthday. I used a stamp and layering stencil to colour the floral image and added a strip of patterned paper along the side. The front was spattered with black paint and I fussy cut around the words. There is a birthday message inside the card. 

Enjoy,

Alyson

Wednesday, March 27, 2024

Art Journal

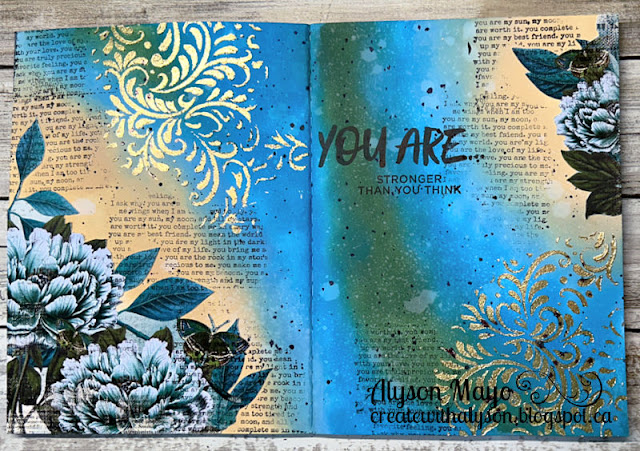
 I have several friends who do art journaling and it is something I have wanted to do for a while - honestly, I had NO IDEA where to begin. 

I watched a few videos designed for beginners. I understand that it is more a place to do anything and everything without a definitive guide and that is extremely difficult for me. I like organization whether that comes from a sketch, a given theme, a specific design and colours, etc. "Winging it" stresses me out something awful. It's like using a lot of mixed media on a project - I don't know how it will turn out and I have a hard time not being able to control that!

So here is my first foray into this new form of art. Much of was still controlled - that's just me. I ink blended a double page panel and splattered it with water. I used a stencil and gold paste to add some colour to the two corner areas. The flowers were fussy cut and added and I used a text stamp to stamp randomly (as random as I could manage) over the flowers, although I missed sections. I stamped a sentiment to cover some of the empty space and then splattered the entire page with black paint. Do I like it? Kind of... I realize I have to be able to let go for this process. 

Back to more experimenting... 

Enjoy,

Alyson

Tuesday, March 26, 2024

Hummingbird Box Card

This sweet fun fold card design has been around forever - this is my take on it. 

I used several Distress Oxide inks to blend a sunburst background and adhered that to the inside of the box (before it was assembled). The flower and hummingbird were stamped (layering stamps), die cut and added inside the box to appear like they are floating. An opening was die cut from the front of the card, allowing the bird and flower to be visible thought that opening. A small sentiment was placed at the side and I added a panel on the back to write a message. 


Enjoy, 

Alyson


Monday, March 25, 2024

AH 570 - Friend Flowers

Welcome to Atlantic Hearts Sketch Challenge 570! 

I opted to create a vertical card with this sketch. 

The background was lightly stencilled in a dot pattern and I added a strip of light purple glitter paper down each side. The flowers were stamped, stencilled and die cut and I placed a piece of black cardstock between the two floral sections. The "friend" sentiment was die cut and I used the die cut mask to place the letters evenly. The smaller sentiment was heat embossed - AFTER I had assembled the rest of the card. That's a risk - luckily it worked out for me. 

Come and join us at Atlantic Hearts and show us how you interpret this week's sketch. 

You have until Sunday evening to link up your project.

We can’t wait to see what you create!

Enjoy, 

Alyson

Sunday, March 24, 2024

Postage Collage Roses

 I am loving the postage collage series - these two cards were made using the rose stencil that goes with that set. 

For both cards, I lightly inked a background in each of the sections. The rose stencil was applied and I created two different colours - one in yellow and the second in turquoise. The last stencil added the little diamonds so I used gold paste for the yellow card and turquoise glitter gel for the other. I also stamped several of the postage images on each of the card fronts. Black splatter was added to both cards and a small bow was tied near the bottom and the sentiments were placed accordingly. 


Enjoy,

Alyson

Saturday, March 23, 2024

SS 747 - Happy Birthday

 Welcome to Sketch Saturday Challenge 747!

The optional theme (in addition to the sketch) is to use black and white. 

I initially wanted just a black and white card but it didn't work for me with this sketch. I decided to add lime green to the mix - definitely not a go-to colour for me! 

I cut strips of glitter cardsotck in black and green and adhered them according to th sketch. The sentiment was die cut from black, white and green and assembled and I stamped and coloured a smaller sentiment to place at the bottom. Some birthday images were stamped in the corners and the card front was adhered to a green mat and then to a black card base. 

Come and join us at Sketch Saturday and show us how you interpret this week's sketch. 

You have two weeks to link up your project. 

We can't wait to see what you create!

Enjoy, 

Alyson

Friday, March 22, 2024

Colour Dare Challenge 593 - Inlay Card

 Welcome to Colour Dare Challenge 593!

This is a two colour challenge with neutrals and metallics free to use. 

I chose Royal with Honey Butter and added gold and black. 

The frame was die cut from black cardstock and placed on a yellow background. I die cut it again from Royal and gold and pieced the flowers and leaves back into the frame. The sentiment was die cut from black and gold and added in the centre. Aside from brushing the purple flowers with a clear shimmer brush, I didn't add anything else to this card. 

Come and join us at Colour Dare and show us how you interpret this week's challenge. 

You have two weeks to link up your project. 

We can't wait to see what you create!

Enjoy,

Alyson


Cut It Up Challenge 300 - Burning Birthday Cake

 Welcome to Cut It Up Challenge 300! 

As a celebration for 300 challenges, the theme for this challenge is birthday.

One of my favourite birthday stamps is this one with a lady holding a cake with so many candles that they started a fire over her head. I stamped, coloured and die cut the image and set it on a die cut gold frame using foam tape. The sentiment was added at the bottom corner. The background was hot foiled using rainbow foil and an arch foil plate - the rainbow colours worked well with all the colours in the image. 

Come and join us at Cut It Up and show us your birthday creations. 

You have two weeks to link up your project.

We can't wait to see what you create!

Enjoy,

Alyson


MTTC 530 - Mixed Florals in Frame

 Welcome to My Time to Craft Challenge 530!

The theme for this challenge is mixed coloured florals. 

I stamped, stencilled (using various ink colours) and die cut two floral sections . The background was stencilled in shades of green to create a plaid pattern and I die cut three scalloped frames and stacked them together. They were placed on a green cardstock piece and the flowers were arranged along the sides. I heat embossed a sentiment in black and added it across the bottom and added some green gems to finish off this pretty card. 

Come and join us at MTTC and show us your floral projects. 

You have two weeks to link up your project. 

We can't wait to ee what you create!

Enjoy,

Alyson


Thursday, March 21, 2024

Birdies on Branches

 This adorable birdie card was all die cut from white cardstock and the pieces were inked. That took quite a bit of time. The eyes and beaks of the birds were created by placing a tiny pieces of cardstock behind the openings. 

The background was embossed with a 3D leaf embossing folder and then splattered with brown ink. The branches were arranged with the birds on them and I added a stamped sentiment for a cute birthday card. 

Enjoy,

Alyson

Wednesday, March 20, 2024

More of You Outdoor Scene

 This scene is so neat - it was die cut first and then I used a series of stencils to add colour. 

I played with some different colours for this scene. The mountains were inked with grey but I also pulled in some pink to reflect the sunrise in the background. The trees in the foreground were inked using shades of green and blue. I added some clear glitter gel to the lake to make it shine. The canoe was placed at the bottom and I embossed a sentiment and adhered it on the right side of the sky. 

Enjoy,

Alyson

Tuesday, March 19, 2024

TSOT 643 - Glitter Butterfly Trio

 Welcome to Try a Sketch on Tuesday Challenge 643!

Although the sketch shows three circles, any shapes can be used. Make sure the sketch is evident in your project. 

I ink blended a petal background using shades of blue ink. The darkest ink is in the centre but in the picture, the petals look like just one colour - the difficulties with photography! I added a clear glitter paste over the stencilled background.The doilies were die cut in white and lightly inked in the centres. I die cut three butterflies from vellum and grey-blue glitter paper and added them to the centres of the doilies. A hot foiled sentiment was placed between then bottom butterflies and the card front was adhered to a grey-blue cardstock piece. 

Come and join us at TSOT and show us how you interpret this week's sketch. 

You have two weeks to link up your project. 

We can't wait to see what you create!

Enjoy, 

Alyson

Monday, March 18, 2024

Friend Postage Collage Card

 Another postage collage card - I am loving this die!

This card required a lot of masking to ensure that the images remained within their respective sections. The flowers were stamped and stencilled and I added clear Stickles to the centres. The other sections were inked with various stencils or simply inked to cover the rectangle. I die cut a sentiment and backed it with vellum. The hearts and the smaller sentiment were stamped and the postage collage front was added to a turquoise background and then to a white card base. 

Enjoy,

Alyson

Sunday, March 17, 2024

Paper Airplane Mice Card

 This adorable card was CASEd from one designed by a friend of mine, Melanie Hungerford. I asked if she would be ok if I replicated her card and she said absolutely!

I die cut the postage collage piece and stencilled clouds on the top half. Grass was stencilled in the lower left box and I stamped two hearts in the lower right box. The mice were stamped, coloured and die cut and added around the card. A couple of postage images were also placed around the mice. The card front was set on dark blue cardstock and then onto a white card base. Super cute! 

Enjoy, 

Alyson

Saturday, March 16, 2024

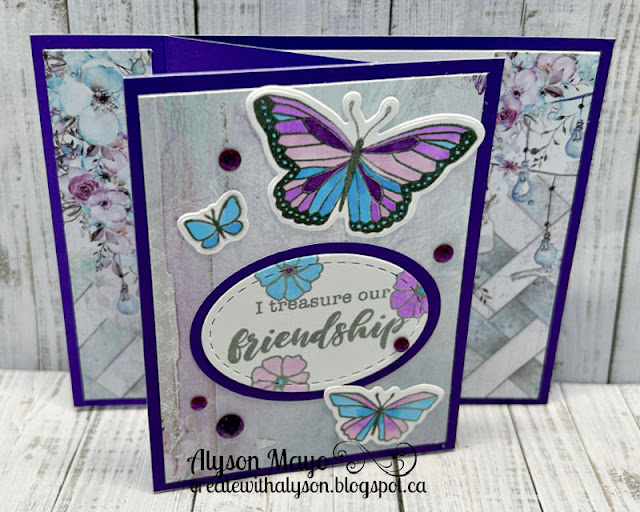
Matchbook Fun Fold Card

 This cute card is one I found on YouTube. A matchbook card has been around for ages but this one has a twist to it. 

The front flap provides an opening to another section in the back. I used some Prima patterned papers and purple cardstock for the colour theme. I stamped and coloured some butterflies and added a sentiment to the front. There is a place to write a message inside the card. 

Enjoy,

Alyson

Friday, March 15, 2024

DT 162 - Basket of Peonies

 Welcome to Double Trouble Challenge 162!

This challenge is all about flowers - please see the Double Trouble Challenge Blog for detailed information. 


I loved the purple and yellow flowers in the Beautiful Blossoms collage (our partner challenge) and that is what inspired my card. I stamped, stencilled and die cut several peonies. The only basket I have (no bonnets in my stash) is the one I used - I inked that piece and filled it with the peonies. The purple background was hot foiled and added to dark purple cardstock on a white base. The inside of the card also has a purple mat and then a white panel. The basket was placed on the front and I die cut extra white pieces to cover the back so all the messy work wouldn't show since the basket overhangs the edge of the card. I added an extra flower and two butterflies to the inside panel and a hot foiled sentiment was placed at the bottom of the basket. Liquid pearls were added to the basket border and gold Sickles were used on the flower centres. 


Come and join us at Double Trouble and show us how you interpret this week's challenge. 

You have two weeks to link up your project. 

I am also linking up my card with the Beautiful Blossoms challenge (florals). 

We can't wait to see what you create! 

Enjoy,

Alyson

MTTCC 82 - Nativity Silhouette

Welcome to My Time to Craft Christmas Challenge 82!

The theme for this challenge is baby's first Christmas or baby Jesus. 

Since I have no purpose for a baby's first Christmas card, I chose baby Jesus for the theme. I stamped a silhouette image of the stable and also of a large Noel sentiment. The blue background was splattered with gold paint and I added a black and white chevron strip down the side. The sentiment was placed at the bottom and the image was double matted and placed just off centre. Some gold gems were added around the image. 

Come and join us at MTTCC and show us your projects with this week's theme. 

You have two weeks to link up with the challenge. 

We can't wait to see what you create!

Enjoy,

Alyson

Thursday, March 14, 2024

A Window with a View

 I recently purchased some of the Spellbinders Window with a View collection and these cards are my first attempts. Most are CASEd from examples I found online. Some of the dies for these sets are simply minuscule! I need practice creating scenes, especially behind a frame where parts are hidden. 


Enjoy,

Alyson

Wednesday, March 13, 2024

More Complex Flip Card - HELLO

 This flip card is made from the same die that I used on a card posted a couple of days ago. The trick here is the inside has an additional hidden flap. 

The flowers and leaves were stamped, coloured and die cut and arranged both on the outside and the inside of the flip components. I love the added stitched element on each of the pieces. The card opens to reveal a hidden section that I chose to use for a message. 


Enjoy,

Alyson

Tuesday, March 12, 2024

Simple Flip Card - Smile

 The die used to create this card design is one that I received as part of the last Crop and Create event. The company recently aded some new sentiments to use on the flip portion so I pulled out the die and went to work. 

This one uses a SMILE sentiment. I die cut some flowers and leaves in coordinating colours and added them both on the front and inside the flip component. A message was stamped on the back of the flip part as well. There is a place to write a message on the back. 


Enjoy,

Alyson

Monday, March 11, 2024

AH 568 - Masculine Birthday Card with Butterfly

Welcome to Atlantic Hearts Sketch Challenge 568!

The sketch is shown in vertical format - that can be altered as long as the sketch is still visible in your project. 

I stayed true to the sketch with a circle for the sentiment and the same repeated patterned for the pieces. The sentiment was stamped on yellow cardstock and die cut with a stitched circle die. That was added to a second circle and I added a hot foiled butterfly at the bottom. The butterfly was coloured from the back using markers. Some gold metallic thread and gold gems were placed around the sentiment.

Come and join us at Atlantic Hearts and show us how you interpret this week's challenge. 

You have until Sunday evening to link up your project. 

We can't wait to see what you create!

Enjoy, 

Alyson


Sunday, March 10, 2024

LST - Bonus Cards

 The second part of the Let's Stamp Together program is the bonus cards. These cards are not made in class but the instructions are provided so we can make them later. 

I love the rainbow colours in these cards and the black and white just shows off those colours. One was meant to be a tag but I never use tags so I turned it into a card instead. 

Enjoy,

Alyson

Saturday, March 9, 2024

Hello Sunshine

 This card is from another 30 Minute Cardmaking Stash Dash event. 

The parameters for this challenge were as follows: Type of Card: square card, Colours: ombre, Technique: die cut and Embellishment/Idea: layers.

I created an ombre background using threee Distress Oxide inks. Three squares were die cut - the middle one from gold foil and the others from gold glitter paper. I arranged them on the front and added a black die cut image and a black sentiment. I also inked around the edges of the card to keep the ombre look all the way to the bottom. A black mat separates the base from the card front. Some black sequins were added to finish off this bold card. 

Enjoy, 

Alyson

SS 746 - Butterfly Thinking of You

 Welcome to Sketch Saturday Challenge 746!

The optional theme (in addition to the sketch) is to use an animal. 

I spent a long time sorting out the pieces for my card. I wanted to use a pattern that was the same as the sketch. It took me a while to cut the pieces correctly so I would still have a border around and between the sections. I die cut a butterfly and shadow from dark blue cardstock and vellum and placed it at the top with a hot foiled sentiment across the body. A few clear gems were added around the butterfly. 

Come and join us at Sketch Saturday and show us how you interpret this week's sketch.

You have two weeks to link up your project. 

We can't wait to see what you create!

Enjoy,

Alyson


Friday, March 8, 2024

CD 591 - Hello Honey

 Welcome to Colour Dare Challenge 591!

Choose ONE colour to use with only black and white. I chose yellow. 

The honeycomb background was lightly stencilled and then die cut with an oval die. A black mat was adhered to a card base and I die cut a larger oval from the white card front. The bees were stamped, coloured and die cut and I added a large stacked sentiment across the oval along with a smaller stamped word to form the Hello Honey sentiment. I brushed the wings of the bees with a clear shimmer brush. 

Come and join us at Colour Dare and show us how you interpret this week's challenge. 

You have two weeks to link up your project. 

We can't wait to see what you create!

Enjoy,

Alyson