Tuesday, May 31, 2022

We Rise Fun Fold Card

 This is such a simple fun fold design - I decided to use some of my favourite patterned papers to make it.

The right side folds partially over the left side, covering the centre of the writing section. I stamped and coloured some flowers images for that side piece and added the sentiment there as well. Once the card is open, you can see the writing panel. I stamped tiny images along the edges, just to add a little more interest. Some coordinating gems were added to the front of the card to finish it off. 


Enjoy,

Alyson

Monday, May 30, 2022

DT 112 - Meerkat Peek-a-Boo Card

 Welcome to Double Trouble Challenge 112! 

It's the 5th Monday in the month so this is an open challenge. Be sure to check out the suggestion for Thing 3 and also to link up with one of our partner challenges as well. The small graphic is below.

I chose to create a peek-a-boo card where the back panel slides in under the top panel with a different image. My repeating element is the meerkat - there are several of them on each page but I purposely used the single meerkat, a cactus and the lizard at he bottom of both pages. 

This colour scheme is a different one for me... these are definitely not my go-to colours but they represented a desert environment pretty well. The images were stamped and coloured and I fussy cut the individual images as there isn't a set of dies for this stamp set. The borders around the circe windows were die cut from a stitched circle die. I didn't add many extras to this card to keep it flat for mailing. There is a panel on the back to write a message. 


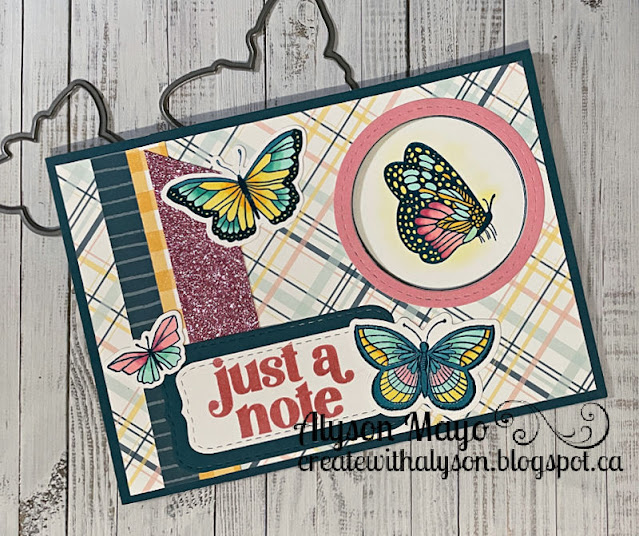
A second card in the same style was created with butterflies. The photos are below. 


Come and join us at Double Trouble and show us your project with repeating elements. 

This is a one week challenge - it ends on Sunday evening.

I am also linking up my card with the Creative Creases challenge (fun fold cards). 

We can’t wait to see what you create! 

Enjoy,

Alyson

Sunday, May 29, 2022

Friends Slimline Shaker Card

This is such a neat idea for not only a slimline shaker, but also for long washi tape! 

Pinkfresh Studio makes the most beautiful washi tape in 4" wide rolls. Each roll has about 50 repetitions of the design and there are dies available to cut out the images. In this case, I used a full section of washi tape without die cutting the individual images. 

The base cardstock with the sunflower washi tape adhered was die cut using a blanket stitched slimline die. I used the letters to spell the word "friend" and cut them out of the panel. I saved the inside letter pieces for the D and R. Acetate was adhered to the back of the panel and then I sectioned off each letter with foam tape. I added some white "snow" and gold star confetti before closing up the back with purple cardstock. That piece was adhered to a purple cardstock layer and then to the white card base. I didn't add anything else to this card - it was pretty enough on its own. The photograph doesn't show the beautiful gold foiling detail around the images. 


Enjoy,

Alyson

Saturday, May 28, 2022

Leftover Inked Backgrounds

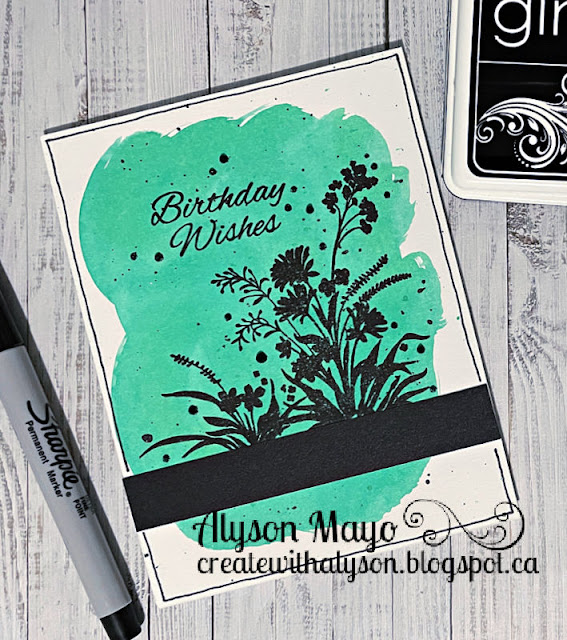
 The backgrounds of these two cards were created from leftover ink on my blending brushes. I simply dipped the brushes in water and used the ink to create a background on watercolour paper. 

Once the backgrounds were dry, I ink splattered them and then I stamped images in black ink. For the first card, I also added flowers at the ends of the branches with a dark pink ink. Easy!

The second card needed something toward the bottom so a simple strip of black cardstock was added. I also added black Stickles around the image. 

Enjoy,

Alyson

Friday, May 27, 2022

Rain Bead Card

I have made these types of cards in the past but this one... it took WAY longer than it should have taken me to finish it. 

The frame was created using dies and I stencilled a grey, cloudy background to put behind the opening. The beads were strung on fishing line and attached between the front layer and the clouds. I stamped some coordinating images, coloured and fussy cut them to add at the bottom right side. The clouds were die cut from silver glitter paper and I stamped and die cut a relevant sentiment. As an afterthought, I covered the centre section before adding the images and splattered that with two shimmer brushes. The card front was adhered to a blue layer and then to a white card base. The beads slide up and down when the card is tipped back and forth. 

Enjoy,

Alyson

Thursday, May 26, 2022

Lily Hugs

Lillies are such beautiful flowers and they come in a wide variety of colours. I chose to stencil these ones in shades of purple. The stencils were created by Trina Wirihana and her site can be found here

The background was stamped in the same ink colour as the paper and the hexagon shape was foiled in purple. Inside the hexagon, a plaid background was stencilled in light green to coordinate with the same colour in the lilies. The lilies were fussy cut and added to the edges of the hexagon with some silver metallic thread underneath. Coordinating gems finished off this pretty card. 

Enjoy,

Alyson

Wednesday, May 25, 2022

Sunflower Thinking of You

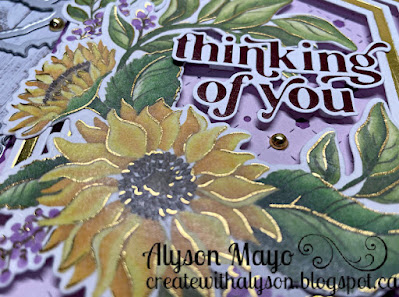
 These gorgeous sunflower images are actually washi tape -yes, washi tape! The tape comes on a 4" wide roll and there is a die to cut out the images. Each roll has approx. 50 repetitions of the images. 

The background was die cut from light purple cardstock and backed with a darker shade of purple. The hexagons were hot foiled in gold and adhered with foam tape. I arranged the sunflower images around the hexagons and placed the dark brown foiled sentiment across the centre. Some gold gems were added but the gold outline on the sunflower and leaf images certainly bring this card to life! 


Enjoy,

Alyson

Tuesday, May 24, 2022

I Really Miss You Flowers

I used a leaf embossing folder on two panels on my card - the two gold foil pieces. I didn't have a dark purple cardstock piece that worked with this colour scheme so I created my own using a dark purple ink. The flowers and leaves were stencilled and die cut.  The sentiment was added under one of the flowers which were adhered with thin and regular foam tape for dimension. I added some gold metallic thread and purple gems around the flowers. 

I am entering this card in the following challenges: 

Can You Handle the Pressure challenge (embossing folder and flowers)

 Use Your Stuff Challenge (A Touch of Gold)

Enjoy,

Alyson 

TSOT 557 - Hi Card

 Welcome to Try Stampin' on Tuesday Challenge 557!

The optional theme this week (in addition to the sketch) is congratulations.

I used only the sketch as I don't often need congratulatory cards. 

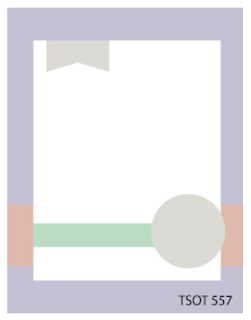
The gold frame was die cut from stitched rectangle dies and the sentiment was embossed in gold. The background paper is an alcohol inked patterned paper and I paired that with two shades of blue cardstock and emerald cardstock. I stayed true to the sketch although I added three banners at the top. Some gold metallic thread was added under the die cut sentiment piece. 

Come and join us at TSOT and show us how you interpret the sketch shown above.

You have two weeks to link up your project. 

We can’t wait to see what you create! 

Enjoy,

Alyson

Monday, May 23, 2022

AH 474 - Floral Friends Card


Welcome to Atlantic Hearts Sketch 474!

I chose to use some gorgeous floral papers and ephemera for my card - after all, it's SPRING! 

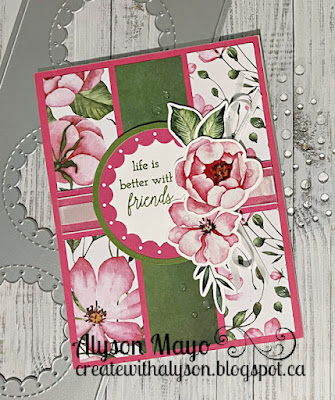
The paper is from Gina K. Designs and it is her latest release - I just love it! I found some coordinating cardstock in my stash. I wrapped a ribbon around the cross piece for more definition and die cut three circles (or parts of circles) for the sentiment piece. The sentiment was stamped in dark green, embossed and adhered with thin foam tape before I added various flowers and leaves along the right side. I tucked some skinny white ribbon under the flowers and added a few dew drops to finish off the card. 


Come and join us at Atlantic Hearts and show us how you interpret the sketch shown above. 

You have until Sunday evening to link up your project. 

We can’t wait to see what you create!

Enjoy,

Alyson

Sunday, May 22, 2022

Blue Poppies Half Fold Card

 I posted a card of this style a couple of weeks ago - this is the one that I created when I taught it to others. 

The poppies and leaves were stamped and die cut (and there are a LOT of layers for those flowers)! The top front of the card was cut away and the flowers were adhered along the lower half. I die cut some white pieces to place on the backside of the flowers to strengthen them and also to cover any ink spots. The sentiment was stamped and die cut and added to the inside top of the card. When the card is open, there is a place to write a message on the inside lower half. 


Enjoy,

Alyson

Saturday, May 21, 2022

You are a Blessing Tulips

The background of this card was made using strips of blue cardstock from my stash - I sure have a lot of it! That panel was adhered to two shades of blue cardsotck and then to the white card base. The tulips were stencilled using a Cricut cut design created by my wonderful friend, Trina Wirihana. The tulips were fussy cut and I stamped a sentiment with dark blue ink and adhered it partially over the tulips with foam tape. The last step was to add some white gems around the image. 

Enjoy,

Alyson

Friday, May 20, 2022

CD 497 - Rainbow Hugs

Welcome to Colour Dare Challenge 497! 

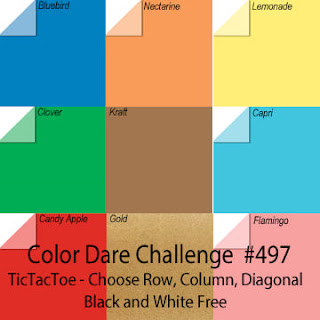
Choose any row or column from the grid below. Black and white are free to use and you can add any other colours that are on the grid. 

I used every colour except Kraft for my card. 

The rainbow sections were created using strips of cardstock and sized to fit behind the circular openings. The circles were die cut using a scalloped circle die and I also die cut a thin circle outline for each to allow for placement of the gold glitter leaves. The sentiment was hot foiled in gold and added in the middle. I coloured some clear sparkles in the same colours as the papers and added them around the card. The card front was adhered to a gold panel with foam tape and then to the card base. 

Come and join us at Colour Dare and show us how you interpret the colour grid shown above. 

You have two weeks to link up your project. 

We can’t wait to see what you create! 

Enjoy,

Alyson

Thursday, May 19, 2022

Sure Do Miss You

The main image on this clean and simple card was stencilled using five ink shades. The sentiment was embossed in white on black cardstock to coordinate with the top layer. I adhered the card front to black, turquoise and finally purple cardstock using craft foam for the last layer. Some glitter gems in turquoise and purple were added around the image. Easy!

Enjoy,

Alyson

Wednesday, May 18, 2022

Sending Rainbows for a Birthday

This easy fun fold card was created for the granddaughter of a friend of mine - the little girl is turning nine shortly.

The front panel was made from seven cardstock colours of the rainbow and I added part of the sentiment at the left. Inside, the rainbow was stencilled and I glued very thin strips of cardstock in the same colour order to a piece of printer paper and die cut the word "rainbows". A birthday sentiment was added under the word and I also stamped and die cut a sun. A few clouds were die cut from white glitter paper and strategically placed so the rainbow word would be covered when the card is closed. I added a panel inside for a place to write a message. 


Enjoy,

Alyson 

Tuesday, May 17, 2022

Northern Lights Card

The Northern Lights technique is an oldie but a goodie... the effect is so neat. It does result in inky fingers... very inky fingers! 

The background was created on a piece of white cardstock using a variety of ink colours. The black base (hills) was hand cut and used to create a guide to stamp the trees and then glued in place. The sentiment was embossed in white and the card front, followed by a border piece of white cardstock and then a green background were all adhered to the card base. A white gel pen was used to add some stars in the night sky.


Enjoy,

Alyson

Monday, May 16, 2022

Double Trouble 111 - Kraft plus Dots and/or Stripes

Welcome to Double Trouble Challenge 111! 

This week, Kraft is the name of the game. Thing 1 requires you to use Kraft on your project. Thing 3 wants you to add dots or stripes. The small graphic is below - please visit the Double Trouble challenge blog for more information. 

I began with a green card front and wove (largely spaced) Kraft pieces across. Each of those pieces is either dotted or striped. I die cut two circles and added them at the bottom. Two floral images were hot foiled in gold and coloured - they were added inside the circle along with a sentiment. I tied some green twine around the base of the images and added a few gold gems around the circle. 

Come and join us at Double Trouble and show us how you interpret this challenge.

You have two weeks to link up your project.

I am also linking up my card with the Crafter's Cafe challenge (use of dots and stripes). 

We can’t wait to see what you create! 

Enjoy,

Alyson

Sunday, May 15, 2022

Petal Smiles

This card looks so easy... but it was very time consuming. 

The petals each have five layers so I chose three blue-green colours plus grey and silver. The petal images were die cut multiple times and I arranged the inside pieces so no petal had repeated colours. They were then arranged starting at the bottom of the card and working toward the top. I embossed the sentiment in silver and adhered it to the top right of the card. Some enamel gems were added to finish it off! 

Enjoy,

Alyson

Saturday, May 14, 2022

White Pigment Ink Birthday

I posted a couple of cards about a week ago that used this same technique of stamping with white pigment ink and then using darker ink on top. This card was created when I taught this technique. 

I purposely chose a dark blue cardstock piece on which to stamp - white ink doesn't show up on lighter colours. The leaves were stamped first in white and then in a dark blue but offset from the white images. The sentiment was stamped in the same blue ink and the card front was adhered to a white card base. I added some white Pops of Colour around the card and that was it! 

Enjoy,

Alyson


Friday, May 13, 2022

Birthday Floral Sprays

These two cards took HOURS upon HOURS to create! The only stamping on each is the sentiment - the floral pieces are all die cuts. Some of those pieces are tiny! 

I embossed a light coloured piece of cardstock with a floral pattern and adhered that to the white card bases. All the floral and leaf pieces were die cut from white, pink or blue cardstock (depending on the card). Some pieces were inked with the coordinating ink colour to add depth and then everything was glued together with the appropriate stem(s). The pieces were adhered in a spray leading from the top left to the edges of the card. I stamped the sentiments and coloured the word "happy" in an ombre pattern with similar coloured markers. The last step was to add some shimmer to the large flower centres and place a few dew drops around the spray. I also finished the inside of each card. Whew! 


Enjoy,

Alyson

Thursday, May 12, 2022

Acetate Partial Die Cut Card

 This cute card was inspired by my friend, Trina Wirihana. The card base is a piece of acetate.

The image was stamped, stencilled and die cut only along the bottom edge. I purposely used a piece of cardstock larger than what I needed so I could trim the top along the edge of the acetate base. I die cut three more pieces - two from printer paper and a third from white cardstock. The cardstock is on the back inside panel as a place to write a message. The printer paper pieces were adhered to the back sides to cover the adhesive. I also ink splattered the floral piece. 

I added a strip of holographic paper along the bottom (both sides) and brushed the flower centres with a clear shimmer brush. A holographic foiled sentiment was added at the top. 


Enjoy,

Alyson

Wednesday, May 11, 2022

Sweet Friend Blue Diamonds

The background of this card was created from a series of die cuts made with a triangle border die. They were layered on top of each other to form diamonds in three shades of blue. 

The flowers and leaves were die cut in various darker colours with a touch of light pink and the sentiment was stamped in sapphire ink and added at the side. Some dew drop gems were added around the floral spray. 


Enjoy,

Alyson

Tuesday, May 10, 2022

TSOT 555 - Carnation Smiles

Welcome to Try Stampin' on Tuesday Challenge 555!

The optional theme this week (in addition to the sketch) is to use pastels. I did only the sketch. 

I recently ordered the new kit from Gina K. Designs and it contains this gorgeous layered carnation stamp image. That was the basis for this card. The flowers, leaves and berries were stamped and die cut. I found some patterned paper in my stash that worked very well with the colours in the flowers. The woodgrain panel was created by dragging a grey ink pad over a piece of white cardstock. That was adhered to a Cricut cut scalloped piece of black cardstock. The sentiment was die cut from black cardstock, stacked three times and added to a vellum shadow layer. I added some gold metallic thread and gold sequins under and around the flowers and brushed the darkest flower lines with a gold shimmer brush. The flowers were adhered with thin and regular foam tape to add some dimension. 


Come and join us at TSOT and show us how you interpret the sketch shown above. 

You have two weeks to link up your project. 

We can’t wait to see what you create! 

Enjoy,

Alyson


Monday, May 9, 2022

AH 472 - Kind People Card

Welcome to Atlantic Hearts Sketch Challenge 472!

It's an interesting sketch this week - there are so many possibilities for interpretation. I chose to stay true to the sketch. 

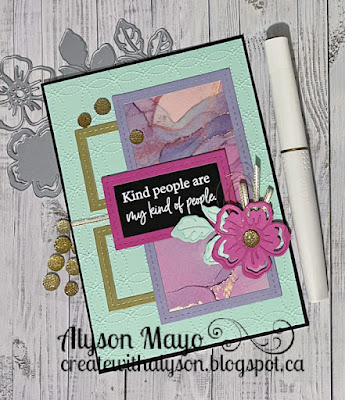
The mint background was embossed with a stitched circle embossing folder and adhered to a black base. I die cut several rectangle outlines and left the two gold ones open. The others had paper adhered behind them - one with the white embossed sentiment and the other with alcohol inked patterned paper. I added a white and gold ribbon between the gold pieces and used that same ribbon behind the die cut flower. I also added some gold metallic thread behind the flower and brushed the outline with a gold shimmer brush. 


Come and join us at Atlantic Hearts and show us how you interpret the sketch shown above.

You have until Sunday evening to link up your project. 

We can’t wait to see what you create! 

Enjoy,

Alyson