Tuesday, August 31, 2021

Beautiful Day

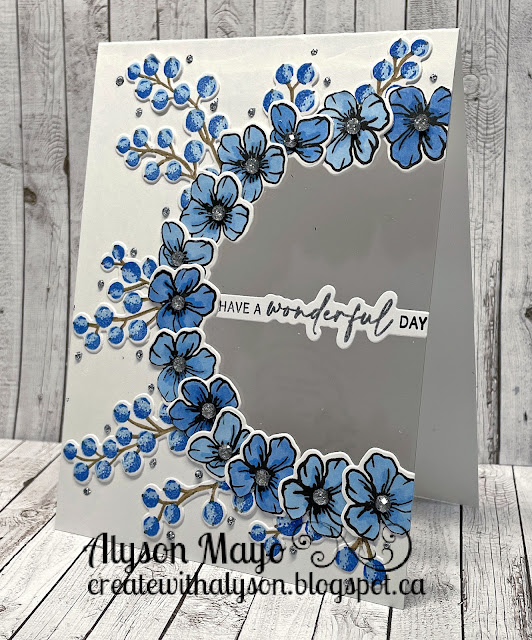
Digital designs are very new to me and this is one of a few that I purchased a while ago. I love the wreath image and the sentiment underneath. It was simply a matter of colouring the image and adhering it to a base. The first base layer is black and the card base is Bluebird cardstock. 

I added some Stickles around the wreath but kept this simple so the wreath was the focus. 

Products used are as follows: 

Paper: White Daisy Cardstock, Black Cardstock, Bluebird Cardstock (All CTMH)

Inks: none

Stamps: none

Accessories: Angie Blom Digital Designs, Copic Markers, Waterfall Stickles

Enjoy,

Alyson

Monday, August 30, 2021

AH 436 - Daisies on Woodgrain Slimline


Welcome to Atlantic Hearts Sketch Challenge 436! 

The sketch is in a slimline format but that can certainly be changed to a standard card size. 

I followed the sketch very closely as it worked for what I had in mind. 

The woodgrain background was enhanced as I scored the backside to raise the panels and then dragged two shades of grey ink pads over the top. The flowers were created using layering stencils and then die cut. The image is a complete wreath so I cut it apart and used the sections that I liked. The sentiment was stamped and die cut with a stitched hexagon. The flowers were adhered wth foam tape and some gold embellishing thread was added underneath. Some gold gems were placed around the card and the flower centres and the darkest parts of the flowers were brushed with a gold shimmer brush. The woodgrain panel was adhered to green cardstock and then to a piece of purple cardstock. 

Come and join us at Atlantic Hearts and show us how you interpret the sketch shown above. 

You have until Sunday evening to link up your project. 

We can’t wait to see what you create! 

Products used are as follows: 

Paper: Woodgrain Paper, White Daisy Cardstock, Slimline Cards and Bases (all CTMH), Green Cardstock, Purple Cardstock (both scrapbook.com)

Stamps/Dies: Daisy Wreath stencil and die (Pink Fresh Studio), Stitched Hexagon dies (CTMH), Sentiment Collection (Penny Black)

Inks: Sunshine, Sweet Mustard (both Pink Fresh Studio), Wisteria, Hydrangea, Ultraviolet, Firefly, Grass Field, Shadow Creek (all Altenew)

Accessories: Gold Embellishing Thread (Misc.), Gold Glitter Gems, Gold Shimmer Brush (both CTMH), Thin Foam Tape (misc.)

Enjoy,

Alyson

Sunday, August 29, 2021

Expanding Accordion Card - The Wonder of the Season

Interactive cards... so much fun to make! This is an expanding accordion card and the tutorial that I used can be found here

This card is thick along the spine and it folds to a 5x7 finished card. A larger envelope would be required for mailing to accommodate the thick spine. 

I used some beautiful alcohol-ink like papers for the patterned papers. Evergreen and White Daisy cardstock plus gold foil were the others papers that I used. The accordion and the inside letters were assembled first. I die cut the letters in gold foil and added them to the panels. On each side, a large stitched oval was die cut twice - once in Evergreen cardstock and once in gold foil. They were layered together and I added some stamped and coloured poinsettia images on each side. A sentiment was stamped for the front panel and die cut using a stiched bracket die. I added an extra poinsettia to the front as well. There is a round piece that has also been stamped and coloured - this can be removed and used as an ornament. Finally, there is a panel on the back for a place to write a message. 


Products used are Close To My Heart unless otherwise indicated: 

Paper: White Daisy Cardstock, Evergreen Cardstock, Gold Foil, Ink Drops - Vivid (Craft Consortium)

Stamps/Dies: Wonder of the Season, Whimsical Holiday 

Inks: Evergreen, Versamark, Intense Black (SSS)

Accessories: Block Alphabet Thin Cuts, Stitched Bracket Thin Cuts, Basic Circle Thin Cuts, Stitched Circle Dies (GMD), Stitched Oval Dies (GMD), White Organdy Ribbon, Gold Embossing Powder, Heat Tool, Red Twine (misc.), Markers (misc.)

Enjoy,

Alyson

Saturday, August 28, 2021

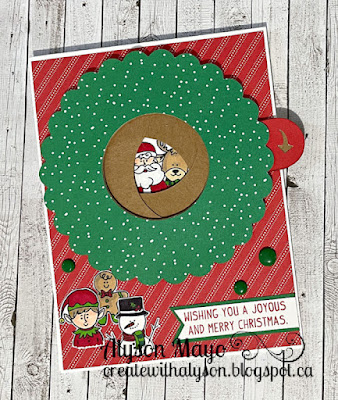
Christmas Characters Magic Iris Card

I love interactive cards and this is a great one - a moveable center iris fold. 

Christmas is going to be upon us faster than we realize - it's never too early to be working on cards for the season. 

I stamped several of the jolly characters, coloured and fussy cut them. Two of them were stamped inside the iris and are visible when the side tab is pulled down. I added a sentiment and a few enamel dots to finish off the card. 


Products used are Close To My Heart unless otherwise indicated: 

Paper: Holiday Paper Stack, White Daisy Cardstock, Clover Cardstock, Kraft Cardstock, Neenah Solar White Cardstock

Stamps: Jolly Characters, Reindeer Bells

Inks: Clover, Intense Black (SSS) 

Accessories: Magic Iris Dies (Lawn Fawn), Tri-Blend Markers, Holly Jolly Dots

Enjoy,

Alyson

Friday, August 27, 2021

Colour Dare 459 - Poinsettia Joy

Welcome to this week's Colour Dare challenge! 

We have a very specific set of colours for this challenge - ONLY French Vanilla (off white), Black and Gold. No other colours are permitted. 

I had to think carefully about this colour scheme... and I decided to create a Christmas card. 

The background was die cut from black cardstock, gold glitter paper and gold foil. I stacked the black outline three times and then added the gold pieces inside the squares. The poinsettia pieces were die cut from French vanilla and black cardstock, black glitter paper and vellum (colourless). They were adhered together and a gold gem was placed in the center. I outlined the French vanilla leaves with a gold marker and then brushed all the pieces with Goldenrod Stickles. It added a nice gold shimmer but it also helps to maintain the shape of the flower even when it is flattened in an envelope. The sentiment was embossed in gold and adhered to black cardstock. The last step was to add a few flower sequins around the card. 


Come and join us at Colour Dare and show us how you interpret this week's challenge. 

You have two weeks to link up your project. 

We can’t wait to see what you create! 

Products used are Close To My Heart unless otherwise indicated: 

Paper: French Vanilla Cardstock, Black Cardstock, Gold Foil, Gold Glitter Paper, Vellum, Neenah Solar White Cardstock

Stamps: First Noel

Inks: Versamark

Accessories: Comfort and Joy Scrapbooking Thin Cuts, Multi Square Window Thin Cut, Gold Gems, Gold Embossing Powder, Heat Tool, Gold Marker (misc.), Iridescent Sequins, Goldenrod Stickles 

Enjoy,

Alyson

Thursday, August 26, 2021

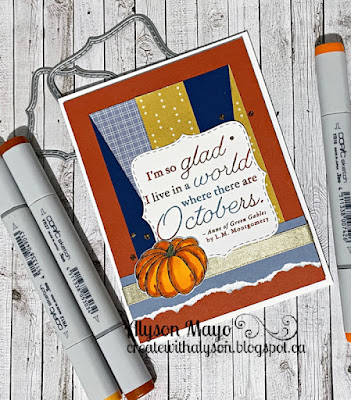
Angled Top Fold Card - Ah, Autumn

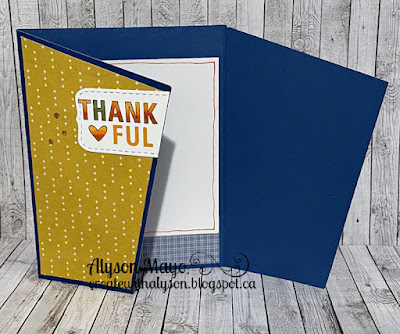
This card has an angled top and the space to write a message is inside. Both flaps open to reveal the center section. Thanks to Lynn Dunn for the idea! 

I used some autumn themed papers and pumpkins to create my two cards. The pumpkins were stamped, coloured and fussy cut along with a sentiment for the front of the card. The inside flap has a "thankful" image that was stamped and coloured. When I coloured the letters, I used light markers at the top and darker markers at the bottom to create an ombre effect. The inside has more pumpkins (they were masked)  and a border piece at the bottom. A few gold Stickles finished off the card. 


The scraps that were left over were used to create a second card. The printed pieces lined up to create a center panel. I stamped a beautiful sentiment in both Blue Belle and Paprika ink and added a pumpkin at the bottom. It's a great way to use up the scraps from the folded card. 

Products used are Close To My Heart unless otherwise indicated: 

Paper: Misc. Patterned Papers, White Daisy Cardstock, Fern Cardstock, Sapphire Cardstock, Paprika Cardstock, Blue Belle Cardstock, White Cards and Envelopes

Stamps: Always Grateful, Feeling So Blessed, A World with Octobers 

Inks: Fern, Paprika, Blue Belle, Intense Black (SSS)

Accessories: Stitched Brackets Thin Cuts, Stitched Simple Brackets Thin Cuts, Copic Markers (not CTMH), Touch Markers (not CTMH), Sharpie Markers (not CTMH), Gold Ribbon, Goldenrod Stickles, Craft Foam (not CTMH) 

Enjoy,

Alyson


Wednesday, August 25, 2021

Colouring Just for Fun

I purchased some digital images ages ago and was finally able to resize them. The floral outline is a digital  image and it was printed in black. I coloured two of them - one in red and the other in blue and both were mounted on black cardstock. A sentiment was stamped in the middle of each card and the only extra I added was to brush the centres of the flowers with the Clear Shimmer Brush. Clean and simple! 


Products used are Close To My Heart unless otherwise indicated:

Paper: White Daisy Cardstock, Black Cardstock, White Cards and Envelopes, Neenah Solar White Cardstock

Stamps: Heartfelt Sentiments (Altenew)

Inks: Archival Black 

Accessories: Digital Image (Angie Blom Designs), Tri-Blend Markers, Clear Shimmer Brush (CTMH), Touch Markers 

Enjoy,

Alyson


Tuesday, August 24, 2021

Try Stampin' on Tuesday - Woodgrain NOEL

Welcome to Try Stampin' on Tuesday Sketch 521.

The optional theme (in addition to the sketch) is school days. 

My card for this challenge is based on a gorgeous card that was presented by Desiree Kuemmerele at an online Christmas card making event. I have provided a link to her blog but this card idea was not posted on her blog. I did much of the preparation for this card with my Cricut. The poinsettia and the letters were all Cricut cut. The small branches under the NOEL were stamped and die cut. 

I started by preparing two woodgrain panels. The bottom one is woodgrain paper but I scored along the lines from the back and then used two ink pads to rub over the paper. The smaller panel was embossed with a woodgrain embossing folder and then inked to bring out the lines.

The letters were cut with my Cricut and adhered together. They were applied to the background with foam tape. The poinsettia was assembled and the branches were stamped and die cut. The branches were layered along the bottom with some adhered with foam tape. Once everything was in place, I mixed some white craft paint with water and splattered it heavily over the entire card. The last step was to add some red Stickles to the branch on the flower and along the die cut branches. 

Come and join us at TSOT on show us how you interpret the sketch shown above. 

You have two weeks to link up your project. 

We can’t wait to see what you create!

Products used are Close To My Heart unless otherwise indicated: 

Paper: Woodgrain Paper Pack, White Daisy Cardstock, Espresso Cardstock, Candy Apple Cardstock, Evergreen Cardstock, Sage Cardstock, Scarlet Cardstock, Toffee Cardstock, Vellum, Neenah Solar White Cardstock 

Stamps: Comfort and Joy Scrapbooking 

Inks: Mink, Pewter, Espresso, Evergreen, Scarlet

Accessories: Cricut - Basic Shapes, Base Camp, Flower Market, Comfort and Joy Scrapbooking Thin Cuts, Woodgrain Embossing Folder, Gold Gems, Christmas Red Stickles, Foam Tape, White Craft Paint (not CTMH)

Enjoy,

Alyson


Monday, August 23, 2021

Acetate Lattice Card in Blue

I recently posted this same card but in a pink colour scheme. I demonstrated this card in my Facebook group and this was the result the second time around. 

The blue shades make for such pretty flowers. I left the inside of the card blank this time (I added some holographic paper inside on the pink card). 

Products used are as follows: 

Paper: White Daisy Cardstock, Neenah Solar White Cardstock

Stamps/Dies: Rose Label stamp and die (The Ton), Easy Expressions stamp and die (The Ton), Berry Branches stamp and die (The Ton), Diamond Grid die (Gina Marie Designs), Stitched Rectangle dies (Gina Marie Designs) 

Inks: Carolina, Bluebird, Sapphire, Black, Versamark (all CTMH)

Accessories: Gold Embossing Powder, Heat Tool, Gold Embellishing Thread, Acetate (misc.)

Enjoy,

Alyson


Sunday, August 22, 2021

Good Tidings Paperscape

Creating a paperscape was a first for me - it's a multi-dimensional card that contains some sort of scene. This one is approximately 6" x 9" x 2" when standing up but it folds flat and slides into an envelope that was created specifically for this card. The file is from The Dreaming Tree website and comes in an SVG format so it can be cut on most standard electronic machines. 

It took me a long time to decide on the colour scheme. I knew I wanted the background pieces to be white but I cut them from Pearl paper so they had some extra shine to them. The sky at the back was stamped with little snowflakes and embossed in white. I used some distress oxide ink to add a bit of colour around the edges. A few gems were placed on the envelope and one was used to dot the letter I in the sentiment. I did photograph some of these pictures with a small flashlight underneath - there is a space for a battery operated tea light to brighten the scene. 


Products used are Close To My Heart unless otherwise indicated: 

Paper: White Daisy Cardstock, Mint Cardstock, Lagoon Cardstock, Pearl Paper, Silver Foil, White Glitter Paper

Stamps: Polar Bear Holiday

Inks: Versamark, Shaded Lilac DO Ink (not CTMH)

Accessories: Cricut - Dreaming Tree File, White Embossing Powder, Heat Tool, Glacier Gems (Pink Fresh Studio), Ocean Breeze Gems (Pink Fresh Studio)

Enjoy,
Alyson

Saturday, August 21, 2021

Triple Time Stamping 2 - Coloured Flowers

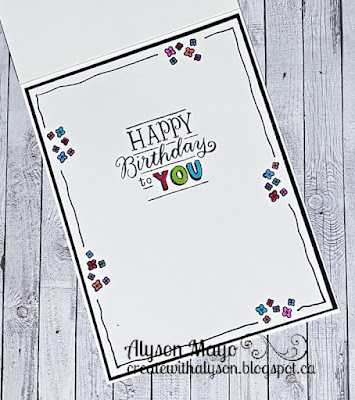
This is my second post about the triple time stamping technique. This time, I stamped some related floral images in black and coloured them... that was a LOT of work! 

I chose three floral images and began stamping in the center so I wouldn't have any gaps around the last layer. Once the ink was completely dry (Intense Black), I coloured the flowers using several bold and intense colours. Although I didn't do any shading, the colouring took a long time to complete. Black cardstock was added between each layer and since the flowers were already so busy, I just added a small sentiment. The remainder of the sentiment is inside the card. The centres of the flowers were brushed with a clear shimmer brush.


Products used are Close To My Heart unless otherwise indicated: 

Paper: White Daisy Cardstock, Black Cardstock

Stamps: Every Bit of Wonderful, Birthday Sparkles, Word Up (Reverse Confetti)

Inks: Intense Black (SSS)

Accessories: Clear Shimmer Brush, Tri-Blend Markers, Copic Markers (not CMTH), Touch Markers (not CTMH), Sharpie Markers (not CTMH)

Enjoy,

Alyson
Friday, August 20, 2021

Double Trouble 91 and Colour Dare 458 - I Miss Your Face Slimline

Welcome to Double Trouble Challenge 91! 

This week, it's all about patterns, specifically plaids, check or polka dots. The small image is below - please visit the Double Trouble Challenge Blog for detailed information. 


The colour scheme from Colour Dare was a challenging one for me - these are not my go to colours, for sure! The plaid/checkered/polka dot element also really made me think. 

I started out with a set of layering stencils but used a different colour scheme (still on the Colour Dare grid). Since there isn't a die for this floral grouping, I stamped it on masking paper and fussy cut it - UGH! I had done all the ink layering and wanted to use a stencil that I created on the Cricut to add dots around the flowers. After I had stencilled the dots, I removed the masking paper - or TRIED to remove it. It stuck terribly to the paper, lifting all the ink. I had to start again. The second time, I chose a different colour scheme and didn't use masking paper at all to add the dots. I just carefully stencilled around the image. 

The sentiment was stamped in the three darkest colours used for the flowers - Desert Rose, Cinnamon and Peacock. I also splattered the areas around the flowers with the Peacock Shimmer Brush. The center panel was cut down slightly so it could be mounted on Peacock cardstock. The last step was to add some Stickles around the flowers. 

Come and join us at Double Trouble and show us how you interpret this week's challenge. 

You have two weeks to link up your project. 

I am also adding my card to the Colour Dare Design Team section as I am part of that design team. 

We can’t wait to see what you create!

Products used are as follows: 

Paper: White Cardstock, Peacock Cardstock (both CMTH)

Inks: Desert Rose, Cinnamon, Peacock, Glacier, Pebble (all CTMH) 

Stamps: Miss Your Smile (Pink Fresh Studio)

Accessories: Artbooking Cricut Cartridge, Peacock Shimmer Brush (both CTMH), Turquoise Stickles (misc.)

Enjoy,

Alyson

Thursday, August 19, 2021

Triple Time Stamping - Flowers in Turquoise

I have tried the triple time stamping technique in the past and there are lots of videos that show how to do it. This card was created using that technique. 

I used a layering stamp from Stampin' Up to create the flowers. Lining them up after all the stamping was finished was not difficult at all. I used Peacock cardstock (the light side) between the layers as it matched the colour of the flower outline. I also added some twine and an acrylic heart which was coloured in a teal shade. The sentiment is small and simple. The centres of the flowers were enhanced with some Stickles glitter gel. 

Products used are Close To My Heart unless otherwise indicated: 

Paper: White Daisy Cardstock, Peacock Cardstock 

Stamps: To a Wild Rose (SU), Word Up (Reverse Confetti)

Inks: Peacock, Lagoon, Mint

Accessories: White Acrylic Hearts, Lagoon Twine, Turquoise Stickles (not CTMH)

Enjoy,

Alyson

Wednesday, August 18, 2021

AH 434 - Sparkly Poinsettias

Welcome to Atlantic Hearts Sketch Challenge 434!

I stayed true to the sketch this week - it's time for some sparkly poinsettias! 

The background was created using a piece of woodgrain paper. I dry embossed the lines to bring them out more and dragged a grey ink pad over the entire surface. The gold strips were embossed using a holly embossing folder. All the petals and branches for the poinsettias were Cricut cut, inked and shaped. They were layered and some gold confetti was added to the centre of each flower. I stamped a sentiment and added it to the bottom corner. The flowers were brushed with a shimmer brush and some gold gems finished off this card. 

Come and join us at Atlantic Hearts and show us how you interpret the sketch shown above. 

You have two weeks to link up your project. 

We can’t wait to see what you create! 

Products used are as follows: 

Paper: Woodgrain Paper, Linen Cardstock, Charcoal Cardstock, Scarlet Cardstock, Evergreen Cardstock, Vellum, Gold Foil (all CTMU), Neenah Solar White Cardstock 

Stamps: First Noel (CTMH)

Inks: Mink, Pewter, Scarlet, Evergreen (all CTMH)

Accessories: Flower Market Cricut Collection, Gold Confetti, Gold Glitter Gems, Clear Shimmer Brush  (all CTMH), Holly Vines Embossing Folder (Darice)

Enjoy,

Alyson

Tuesday, August 17, 2021

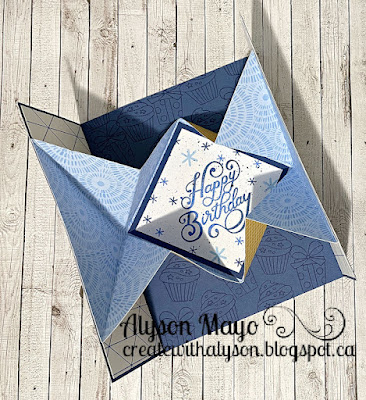
Gatefold Card with Inner Surprise

This gatefold card opens to reveal a surprise inside. I chose to make this one with a blue birthday theme. 

The outside of the card is a standard gatefold card - it meets in the middle and a belly band holds it together. I decorated the front panel with balloons and gifts all coloured in shades of blue. The sentiment was stamped with two shades of blue. 

Inside, the card opens to reveal a birthday message. Since the inside is adhered to the outer panels, the card will not lay flat but that's not a problem. It can be displayed standing up to see the inside. I splattered the centre piece with two shimmer brushes and stamped a sentiment in the same inks as on the front. I also stamped little stars around the sentiment. The background was random stamped using the same images that are on the front of the card. Since there isn't a place to write a message, I added a panel on the back of the card for that purpose. 

I hope this is a little surprise for the recipient! 

Products used are Close To My Heart unless otherwise indicated:

Paper: These are My People Paper Pack, I Heart Us Paper Pack, White Daisy Cardstock, Bluebird Cardstock, Sapphire Cardstock 

Stamps: Swirly Happy Birthday, Birthday Banners, Best Wishes All Around, Celebrate Today Card Kit, Birthday Borders 

Inks: Sapphire Pigment Ink, Sapphire, Bluebird, Carolina

Accessories: Birthday Borders Thin Cuts, Tri-Blend Markers, Touch Markers (not CMTH), Copic Markers (not CTMH), Sharpie Markers (not CTMH), Bluebird Shimmer Brush, Sapphire Shimmer Brush, Clear Embossing Powder, Heat Tool 

Enjoy,

Alyson

Monday, August 16, 2021

Heart 2 Heart - Home Sweet Gnome

Welcome to this week's Heart 2 Heart challenge. 

The theme for this challenge is Vacation/Staycation. Many of us haven't travelled anywhere lately with lockdowns in place for so long... "staycations" are the new normal.

Since I haven't gone anywhere and I don't take pictures of my "staycation" at home, I had to decide on a different approach for this challenge. I used a gnome stamp for a home sweet home idea. 

The background was created by masking around a circle (I cut that on my Cricut) and using Distress Oxide inks to create a multi-coloured background. Once the mask was removed, I stamped two gnomes in black (masked one of them), the flowers along the left side and a sentiment at the top. That piece was adhered to a piece of Sundance cardstock and then to a white card base. Clean and simple! 

Come and join us at Heart 2 Heart and show us how you interpret the Vacation/Staycation theme. 

You have until the end of August to link up your project. 

We can’t wait to see what you create! 

Products used are Close To My Heart:

Paper: White Daisy Cardstock, Sundance Cardstock, White Cards and Envelopes 

Stamps: Gnome Matter, Angel Hugs

Inks: Archival Black, DO Inks - Picked Raspberry, Spiced Marmalade, Mustard Seed, Mowed Lawn, Peacock Feathers

Accessories: Cricut Basic Shapes, Circle Shaker Window Thin Cut

Enjoy,

Alyson

Sunday, August 15, 2021

Half Wreath Acetate Card in Blue

Love me some blues!

This half wreath card is so pretty in real life - the sentiment looks like it is floating as it is adhered to acetate. The inspiration for this card can be found here

I die cut two thirds of a circle from the front of my card base. The flowers were stamped (and stamped, and stamped...), coloured and die cut. There were leaves on the flowers but I cut them away as I didn't want them on this card. The flowers and branches were arranged around the circle and adhered. The sentiment was just barely tucked under one of the flowers. I added some silver glitter gems to the centres of the flowers and then dotted around the card with silver Stickles. 

Products used are as follows: 

Paper: White Daisy Cardstock (CMTH), Neenah Solar White Cardstock

Stamps/Dies: May Flowers stamp and dies (Gina K. Designs), Berry Branches stamp and die (The Ton), Easy Expressions stamp and die (The Ton), Nestabilities Circle Dies 

Inks: Carolina, Bluebird, Toffee, Espresso, Versamark (all CTMH), Intense Black (SSS)

Accessories: Acetate (misc.), Silver Embossing Powder, Heat Tool, Tri-Blend Markers, Silver Glitter Gems, Silver Stickles (all CTMH)

Enjoy,

Alyson

Saturday, August 14, 2021

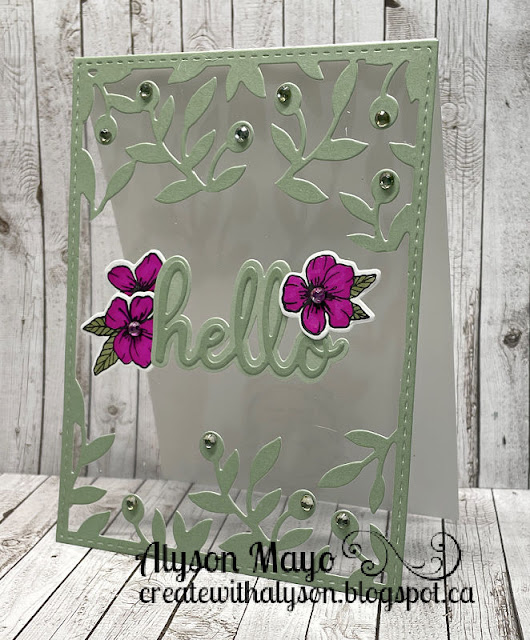
Acetate Front Cards - Olive Branches Hello and Happy Birthday

Acetate requires a very different approach to making a card. Since it is clear, anything behind the acetate will show through. Here are two acetate front cards...

Green... it goes with so many colours. This time, I paired a sage green with a bold pink/purple colour. 

The background is a full front card size die - I cut it from sage cardstock and then cut away the centre section and some extra branches to leave an open area in the middle. Acetate was adhered and the remaining frame was adhered. I die cut a sentiment using both the light and dark side of the sage cardstock. A few flowers were stamped, coloured and die cut and arranged around the sentiment. The last step was to colour some clear sparkles and add them to the olive branches. 


The second card was created using the Floral Background die from CTMH and I cut away the center section as I did for the first card. I die cut the word happy and stamped two smaller sentiments that were adhered above and below the main word. Some sparkles were coloured and adhered to the centres of the flowers. 


Products used are as follows: 

Paper: White Daisy Cardstock, Sage Cardstock, Wisteria Cardstock, Black Cardstock (all CTMH), Neenah Solar White Cardstock

Stamps and Dies: May Flowers stamp and dies (Ginka K. Designs), Olive Branches Background die (CTMH), Phrase Builder - Hello (Pink Fresh Studio), Floral Background Die (CTMH), Happy stamp and dies (Photoplay)

Inks: Intense Black (SSS) 

Accessories: Touch Markers (misc.), Tri-Blend Markers, Clear Sparkles (both CTMH), Acetate (misc.)

Enjoy,

Alyson

Friday, August 13, 2021

Colour Dare 457 - Birthday Wishes

Welcome to Colour Dare Challenge 457!

We have a tic tac toe grid this week - it is based on the colours from the Close To My Heart paper pack called Isabella. 

I used the left column (Evergreen, Mink and Sundance) as well as the bottom row (Sundance, Gold and Sage).

I used a pattern from an old Make It From Your Heart book but reversed the top two panels. The papers are all from the Isabella paper pack. The bottom of the green panel was die cut using a stitched bracket die. The flowers were coloured and die cut. I added some gold Liquid Pearls and Stickles to the berries and a birthday sentiment was placed along the cross piece. Some gold embellishing thread and glitter gems were added around the card and the lines of the flowers were brushed with the gold shimmer brush. 


Come and join us at Colour Dare and show us how you use the tic tac toe grid shown above. 

You have two weeks to link up your project. 

We can’t wait to see what you create! 

Products used are Close To My Heart unless otherwise indicated: 

Paper: Isabella Paper Pack, White Daisy Cardstock, Sage Cardstock, Evergreen Cardstock, Neenah Solar White Cardstock

Stamps: Isabella Scrapbooking Stamp and Thin Cuts, Easy Expressions Stamp and Die (The Ton Stamps) 

Inks: Archival Black, Versamark, Intense Black (SSS)

Accessories: Stitched Brackets Thin Cuts, Gold Shimmer Ribbon, Gold Glitter Gems, Gold Shimmer Brush, Goldenrod Stickles, Gold Liquid Pearls, Gold Embossing Powder, Heat Tool, Tri-Blend Markers, Thin Foam Tape

Enjoy,

Alyson


Thursday, August 12, 2021

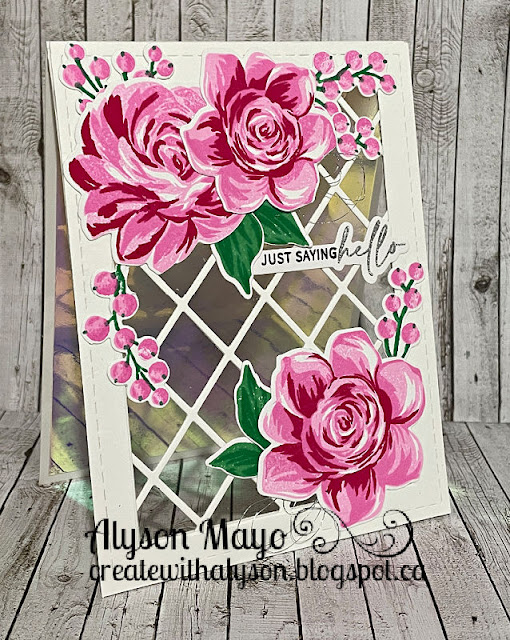
Roses on Lattice Card

I love finding new ideas to try on Pinterest! This is one type of card I have been wanting to make for a long time. The inspiration for this card can be found here. The front of the card was cut out and a piece of acetate was adhered, allowing you to see through the card. 

I have had a diamond die that I haven't used in ages. That was used to cut the lattice piece. I cut out a rectangle from both the front of the card base and from a separate piece of cardstock. The pieces were adhered together to create a window opening in the front. The flowers and branches were stamped in a pink and green colour scheme and die cut. They were adhered carefully to the front of the card and some silver embellishing thread was added. I stamped and embossed a sentiment and placed that just under a leaf and to the right. Finally, a piece of pink/blue holographic paper was added to the inside of the card. 

Cards with acetate or holographic paper are extremely difficult to photograph due to the shadows... 

Products used are as follows: 

Paper: White Daisy Cardstock, Majestic Holographic Paper (CTMH), Neenah Solar White Cardstock

Stamps/Dies: Rose Label stamp and die (The Ton), Easy Expressions stamp and die (The Ton), Diamond Grid die (Gina Marie Designs), Stitched Rectangle dies (Gina Marie Designs) 

Inks: Meadow, Emerald City, Sparkling Rose, Bubblegum, Raspberry Bliss (all Pink Fresh Studio), Black, Versamark (both CTMH)

Accessories: Silver Embossing Powder, Heat Tool, Silver Embellishing Thread, Acetate (misc.)

Enjoy,

Alyson

Wednesday, August 11, 2021

Pinwheel Tower Card

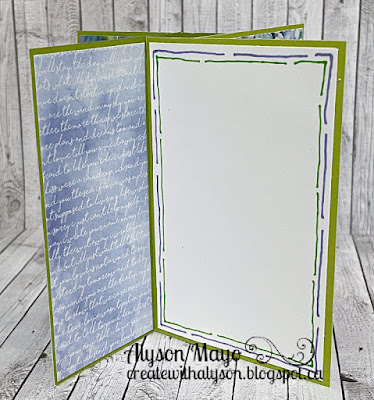
I have seen a lot of this card style the last few weeks and wanted to try one myself. I figured out the measurements on my own and this card will fit into a standard A2 envelope as it folds flat to   4 1/4" x 5 1/2".

I used a bright green cardstock for the card base and the patterned paper is all from the same gorgeous paper pack. The left panels were random stamped with various butterflies on purple cardstock and I also added a border to each piece. There is one white section for the purpose of writing a message. I did stamp, colour and die cut a couple of butterflies and brushed them with a clear shimmer brush. The sentiments are from the paper pad. The key to this card's success in to keep it flat - bulky embellishments prevent it from folding flat. 

Each section is shown below. The first photo is taken slightly from above to show how this card stands. 


Products used are as follows: 

Paper: Hydrangea Lawns Paper Pad (Dress My Craft), White Cardstock, Wisteria Cardstock, Avocado Cardstock (CTMH)

Stamps: Chelsea Gardens Cardmaking Stamp and Thin Cuts, Butterfly Friendship Stamp and Thin Cuts (both CTMH)

Inks: Wisteria (CTMH)

Accessories: Clear Shimmer Brush (CMTH), Touch Markers, Tri-Blend Markers, Sharpie Markers 

Enjoy,

Alyson

Tuesday, August 10, 2021

TSOT 519 - Smiles with Japanese Mum

Welcome to Try Stampin' on Tuesday Challenge 519! 

The optional theme (in addition to the sketch) is to create something that was inspired by a book or a movie. 
I chose a colour scheme of purple and yellow for my card. Those colours are opposite each other on the colour wheel so they always work well together. 

The layers were die cut using stitched rectangle dies and the top edge was cut off. Those pieces were layered on a purple polka dot background. The flower and leaves were stamped (4 layers) and die cut for the rectangle in the sketch. I added a stacked sentiment at the top and some gold gems at the bottom. Gold embellishing thread and gold gems were added to the card and the darkest parts of the flower were brushed with a gold shimmer brush. 


Come and join us at TSOT and show us how you interpret the sketch shown above. 

You have two weeks to link up your project. 

We can't wait to see what you create! 

Products used are as follows: 

Paper: Misc. Patterned Paper, Canary Cardstock, Pansy Cardstock, White Daisy Cardstock (all CTMH), Neenah Solar White Cardstock 

Stamp and Die: Japanese Mum (Altenew) 

Inks: Lemon Whip, Sunshine, Sweet Mustard, Fresh Pear, Grassy Knoll, Ley Lime (all PFS), Black (CTMH)

Accessories: Stitched Rectangle Dies (GMD), Phrase Builder - Sending Dies (PFS), Grape Shimmer Trim, Gold Shimmer Brush, Gold Gems (CTMH), Gold Embellishing Thread (misc.), Thin Foam Tape, Foam Tape (misc.)

Enjoy,

Alyson