Friday, November 29, 2019

Christmas Peonies

Welcome to this week's Colour Dare challenge! 

I am sure you recognize the M&Ms characters that represent this week's colour choices. Chose ONLY TWO of the colours. Black, white and all other neutrals are free to use.
Since it is so close to Christmas, I selected red and green plus white and black for my card. I pulled out one of my favourite stamps - Budding Peonies - for this card. I wanted to make it into a shaker card but since the flowers are so large, the best option was to turn the entire card into a shaker. I did place some foam tape under the flowers to prevent the sequins from gathering in the corners. The flowers and leaves were coloured using the Tri-Blend markers and I brushed the flower lines with the Clear Shimmer Brush after they were coloured. The centre of each flower is done using a silver pen - since I wasn't able to use yellow... 

The sentiment was stamped using two colours and then the sequins were placed inside the shaker, which covers the entire front of the card. 

In order to get the sequins looking like they are spread over the card, I had to photograph this from above. That makes it very difficult to get a rectangular shape without the edges being "off" a little... 


Come and join us at Colour Dare and show us how you use the M&Ms family colours 
to create your project. 
You have two weeks to link up with this challenge. 
We can’t wait to see what you create! 

Products used are Close To My Heart unless otherwise indicated: 

Paper: White Daisy Cardstock, White Cards and Envelopes 
Stamps: Budding Peony, Christmas Joy
Inks: Intense Black, Candy Apple, Clover
Accessories: Stitched Rectangle Thin Cuts, Holiday Sequins, Foam Tape, Clear Shimmer Brush, Silver Marker (Sharpie) 

Enjoy,
Alyson 


Wednesday, November 27, 2019

Glitter Ornament

It is time to enter another Double Trouble challenge! 

I saw the technique for this card on Sam Clayton's blog. I really wanted to try it - but it is harder to do than it appears. 

The circle was cut from a piece of masking paper and then placed on top of the card front. All the work was done inside that mask. The outlining in Lilac ink was done first. I chose an ink colour that would be a little bit purple but also sort of grey. 

My biggest struggle was finding stamps that were small enough for this purpose. I used individual stamps from 6 different sets... Once the circle was complete, the masking paper was peeled off and the ornament top plus the sentiment were added. Then came the glitter... I forgot how awful this stuff is to use. A little bit of glue was placed on the sections where I wanted glitter. It took me forever to brush off the unwanted glitter as it gets everywhere.


The three Double Trouble challenges components are: 
- use bling or glitter 
- add a snowman
- link to Cupcake Inspirations for their challenge (use a snowman)

I completed all three elements and am linking this card to both the Double Trouble Challenge and Cupcake Inspirations.

Products used are Close To My Heart unless otherwise indicated: 

Paper: Neenah Solar White Cardstock, Silver Foil Paper 
Stamps: Merry & Bright, Thoughtful Bird, Reindeer Crossing, Nature's Wish, Giving Thanks, A Dash of Joy
Inks: Black, Lilac
Accessories: Nestabilities Circle Dies, Silver Embellishing Thread, Prisma Glitter 

Enjoy,
Alyson

Monday, November 25, 2019

Best Friends Furever Blog Hop


Welcome to the Best Friends Furever Blog Hop! 

This campaign is awesome if you are a dog or cat owner. There are several options available to create 12x12 pages, a mini album, some cards or just do your own thing! This blog hop is about using some of those products to create projects other than those available though 
Close To My Heart. 

You should have arrived here from Cat Nowak's blog.
If you get lost, a complete list of participants can be found on Melinda Everitt's blog.

I chose to use both the stamp sets from this campaign (Eat Play Love - for dogs and 
Kitty Cuddles - for cats) plus the paper pack. Photos of each stamp set are below. 


I used Pattern #24 from Make It From Your Heart Vol. 4 (card patterns). I wanted to use the same pattern to create a dog card and cat card. 

The images were coloured using the Tri-Blend markers and mounted on Black cardstock. Some Silver Embellishing Thread was placed above each of the sentiments and I added some gems as well. The inside of each card is also decorated but I am not showing that here. I love how the papers are interchangeable - notice the fish on the cat card and the bones on the dog card. That's the same paper with a different pattern on each side, appropriate to either dogs or cats... although I suppose some cats play with bones and dogs would eat fish if given the chance :) 


I hope you enjoyed my cards.

The next consultant on this blog hop is Gina Brandstetter's blog.
I am sure she has a terrific project to share with you! 

Products used are all Close To My Heart

Paper: Best Friends Furever Paper Pack, White Daisy Cardstock, Black Cardstock, Ballerina Cardstock, Carolina Cardstock, White Daisy Cards and Envelopes
Stamps: Eat Play Love, Kitty Cuddles
Inks: Black, Intense Black
Accessories: Silver Embellishing Thread, Silver Glitter Gems, Tri-Blend Markers, Black Journaling Pen

Enjoy,
Alyson


Atlantic Hearts 344 - O Christmas Tree


Welcome to Atlantic Hearts Sketch #344! 


I chose to rotate the sketch 90 degrees and create a vertical card rather than a horizontal one. 
I wanted to make a shaker for the focal point of my card. Christmas trees sounded like the perfect idea - and they fit just right. I masked them as I stamped them in Clover for the outline and 2nd or 3rd generation for the insides. I did the same for the trunks (using Toffee), although those are hidden until the card is shaken. A star sits atop one of the trees. I die cut a few snowflakes and brushed the points with the Clear Shimmer Brush. The shaker filler is a very light "snow" - it is hard to use because it attaches to everything! 


Come and join us at Atlantic Hearts and show us how you interpret the sketch shown above. 
You have until Sunday evening to link up your project. 
We can’t wait to see what you create!

Products used are Close To My Heart unless otherwise indicated: 

Paper: Holly Jolly Paper Pack, White Daisy Cardstock, Clover Cardstock, Candy Apple Cardstock, Neenah Solar White Cardstock 
Stamps: White Pines Cardmaking, Woodland Wishes
Inks: Clover, Lemonade, Glacier, Toffee
Accessories: Woodland Wishes Thin Cuts, Stitched Rectangle Dies (Simon Says Stamp), Stitched Rectangle Thin Cuts, Clear Shimmer Brush, Holly Jolly Dots, Foam Tape, Thin Foam Tape, Acetate (not CTMH), Snow Filler (not CTMH) 

Enjoy,
Alyson


Tuesday, November 19, 2019

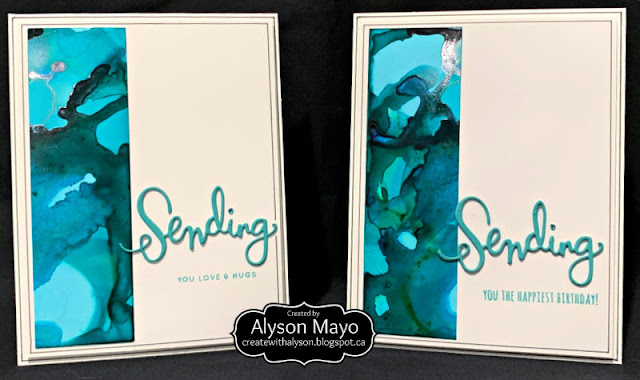
Alcohol Inks - My First Attempt

I have seen so many gorgeous pieces of artwork using alcohol inks... and decided it was time to try it myself. 

There are a lot of factors to consider when using these types of ink - number one: they are permanent so they stain anything and everything that they touch. A working surface is crucial, along with a pair of gloves unless you want stained fingers for several days. Ventilation is also very important as there are fumes from the inks and you are also using a high percentage alcohol at 92%+. 

I also learned that you must work fairly quickly - and the right type of paper is essential. Yupo paper is best but glossy cardstock will work, just not as well. 

So, off I went to discover what I could do. I didn't have a low heat dryer so I was limited to straws to move the ink around as well as adding the alcohol to the inks. 

These are my final results (and I did create a few other cards but they aren't posted here). I know I have a lot of work to do to learn more. There were two other sheets that I did that I 
didn't like at all. 


It's worth taking the time to experiment with this medium - the results can be absolutely stunning. Hopefully mine will get better if I ever figure out the details!

Products used are as follows (CTMH unless otherwise indicated):

Paper: White Daisy Cardstock, Willow Cardstock, Lagoon Cardstock, Neenah Solar White Cardstock, Yupo Paper 
Stamps: Sending and Wishing (SSS)
Inks: Willow, Lagoon, Alcohol Inks: Botanical, Mermaid (Ranger)
Accessories: Alcohol Solution (Ranger), Bitty Sparkles, Sharpie Markers, Black Journaling Pen, Sending Die (SSS), Wishing Die (SSS), Hello Die (Pretty Pink Posh), Friend Die (Pretty Pink Posh), Foam Tape

Enjoy,
Alyson


TSOT 435 - Cozy Christmas

Welcome to Try Stampin' on Tuesday's current challenge! 


This sketch this week is a fun one and the optional twist is to do something that is non-traditional for Christmas. That is my favourite - I LOVE non-traditional colours for Christmas! 

I chose a blue and silver colour combination - one of my favourites. The mitten image and the sentiment were both cut using my Cricut. The light blue background behind the mittens was created by using three sponges and three shades of blue. I purposely didn't push hard or move the sponges around - just pounced them on the white cardstock. I love the sort of mottled look that it provides. I added a stitched border to the top of the mittens and mounted the images on white and then on Sapphire. The mittens and the sentiment were brushed with the Clear Shimmer Brush and that can be seen in the close up photo below. 


Come and join us at TSOT
You have two weeks to link up your project. 
We can’t wait to see what you create! 

Products are Close To My Heart unless otherwise indicated:

Paper: White Daisy Cardstock, Carolina Cardstock, Sapphire Cardstock, Silver Glitter Paper, Neenah Solar White Cardstock
Stamps: none
Inks: Sapphire, Carolina, Bluebird
Accessories: Art Philosophy Cricut Cartridge, Season of Joy Cricut Cartridge, Blue Sharpie Marker (not CTMH), Blue Diamond Ribbon (unknown), Stitched Rectangle Thin Cuts, Clear Shimmer Brush, Blue Enamel and Glitter Gems 

Enjoy,
Alyson

Monday, November 18, 2019

H2H - An Attitude of Gratitude

Welcome to this week's Heart 2 Heart Challenge!


It's all about gratitude this week - everyone has something for which to be thankful. Gratitude really is something that we should practice every single day because we are so very fortunate to live in a part of the world where there isn't war or other life threatening events happening day in and day out. In Canada, we celebrate Remembrance Day on November 11. It is a day to remember our veterans and those whose lives were lost in wars. It is such an important day...

I chose to create a card that isn't autumn related (considering it is autumn) but just a 
"thankful" card.

The trees were stamped (one was masked) using two colours - Evergreen and Green Apple. Some of them were stamped in second generation to give a lighter appearance. This card is from a pattern in the Make It From Your Heart - Vol. 4 book. It came together so easily after the trees were finished. A narrow ribbon and a few gold gems were added... done! 


Come and join us at Heart 2 Heart and show us how you interpret the theme "An Attitude of Gratitude". 
You have until the end of November to link up your project.
We can’t wait to see what you create! 

Products used are Close To My Heart unless otherwise indicated: 

Paper: Mix-In Paper Pack, White Daisy Cardstock, Evergreen Cardstock, Toffee Cardstock, Neenah Solar White Cardstock
Stamps: Always Grateful 
Inks: Toffee, Evergreen, Green Apple
Accessories: White and Gold Skinny Ribbon, Gold Flecked Gems, ShinHan Marker (not CTMH) 

Enjoy,
Alyson

Friday, November 15, 2019

CD 369 - Snowman Squares

Welcome to this week's Colour Dare Challenge!


We have another tic-tac-toe board - this time using the colours from the Holly Jolly paper pack...

I used all the colours except Toffee and Espresso - so the 2 left columns and the middle row. 

The adorable snowman from the Whimsical Holiday stamp set has stolen my heart and I wanted to use that image. I random stamped the white background with 3 snowflakes and then added Silver Stickles to the centre of each snowflake. The Holly Jolly paper pack was used to create the small squares along with 2 colours of cardstock. I don't distress the edges of my paper very often but I did with each of the papers this time as it added definition to them. 
The snowman was stamped, coloured and fussy cut. I also brushed him with the Clear Shimmer Brush and used the Black Shimmer Brush on the buttons. Faux stitching was added between the squares. I love how this turned out!


Come and join us at Colour Dare and show us how you use the tic-tac-toe grid shown above. 
You have two weeks to link up your project. 
We can’t wait to see what you create! 

Products used are all Close To My Heart

Paper: Holly Jolly Paper Pack, White Daisy Cardstock, Smoothie Cardstock, Green Apple Cardstock, Silver Glitter Paper
Stamps: Love with All the Trimmings, Reindeer Bells, Whimsical Holiday 
Inks: Glacier, Clover, Green Apple, Candy Apple, Smoothie, Peach
Accessories: Clear Shimmer Brush, Black Shimmer Brush, Silver Stickles, Thin Foam Tape, ShinHan Markers

Enjoy,
Alyson

Monday, November 11, 2019

AH 342 - Encouragement Card


Welcome to Atlantic Hearts Sketch #342!


Although the sketch is shown in horizontal orientation, I chose to create a card in vertical orientation instead. I used a variety of papers from both Graphic 45 and Bo Bunny to create the strips. The sentiment was stamped in black on Pansy Cardstock and then mounted on Teal Glitter Paper.  I went over the sentiment using the Black Shimmer Brush. A few pieces of twine were added along with some gems. This card came together easily. 


Come and join us at Atlantic Hearts and show us how you interpret the sketch shown above. 
You have until Sunday evening to link up your project. 
We can’t wait to see what you create! 

Products used are Close To My Heart unless otherwise indicated: 

Paper: Peacock papers (Graphic 45), Teal Patterned papers (Bo Bunny), Back Cardstock, Pansy Cardstock, Teal Glitter Paper
Stamps: Rise Strong
Inks: Black
Accessories: Stitched Rectangle Thin Cuts, Black Shimmer Brush, Turquoise Gems (unknown), Turquoise Twine (unknown), Purple Twine (unknown), Nestabilities Circle Dies, Nestabilities Sharp Circle Dies 

Enjoy,
Alyson


Wednesday, November 6, 2019

Silent Night Gatefold Card

I found this type of card on Pinterest - my favourite go-to site - and decided to recreate it using a stamp and die combination that I love. The inside of this card is a little different from a standard gatefold card - as you will see in the photos below. 

The only important measurements are the cutting and scoring of the base piece. After that, you can decorate it however you desire. 

I did this one in a 6"x6" format. The base piece for the card is 6"x12" and it is scored at 5-1/2" and 6-3/4" on one side. Flip the base over and score at 3" and 9" on the other side. That should help with the folding process. Beyond that, it is a personal choice for cutting mats for each piece. I also added mats to the reverse side for the purpose of writing a message. A belly band is easy to create and a 1-1/2" x 12" piece fits around this one as long as a larger piece is attached to the front to hold it together. 

The Cedar and Pine paper collection was perfect for what I wanted to do. Since there are some Toffee shades in that pack, it worked really well with the manger as it is a similar colour. I double matted all the front sections and then created the focal piece. The only important factor is that the centre piece cannot be wider than approx. 5-1/2" or the card will not close. I stamped and die cut the stable and manger, along with the dove. They were coloured as close to the colours in the paper pack as possible. I brushed the dove inside and the one on the front with the Clear Shimmer Brush.


I love how this turned out although I photographed it before I had added any embellishments... it was one of those nights - it was late and I was tired. Embellishments were added afterwards. 

Products used are all Close To My Heart

Paper: Cedar and Pine Paper Pack, White Daisy Cardstock, Candy Apple Cardstock
Stamps: Cedar and Pine Cardmaking Workshop (Holy Night), Hymns of Praise
Inks: Intense Black, Saffron, Evergreen
Accessories: Cedar and Pine Cardmaking (Holy Night) Thin Cuts, Tri-Blend Markers, Clear Shimmer Brush

Enjoy,
Alyson

Tuesday, November 5, 2019

Nov/Dec Catalog New Product Blog Hop


Welcome to the New Product Blog Hop for the November/December catalog! 

There are so many fabulous new products in this catalog including two Christmas paper packs, a bunch of new stamp sets and some other goodies. I am sure you will see a little bit of everything as you progress though this blog hop. 

You should have arrived here from Michelle Loncar's blog
If you get lost a list of all participants can be found on Melinda Everitt's blog

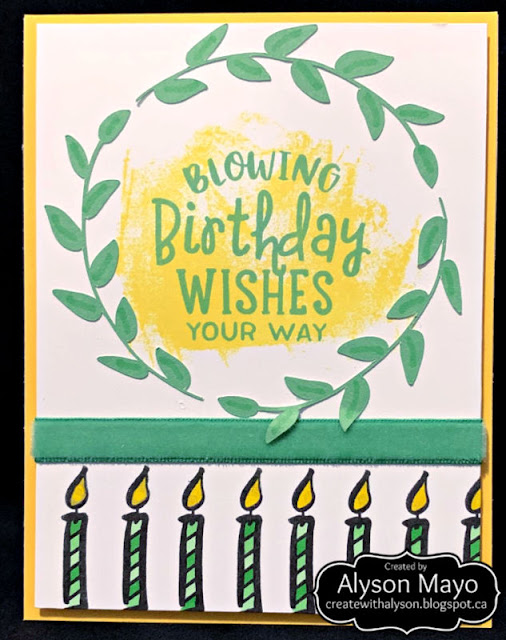
I wanted to do something different for this blog hop. The vast majority of products in the catalog are related to Christmas but I wanted to create at least one project that was not Christmas related. 

This card uses the Birthday Greetings stamp set. There are terrific greetings for birthdays of all ages in this set. I chose one that would also work with candles as a border. I used one of the new SVG images to frame the sentiment - it was ungrouped as it also contains a Christmas sentiment and I only wanted the wreath part. The sentiment was stamped along with a background. The candle bases were coloured using one of the Tri-Blend markers, providing three shades on each candle. The candle tips were brushed with the Clear Shimmer Brush after they were coloured. 


My second card uses the other SVG file - the ornaments. I decided to create this in shades of blue. The Cricut cutting is very detailed, primarily for the hanging pieces. Merry & Bright is a mini stamp from this catalog and I embossed that using Sapphire Pigment Ink and Clear Detail embossing powder. The insides of the chevrons and the open circles without a Bitty Sparkle were brushed with the Clear Shimmer Brush. 


I hope you enjoyed my cards. 

The next blog on this blog hop is Michelle Johns' blog
I am sure she has something awesome to share with you!

Products used are all Close To My Heart 

Paper: White Cards and Envelopes, White Daisy Cardstock, Canary Cardstock, Julep Cardstock, Sapphire Cardstock, Bluebird Cardstock, Carolina Cardstock 
Stamps: Birthday Greetings, Strokes of an Artist, Mini Merry & Bright
Inks: Canary, Julep, Black, Sapphire Pigment Ink 
Accessories: Christmas Memories Digital Art, Ornaments Digital Art, Julep Velvet Ribbon, Tri-Blend Markers, Foam Tape, Stitched Rectangle Thin Cuts, Clear Detail Embossing Powder, Heat Tool, Clear Shimmer Brush, Bitty Sparkles 

Enjoy,
Alyson

TSOT - Masculine Forest Scene

Welcome to Try Stampin' on Tuesday's Challenge #433! 

This week, there is a choice - use the inspiration photo, the sketch or both!


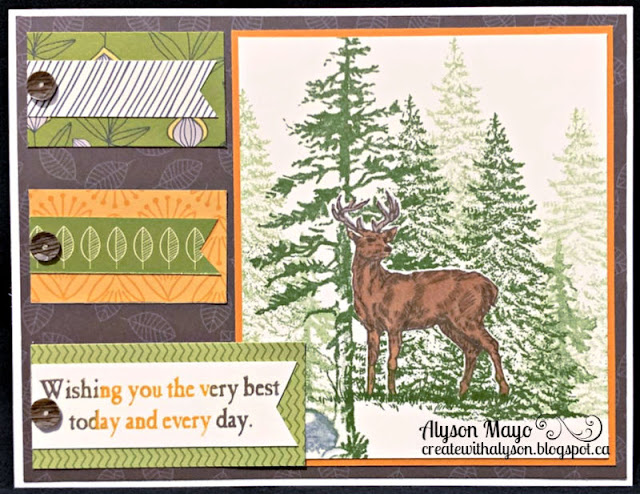
Since I had to create a masculine birthday card, it made sense for me to combine the two elements. 

I created the nature scene with three different stamps and I masked the deer first. The trees come from two stamp sets and a few were stamped in second generation to make the background look more realistic. I coloured the deer as well. The three elements on the side are set up the same although the bottom one had to be extended so the sentiment would fit. I added a few wood patterned sequins to the ends of each small tab. 


Come and join us at TSOT and show us how you interpret the sketch and/or the inspiration photo. 
You have two weeks to link up your project. 
We can’t wait to see what you create! 

Products used are Close To My Heart unless otherwise indicated: 

Paper: Falling for You Paper Pack, White Daisy Cardstock, Goldrush Cardstock, White Cards and Envelopes
Stamps: Nature's Wish, Always Grateful, Beautiful Things 
Inks: Espresso, New England Ivy, Goldrush
Accessories: Tri-Blend Markers, No Worries Sequins

Enjoy,
Alyson

Monday, November 4, 2019

H2H - Spirit of Christmas card

Welcome to this week's Heart 2 Heart challenge! 


It's all about the circle this time... one, two, three or multiples - you just need to use a circle in your project. 

I found a gorgeous card on Pinterest and decided to try the same idea. Unfortunately, I wasn't able to read the watermark to give credit to the original artist...  

I chose a white and silver colour scheme. I love white on white any time but it seemed to fit so well with this card. The pieces were all Cricut cut, including the circle base. However, this card took me a long time to create because I made error after error along the way. I embossed the sentiment on a piece of cardstock that I cut, rather than using the one that was Cricut cut... that meant I had to manually cut the circles from both the white overlay AND the card base. I suppose it would have been easier to just redo the sentiment but I thought it would be faster the other way. I was wrong! 

The holly leaves were cut in white and edged using a silver marker. I added a small die cut along the left side as well. After adding a bow, I then added silver gems where the berries are supposed to go. 

There is a silver foil piece mounted on the inside of the card to provide a backdrop for the open quatrefoil pattern. There is still room under that silver piece to write a message. 


Come and join us at Heart 2 Heart and show us you use circles.
You have until the end of November to link up your project. 
We can’t wait to see what you create! 

Products used are Close To My Heart unless otherwise indicated: 

Paper: White Daisy Cardstock, Silver Foil Paper, Neenah Solar White Cardstock
Stamps: Merry and Bright 
Inks: Versamark
Accessories: Cricut Basic Shapes Cartridge (not CTMH), Cricut Paper Lace Image (not CTMH), Cricut - Teresa Collins Dec.25 (not CTMH), Winterberry Sprig Die (Memory Box), Silver Ribbon (not CTMH), Silver Glitter Gems, Silver Embellishing Thread, Foam Tape, Silver Sharpie Marker (not CTMH)

Enjoy,
Alyson

Friday, November 1, 2019

November SOTM Blog Hop


Welcome to the November Stamp of the Month Blog Hop! 

This is a circular blog hop so you can follow the links from wherever you begin and when you reach the same blog where you started, you will have finished the hop. If you get lost, a list of all participants can be found on Melinda Everitt's blog

You should have arrived here from Michelle Loncar's blog

The November SOTM is one with three large sentiments (suited primarily to scrapbooking) and some smaller images.


I chose to use some of the smaller images and one sentiment that really is part of a larger one (grateful) - "for you" - to create my project. 

Believe it or not, I have enough Christmas cards created at this time so I wanted to do something else. I used some non-Christmas patterned papers from the Cedar and Pine paper pack along with the Mix-In paper pack. The flower is a two-step stamp so I stamped the base using Peach and the lines using Smoothie as it was the best colour match. I brushed the lines with the Gold Shimmer Brush. The Saffron strip at the bottom was stamped with one of the border images. The sentiment was rocked and rolled to use two contrasting colours and then mounted on an oval with some gold embellishing thread placed behind. All the flowers and leaves were fussy cut and then edged with appropriate ink to hide the white lines. 


I hope you enjoyed my card!

The next blog on the hop is Krista Hershberger's blog.
I am sure she has something amazing to share with you! 

Products used are all Close to My Heart

Paper: Cedar and Pine Paper Pack, Mix-In Paper Pack, White Daisy Cardstock, Saffron Cardstock, Evergreen Cardstock
Stamps: Family Time
Inks: Peach, Smoothie, Saffron, Evergreen
Accessories: Gold Embellishing Thread, Gold Glitter Gems, Basic Oval The Cuts, Stitched Oval Thin Cuts, Gold Shimmer Brush, Sponge Daubers

Enjoy,
Alyson

CD 367 - Birthday Shaker

Welcome to Colour Dare Challenge 367!


We have a mixed colour palette this week - very autumn-like colours. I don't tend to send autumn cards but a friend has a birthday coming up shortly so this was a good opportunity to create for that purpose. 

I wanted to use an unusual shaped shaker on my card so I went to my Cricut and did some slicing to get the shape I wanted. I had a birthday sentiment in mind that would fit running up and down instead of across. On the photo, you can’t see the end of the word "birthday" as the sequins are covering it up... 

I used my water brush and ink pads to splatter some ink on the card front. The Every Little Thing - Scrapbooking stamp set has a beautiful large floral image that was perfect for my card. I stamped and coloured it and then fussy cut it out. I also used two of the tiny images to stamp inside the shaker as well. The shaker was embedded into the card and the floral image and ribbon were added on top. A few sequins were placed randomly as well. The lines of the flowers were brushed with the Clear Shimmer Brush. 


Come and join us at Colour Dare and show us how you use the colour palette shown above. 
You have two weeks to link up your project.
We can’t wait to see what you create! 

Products used are Close To My Heart unless otherwise indicated: 

Paper: Documented Paper Pack, White Daisy Cardstock, Goldrush Cardstock, Peacock Cardstock
Stamps: Happy Birthday, Every Little Thing Scrapbooking 
Inks: Intense Black, Goldrush, Peacock
Accessories: Cricut Artiste Cartridge, Teal Ribbon (unknown), Waterbrushes, Teal, Clear, Green and Orange Sequins (misc.), Acetate (Staples), Foam Tape, Clear Shimmer Brush

Enjoy,
Alyson