Sunday, February 28, 2021

Floating Gatefold Card - Flower Girl

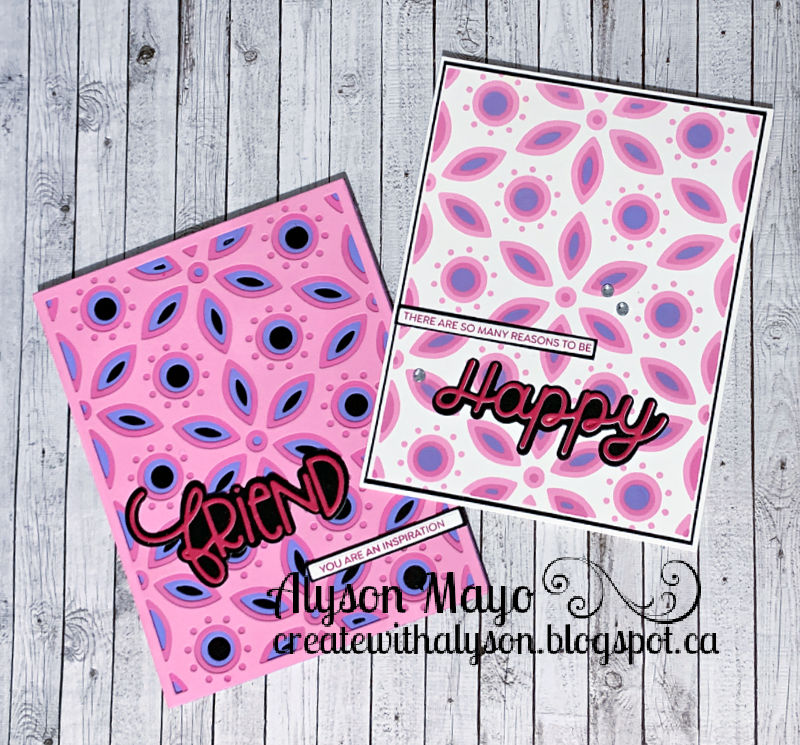
I have created a few cards in this style but I was watching Craft Roulette on Friday evening and the parameters this week fit this type of card perfectly. 

The parameters this week are: 

- fancy fold card (floating gatefold)

- any four colours (I used light pink, a shade of purple plus turquoise and teal)

- floral cluster (lots!)

- dry embossing (woodgrain folder) 

I embossed the front Lagoon panels using a woodgrain embossing folder. The border images were stamped and coloured on every panel. The complete image was used for the front of the card and just the top part with the flowers was used to stamp the inside squares. I stamped two of the sentiments from the stamp set and coloured parts of them in as well. The larger flowers were brushed with the Clear Shimmer Brush and I coloured some sparkles and added them to the flowers on the front. 


Products used are Close To My Heart unless otherwise indicated: 

Paper; White Daisy Cardstock, Black Cardstock, Lagoon Cardstock 

Stamps: For My Beautiful Friend

Inks: Intense Black, Archival Black 

Accessories: Woodgrain Embossing Folder, Tri-Blend Markers, Touch Markers (not CTMH), Clear Sparkles, Bitty Sparkles, Clear Shimmer Brush, Hook and Loop Dots 

Enjoy,

Alyson

Saturday, February 27, 2021

Layered Floral Background Dies - Part 2

A few days ago, I posted a bunch of cards created with the Layered Floral Background Thin Cuts. These thin cuts are a set of three dies that are the size of a standard card front and are designed to be layered on top of each other to create a really neat effect. 

They can also be used as stencils if pieces are cut in white and then inked. Here are some cards created using various colours and effects. The layers of each card will be identified above the card(s). 

Here I used 3 Distress Oxide (DO) inks in shades of blue for the card on the right. The base of that card is silver foil. The inked layers resulted in the background for the card on the left which was backed with Bluebird cardstock and silver foil. 

These 2 cards were created the same way as the set above using pink and purple shades of DO inks. The base of the left card is black cardstock and the right is layered with a white base and black cardstock.


I used only the top layer to ink the card on the left (using pink and blue shades) which resulted in the background for the card on the right. The left card has a Lagoon cardstock base followed by white pearl paper, Teal glitter paper and the inked top piece. The card on the right was mounted on Pixie cardstock and then Lagoon cardstock. 


This set was done the same way as the pair above - the layers on the left card are Peacock cardstock, Raspberry cardstock and then the inked layer. The right card has a Raspberry cardstock base followed by silver glitter paper, Majestic holographic paper and the inked front. 

Some time ago, I posted this combination - I used DO inks in yellow and orange shades to create the front. The left card base is Twinkle Toes holographic paper, black cardstock, gold glitter paper and the inked front. The right card is mounted on black cardstock and then gold foil. 


These two gnome cards were created using shades of green DO inks. Each was mounted on Evergreen cardstock followed by Clover cardstock.


Please feel free to contact me if you have any questions. 

I am not listing all the other supplies used as the list would go on forever. 

Enjoy,

Alyson


Friday, February 26, 2021

CD 433 - Peony Slimline

Welcome to Colour Dare Challenge #433! 

It's a tic-tac-toe board this week - made up of random colours so they aren't associated with a particular paper collection. 

My tic tac toe is Lilac, Flamingo and Glacier but I also used Lemonade and Grape. 

I decided on a slimline card using the Diagonal Striped Slimline Thin Cut. I backed that with Lilac cardstock and the filler is created from some die cut hearts, iridescent flower confetti and lilac sequins. The flowers were stamped, embossed and then coloured. I fussy cut them and added a small banner on the right side with the sentiment. A few of the die cut hearts were added to that piece as well. The word "hugs" was brushed with the Clear Shimmer Brush.  

Come and join us at Colour Dare and show us how you use the grid shown above. 

You have two weeks to link up your project. 

We can’t wait to see what you create! 

Products used are Close To My Heart unless otherwise indicated: 

Paper: White Daisy Cardstock, Lemonade Cardstock, Lilac Cardstock, Glacier Cardstock, Grape Cardstock, Flamingo Cardstock

Stamps: Peony Cluster (Sweet and Sassy Stamps) 

Inks: Black Pigment Ink

Accessories: Heart Shaker Window Thin Cut, Diagonal Stripe Slimline Thin Cut, Hugs Die (Calligraphy Pop), Iridescent Flower Confetti, Lilac Sequins (not CMTH), Tri-Blend Markers, ShinHan Markers (not CTMH), Sharpie Marker (not CTMH), Clear Detail Embossing Powder, Heat Tool, Foam Tape, Acetate (not CTMH)

Enjoy,

Alyson

Thursday, February 25, 2021

Layered Floral Background Dies - SO MANY Possibilities!

I recently pulled out the Layered Floral Background Thin Cuts - they are a set of three dies that are the size of a standard card front. They are designed to be layered on top of each other to create a very cool effect. They are still available for sale on my CTMH website. 

The ways that these dies can be used is truly astonishing! I am writing two posts as I have so many cards completed that there are too many for a single post. 

I used only papers for several of them - no inking the background - including glitter paper, holographic paper, pearl paper, patterned paper, foil paper and coloured cardstock. The results are all so different. In a subsequent post, I will show the cards created specifically using Distress Oxide inks when some layers were used as stencils. Some of these card fronts were also inked using the Distress Oxide inks although that wasn't the focus. 

So - let's take a look! Paper used will be identified from the bottom layer to the top in order. 

On this card, I used patterned paper (from the Aurora paper pack), Willow cardstock, Gold Foil and the top is inked in green shades with DO inks. 

For this one, I used another patterned paper from the Aurora paper pack as the base, Sapphire glitter paper, Dreamy holographic paper and the top layer is Blue Belle glitter paper. 


The left card has Lilac cardstock as the base followed by Grape cardstock, Purple glitter paper and white pearl paper on the top. 
The right card has Mint cardstock as the base, Teal glitter paper, Lagoon cardstock and a DO inked front. 


This one uses Black glitter paper for the base, Sea Glass cardstock, Sea Glass glitter paper and white pearl paper for the top. 

This pair work together - the circle was cut from the left card and used on the right card. The base is Desert Rose cardstock followed by Silver foil, Majestic holographic paper and white pearl paper on top.

Considering the number of cards presented here, I am not listing all my supplies. 

Please contact me if you have any questions. 

Enjoy,

Alyson

Wednesday, February 24, 2021

Graduation Book Card

A friend asked me to create a card for her granddaughter's graduation from university. We discussed various options and she really liked the Every Little Thing paper pack so the card was built around those patterns and colours. 

The base is Evergreen cardstock and I used Wisteria, Julep and White as the other colours. I needed more room than a standard card as she really wanted the "You Are... sentiment plus the parts of that to go with it. The card opens like a book and there is a place to write a message on the back. Some of the images were outlined or coloured with the Black and Clear Shimmer Brushes and I also created a coordinating envelope to hold the card. This was fun to create - involved a fair amount of carefully positioned stamping and colouring. 


Products used are Close To My Heart unless otherwise indicated: 

Paper: Every Little Thing Paper Pack with Stickers, Mix-In Paper Pack, White Daisy Cardstock, Julep Cardstock, Evergreen Cardstock, Julep Glitter Paper

Stamps: Every Little Thing Scrapbooking, Butterflies for You, Always Loved, You Did It

Inks: Intense Black, Archival Black, Wisteria, Julep 

Accessories: Butterflies for You Thin Cuts, Tri-Blend Markers, Black Shimmer Brush, Clear Shimmer Brush, Wisteria Ribbon, Julep Glitter Gems, Thin Foam Tape, Green Sharpie Marker (not CTMH)

Enjoy,

Alyson

Tuesday, February 23, 2021

TSOT 495 - Glitter Gel Friendship

Welcome to Try Stampin' on Tuesday Challenge 495!

The optional theme (in addition to the sketch) is sympathy. I used only the sketch this time. 

The lower background was created using two distress oxide inks and a stencil that I cut from my Cricut. Before removing the stencil, I brushed on Moon Dust Glitter Gel and then left it to dry. I die cut the hearts and the word "friend" and adhered them to a stitched rectangle piece. I added a few flower sequins and coloured a bitty sparkle to go in the centre of each. Once the glitter piece was placed on the card, a white gathered ribbon was added across the centre.

Come and join us at TSOT and show us how you interpret the sketch shown above. 
You have two weeks to link up your project.

We can't wait to see what you create! 

Products used are Close To My Heart unless otherwise indicated: 

Paper: Bright Stack Paper Collection, White Daisy Cardstock, Ballerina Cardstock, Pixie Cardstock, Raspberry Cardstock, Green Apple Cardstock, Neenah Solar White Cardstock 

Inks: Green Apple, Spun Sugar DO Ink (not CTMH), Picked Raspberry DO Ink

Stamps: Friend (Photoplay) 

Accessories: Artbooking Cricut Cartridge, Friend Dies (Photoplay), Stitched Rectangle Thin Cuts, Stitched Hearts Thin Cuts, Basic Hearts Thin Cuts, Stencil Paper, White Ribbon (not CMTH), Moon Dust Stickles Glitter Gel, Springtime Flower Sequins, Bitty Sparkles, Tri-Blend Marker 

Enjoy,

Alyson

Sunday, February 21, 2021

More Alcohol Marker Cards

I am loving my markers for this technique! Every background that is created is different...

These two cards were created using Spectrum Noir Tri-Blend markers - the darkest shades. I love the difference in the backgrounds. I embossed some floral images on one background and left the other as it was. The sentiments were die cut from black cardstock and adhered to the front of the acetate. 

Products used are Close To My Heart unless otherwise indicated: 

Paper: Black Cardstock, Vellum, Acetate (not CTMH), Neenah Solar White Cardstock

Stamps: Every Bit of Wonderful 

Inks: Versamark 

Accessories: Stitched Rectangle Thin Cuts, For Someone Special Die and Hello Sunshine Die (Creative Expressions), White Embossing Powder, Heat Tool, Foam Tape, Tri-Blend Markers, Rubbing Alcohol (not CTMH), Silver Loose Sequins, Julep Loose Sequins, Pink Sequins (not CTMH) 

Enjoy,

Alyson

Thursday, February 18, 2021

Alcohol Pen Cards

I have been experimenting with markers with an alcohol base which include Spectrum Noir, Copics, ShinHan Touch and Sharpies. They can be used to create beautiful backgrounds on certain mediums. Here are some of the cards I have created with those backgrounds. 

Two of these are full size shakers. The sentiment has been placed on top of the acetate. Before adding the shaker components, floral stamps were used to stamp images on the background pieces and they were embossed in white. The silver sentiment was die cut and embossed 3x with Silver Embossing Powder. The black sentiment was cut from Black Ore paper which has a shine to it, although that can’t be seen in the photo. 


The last card is not a shaker but some images were stamped, coloured and die cut and added on top of the background. The sentiment was stamped using Charcoal ink on a Pewter background and added on each side of the flowers. Some silver sequins with a bitty sparkle in the center were also added to this card. 

Products used are Close To My Heart unless otherwise indicated: 

Paper: White Daisy Cardstock, Black Cardstock, Bluebird Cardstock, Pewter Cardstock, Lilac Cardstock, Silver Glitter Paper, Acetate (not CTMH), Vellum, Black Ore Paper, Neenah Solar White Cardstock 

Stamps: Every Bit of Wonderful, Sweet Bouquet, Happiness Lives Here Cardsmaking, Word Up (Reverse Confetti)

Inks: Versamark, Bluebird, Intense Black, Charcoal 

Accessories: Stitched Rectangle Thin Cuts, Hello Thin Cut, Sweet Bouquet Thin Cuts, For Someone Special (Creative Expressions), Silver Embossing Powder, White Detail Embossing Powder, Heat Tool, Misc. Sequins (not CMTH), Silver Loose Sequins, Foam Tape, Tri-Blend Markers, Touch Markers (not CTMH), Copic Markers (not CTMH), Silver Embellishing Thread,  Bitty Sparkles, Purple Shimmer Trim

Enjoy,

Alyson


Wednesday, February 17, 2021

AH 408 - Friendship Card with Alcohol Inks

Welcome to Atlantic Hearts Sketch Challenge 408! 

The sketch is shown in horizontal format but I chose to rotate it 90 degrees and create a vertical card instead. 

I have always posted my projects for Atlantic Hearts on Monday but with some changes made in other design team posting dates, I am looking at 3-4 posts happening on some Mondays now. Consequently, I am moving my Atlantic Hearts posts to early Wednesday morning to avoid so much happening on the same date. Design team artwork isn't posted on the Atlantic Hearts site until Wednesday anyways so that works out ok. 

A while ago, I created a bunch of backgrounds using various alcohol inks and one of those pieces is used on this card. I paired purple with green and added some gold accents. 

The sentiment is in two parts - the second part is on the inside and that reads, "Friendship is about who came and never left your side." It's such a beautiful sentiment! 

The circles were die cut and I added some gold ribbon behind the first circle and then mounted that on foam tape. A few gold gems were added around the circle. 

Come and join us at Atlantic Hearts and show us how you interpret the sketch shown above. 

You have until Sunday evening to link up your project. 

We can’t wait to see what you create! 

Products used are Close To My Heart unless otherwise indicated: 

Paper: Brights Stack, White Daisy Cardstock, Green Apple Cardstock, Yupo Paper (not CTMH), Neenah Solar White Cardstock

Stamps: Thank You Friend (Gina K. Designs) 

Inks: Evergreen, Various Alcohol Inks (Ranger)

Accessories: Basic Circle Thin Cuts, Stitched Circle Thin Cuts, Gold Ribbon, Gold Glitter Gems, Thin Foam Tape 

Enjoy,

Alyson

Monday, February 15, 2021

February Technique Blog Hop

Welcome to the February Technique Blog Hop! 

This month, we are featuring the concept of "faux". Faux can be anything that imitates the original. I chose to use faux stitching for my project. 

You should have arrived here from Lauren Moore's blog

I started with a lattice background die that has faux stitching in diagonal lines. I backed that with Bluebird Cardstock. The flowers were stamped with Sapphire Pigment Ink and embossed. Those were coloured and fussy cut and the flower centres were brushed with the Clear Shimmer Brush. The sentiment was stamped and I used a dark blue marker to draw faux stitching lines along the edge. I added some Diamond Stickles to the tiny holes in the die and this card was finished! 


I hope you enjoyed my card! 

The next stop on this blog hop is Michelle Johns

I'm sure she has something terrific to share with you! 

Products used are Close To My Heart unless otherwise indicated: 

Paper: White Daisy Cardsock, Lilac Cardstock, Bluebird Cardstock, Sapphire Cardstock 

Stamps: Every Bit of Wonderful, Sending Well Wishes 

Inks: Sapphire, Sapphire Pigment Ink 

Accessories: Stitched Lattice Background Thin Cut, Clear Detail Embossing Powder, Heat Tool, Tri-Blend Markers, Clear Shimmer Brush, Blue Sharpie Marker (not CTMH), Diamond Stickles 

Enjoy,

Alyson

Double Trouble 77 - Happy!

Welcome to Double Trouble Challenge 77!

It's all about layers, lace and pearls this week. The graphic is below - please visit the Double Trouble website for more information. 

Layers... I rarely create projects with just one or two layers so this wasn't difficult. I layered two stitched rectangles and two stitched circles on top of each other and then added some pearls to the centres of the flowers and around the card. There is also the woodgrain background which is on top of a card base. The section with the most layers adds up to seven (the sentiment doesn't lay over the rectangles so I didn't count that). 

I stamped the floral image, coloured and die cut it. Stitched circles and stitched rectangles were my dies of choice for this card. I used a fairly long sentiment and arranged it on my block so it would be stamped along the edge of the circle. The word Happy was die cut and adhered just to the bottom right of the circles. I added some embellishing thread and coloured a few pearls gold for the centres of the flowers, The other pearls were left white. The word Happy was brushed with the Clear Shimmer Brush. 


I am also linking up my project with The Crafter's Cafe challenge. 

Come and join us at Double Trouble and show us how you interpret this challenge. 

You have two weeks to link up your project. 

We can’t wait to see what you create! 

Products used are Close To My Heart unless otherwise indicated: 

Paper: In Good Taste (SU), French Vanilla Cardstock, Carolina Cardsock, Bluebird Cardstock, Paprika Cardstock, Neenah Solar White Cardstock 

Stamps: Spruced Up Cardmaking Workshop, Happy (Photoplay) 

Inks: Intense Black, Bluebird, Toffee

Accessories: Happy Die (Photoplay), Stitched Circles (GMD), Stitched Rectangles (GMD), Tri-Blend Markers, Gold Embellishing Thread, White Pearls, Gold Sharpie Marker (not CTMH), Clear Shimmer Brush 

Enjoy,

Alyson

Heart 2 Heart - Slimline Birthday

Welcome to this week's Heart 2 Heart challenge! 

The theme this week is to use a border. You can stamp, die cut or even draw a border - there are lots of ways to do this. 

I created a slimline birthday card and used a stamped and die cut border at the bottom. The balloons and the sentiment pieces were also stamped and die cut. The top piece was die cut using a stitched slimline die and then I embossed it. I added a few glitter gems, some embellishing thread and the images were coloured using markers and three different shimmer brushes.


Come and join us at Heart 2 Heart and show us your project with borders.

You have until the end of February to link up your project. 

We can't wait to see what you create! 

Products used are Close To My Heart unless otherwise indicated: 

Paper: White Daisy Cardstock, Ballerina Cardstock, Mint Cardstock, Desert Rose Glitter Paper, Slimline Cards and Envelopes 

Stamps: Birthday Borders, On Your Birthday, Wishing You Everything 

Inks: Intense Black, Desert Rose 

Accessories: Birthday Borders Thin Cuts, Wishing You Everything Thin Cuts, Stitched Scalloped Brackets Thin Cuts, Stitched Slimline Dies (Pink and Main), Dot Embossing Folder, Tri-Blend Markers, Gold Glitter Gems, Gold Embellishing Thread, Thin Foam Tape, Clear Shimmer Brush, Mint Shimmer Brush, Desert Rose Shimmer Brush 

Enjoy,

Alyson


Saturday, February 13, 2021

Craft Roulette - Leaf Shaker

I like to play song with the Craft Roulette challenge each weekend - here is the info for the current challenge which is open until Sunday evening. 

This week, the challenge parameters at Craft Roulette are as follows: 

- circle(s)

- orange plus two other colours 

- plant(s)

- stencil 

It looks like a lot but it really isn't that difficult... aside from the fact that orange is not my first choice of go-to colours! 

Orange works very well with blue so I decided to use turquoise and add silver as my third colour. 

The background was inked using two blue shades of Distress Oxide inks. I then placed a Cricut cut stencil on top and covered that with Black Soot Distress Oxide ink. While the stencil was still on the paper, I spread Moon Dust Glitter Gel on top. Although that product is clear, it takes on the colour of the ink so here, it turned a silver colour. That piece was then set aside to dry.

In the meantime, I stamped two leaves and coloured them in a two-tone colour scheme. They were die cut and the shaker was also assembled. The inside of the shaker is a piece of silver foil paper and the sequins are all orange, turquoise and silver. I stamped a small sentiment as well. 

Once the background piece was dry, I adhered some adhesive foam to the back and die cut it. The shaker was then embedded in the card front. I added the other elements, tied a bow at the top of the leaves, brushed the leaf centres with the Clear Shimmer Brush and added a few enamel gems. 


Products used are Close To My Heart unless otherwise indicated: 

Paper: White Daisy Cardstock, Lagoon Cardstock, Nectarine Cardstock, Silver Foil Paper, Neenah Solar White Cardstock 

Stamps: Blossoming Friendship, Wordfetti

Inks: Intense Black, Lagoon, DO Inks - Black Soot, Peacock Feathers, Tumbled Glass

Accessories: Artbooking Cricut Cartridge, Stencil Sheets, Blossoming Friendship Thin Cuts, Shaker Circle Thin Cuts, Craft Foam (not CTMH), Moon Dust Glitter Gel, Silver Confetti, Turquoise Sequins (not CTMH), Orange Sequins (not CTMH), Teal Twine (not CTMH), Clear Shimmer Brush, Tri-Blend Markers, Orange Enamel Gems 

Enjoy,

Alyson

Friday, February 12, 2021

Colour Dare 431 - Inks and Pinks!

Welcome to Colour Dare Challenge 431! 

This week, it's all about pink (plus one other colour). Neutrals, Metallics, Black and White are free to use on your project. 

I began by using two Distress Oxide inks to create an ombre background. That was then die cut using the Stitched Lattice Background thin cut. My second colour is Clover so I backed the background die cut with Clover cardstock. A flower was stamped, coloured and fussy cut, along with a few leaves. The sentiment was stamped in Clover and that piece along with a Clover background were both die cut. I added some Silver Embellishing Thread behind the flower and stamped a little heart on the sentiment piece. The lines of the flower were brushed with the Clear Shimmer Brush and a tiny sparkle was added to each of the small circles. 


Come and join us at Colour Dare and show us how you use pinks! 

You have two weeks to link up your project. 

We can’t wait to see what you create!

Products used are Close To My Heart unless otherwise indicated: 

Paper: White Daisy Cardstock, Clover Cardstock, Neenah Solar White Cardstock 

Stamps: Be Gentle, Poppy, Doodled Borders, Shower Flowers

Inks: Clover, Raspberry, Intense Black, Picked Raspberry DO Ink, Tattered Rose DO Ink

Accessories: Stitched Lattice Background Thin Cut, Stitched Fancy Brackets Thin Cuts, Bitty Sparkles, Silver Embellishing Thread, Clear Shimmer Brush, Tri-Blend Markers 

Enjoy,

Alyson

Wednesday, February 10, 2021

Expanding Butterfly Card

This is the most awesome card! The front provides a glimpse of what is inside... and then there is such a pretty surprise when the card is opened. I found directions for this card here

The butterflies were stamped, coloured (yes - every single one of them!) and die cut. They were attached at the top corner to allow them to appear like they are floating inside. I stamped and die cut a few extras for the front of the card. I also stamped some flowers and leaves and coloured them in the same colour scheme. The "miss you" sentiment was stamped in both Lagoon and Peacock ink to create an ombre effect. I coloured some white flower sequins and added a Bitty Sparkle to the centre of each. 

The large letters inside were die cut using large letter dies so the coloured cardstock would show through the cut area. 


I love how this turned out! I did try and do it using hearts but I learned that the image to be used inside really needs to be at least 2.5 inches across or wider. The hearts that I tried to use were approx 1.5 inches wide and they didn't work for me at all. 

Products used are all Close To My Heart: 

Paper: White Daisy Cardstock, Lagoon Cardstock, Peacock Cardstock

Stamps: Every Little Thing Cardmaking Kit (Butterflies for You), For My Beautiful Friend

Inks: Intense Black, Lagoon, Peacock

Accessories: Block Alphabet Thin Cuts, Every Little Thing Cardmaking Kit Thin Cuts, Tri-Blend Markers, Flower Sequins, Bitty Pearls, Black Journalling Pen

Enjoy,

Alyson

Tuesday, February 9, 2021

TSOT 493 - Hello from the Animals

Welcome to Try Stampin' on Tuesday Challenge 493! 

The optional theme in addition to the sketch is peek-a-boo. 

I really wanted to do something with the peek-a-boo idea - and finally decided to create my own card front in Cricut Design Space. I rotated the sketch 180 degrees so the sentiment was on the right side. That circle piece was inked using three Distress Oxide inks and then I splattered some water on top to give it a little bot more interest.

The animal images were stamped and coloured on two separate pieces of white cardstock. One of those pieces was mounted on the black card base and the second open circle piece was placed on top with foam tape around the edges. The second stamped piece slides out from the side and I attached a piece of ribbon there as well for a pull tab. 


Come and join us at TSOT and show us how you interpret the sketch. 

You have two weeks to link up your project.

We can’t wait to see what you create! 

Products used are Close To My Heart unless otherwise indicated: 

Paper: White Daisy Cardstock, Black Cardstock

Stamps: Little Buddies

Inks: Intense Black, Lagoon, Chipped Sapphire Distress Oxide Ink, Mowed Lawn Distress Oxide Ink, Peacock Fathers Distress Oxide Ink

Accessories: Cricut Basic Shapes, Tri-Blend Markers, Lagoon Ribbon, Foam Tape, 1" Circle Punch (not CTMH), Black Journaling Pen

Enjoy,

Alyson

Friday, February 5, 2021

Blossom Blog Hop

Welcome to the Blossom Blog Hop!

This blog hop focuses on the products from the Blossom collection - there is a paper pack, two stamp sets (one with thin cuts) and some coordinating cardstock available.  

You should have arrived here from Brenda Lapp's blog. If you get lost along the way, a list of all participants can be found on Melinda Everitt's blog

I have two projects to share - the first is a card and the second is a layout. 

This card is very easy to create - it folds over itself and opens up to a 12" length. I used the Shower Flowers stamp set to stamp and fussy cut the flowers and greenery for the front. A sentiment was stamped and added to the front and the back panel was also stamped as part of it is visible when the card is closed. I added a few Stickles dots around the sentiment area and some Silver Glitter Gems that were coloured to match the front. 


This layout is a very different style for me... I rarely use water colours but I pulled those out and created a background using the same colours as in the Blossom paper pack. I simply painted strips of colour along the centre of the cardstock and then splattered some paint around the rest of the layout. That piece was trimmed and placed on an angle on a piece of Lagoon cardstock. I surrounded the photo of my dog with a Lagoon frame and added some of the zip strips along the bottom. I typed the journaling and printed it on one of the Blossom papers. The title was stamped in a Cricut cut banner. The little hearts were stamped - some on patterned paper and some on white cardsock so they could be coloured. They were spread around the layout and some tiny hearts were also stamped. Finally, I added some sparkles that were also coloured. A black journaling pen was used to draw a border around the layout. 

I hope you enjoyed my projects. 

The next visit on this hop is Lauren Moore's blog. I am sure she has something terrific to share with you! 

Products used are all Close To My Heart: 

Paper: Blossom Paper Pack, White Daisy Cardstock, Lagoon Cardstock, Nectarine Cardstock 

Stamps: Shower Flowers, Happiness Lives Here, Jennifer's Hand, Wishing You Everything 

Inks: Lagoon, Nectarine, Smoothie, Glacier, Green Apple, Intense Black 

Accessories: Artbooking Cartridge, Artistry Cartridge, Wishing You Everything Thin Cuts, Stitched Fancy Brackets Thin Cuts, Watercolour Paints, Glacier Twine, Silver Glitter Gems, Sparkles, Bitty Sparkles, Tri-Blend Markers, White Shimmer Trim, Mint Stickles, Black Journaling Pen

Enjoy,

Alyson

Thursday, February 4, 2021

Standing Wreath Card

What better way to wish someone a happy birthday than with a standing wreath card? 

This one stands up to display a beautiful wreath with a sentiment that appears to be floating in the centre. 

I began with a piece of white cardstock and cut the circles needed to create this wreath. I stamped and coloured lots and lots of images -and then had to go back and stamp MORE images as I didn't have enough to completely cover the front of the wreath. The base is 6" and in hindsight, I should have watched more carefully as I added pieces to the top of the circle as my card is now larger than 6" from top to bottom. Consequently, I will need to mail it in a larger envelope... 

I added shimmer to some of the flowers and the butterflies and I also used gold Stickles for some of the flower centres. Close-ups of a few sections are shown after the main image. 


Products used are Close To My Heart unless otherwise indicated: 

Paper: White Daisy Cardstock, Black Cardstock

Stamps: Sweet Bouquet, Wishing You Everything, Florals and Flutters, Birthday Sparkles 

Inks: Intense Black

Accessories: Basic Circle Thin Cuts, Stitched Circle Thin Cuts, Sweet Bouquet Thin Cuts, Wishing You Everything Thin Cuts, Florals and Flutters Thin Cuts, Tri-Blend Markers, Touch Markers (not CMTH), Acetate (not CTMH), Coluzzle Templates (not CTMH), Circle Dies (Nestabilities), Clear Shimmer Brush, Goldenrod Stickles 

Enjoy,

Alyson