Wednesday, June 30, 2021

Roses Fun Fold Card - Second Version

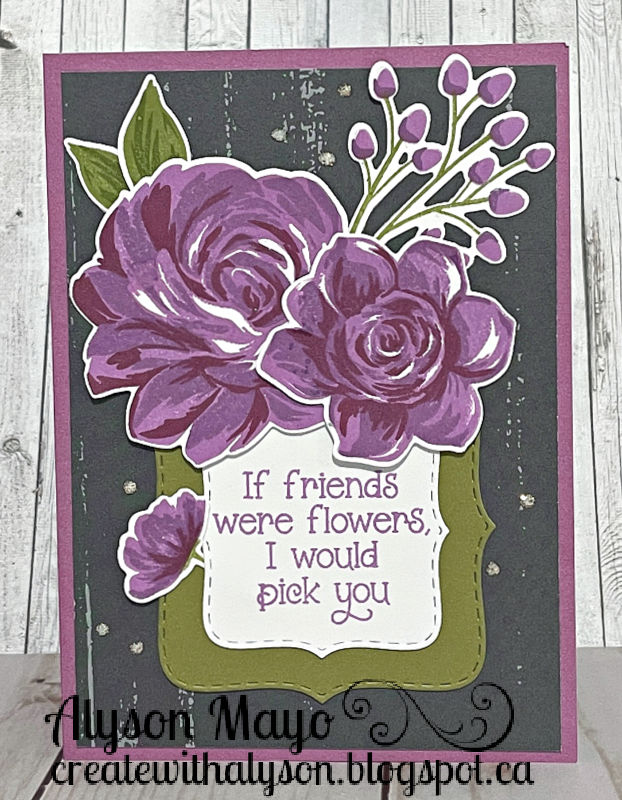
A while ago, I posted this same card design with the same elements but in a blue colour scheme. This one was created in a considerably darker colour scheme using greys and purples. 

The roses and leaves were stamped (multi-step stamping) and die cut. I used coordinating green cardstock for the front bracket. The sentiments were stamped and adhered with the roses accenting those sections. I added some Diamond Stickles around the card and brushed the darkest sections of the flowers with the Clear Shimmer Brush. There is a place on the back panel to write a short message. 


Products used are Close To My Heart unless otherwise indicated: 

Paper: Mix-In Paper Pack, White Daisy Cardstock, Thistle Cardstock, Fern Cardstock

Stamps: Rose Labels (The Ton Stamps), SCT Delivered (Photoplay), Strokes of an Artist

Inks: Thistle, Pansy, Eggplant, Mink, Fern, New England Ivy 

Accessories: Rose Labels Dies, Stitched Bracket Thin Cuts, Stitched Fancy Brackets Thin Cuts, Diamond Stickers, Clear Shimmer Brush 

Enjoy,

Alyson


Tuesday, June 29, 2021

TSOT 513 - Happiness Blooms

Welcome to Try Stampin' on Tuesday Challenge 513!

The sketch is below - the optional theme (in addition to the sketch) is gardening. 

I used the sketch in the same orientation but I placed the circle over the rectangular piece as it worked better for my card. I used the Hillside Cottage paper collection and a Nestabilities circle die for the background. I adhered all the patterned paper to Blue Belle cardstock as it helped to create more defined lines. The flower pot was stamped in black and then the flowers and leaves were stamped in coordinating colours to the papers. The sentiment was adhered to a strip of Blue Bell cardstock and adhered with thin foam tape, as was the watering can. I added some gold embellishing thread behind the flowers and placed a few Blue Belle glitter gems around the card. 

Come and join us at TSOT and show us how you interpret the sketch shown above. 

You have two weeks to link up your project. 

We can’t wait to see what you create! 

Products used are Close To My Heart unless otherwise indicated: 

Paper: Hillside Cottage Paper Pack, White Daisy Cardstock, Blue Belle Cardstock, Canary Cardstock 

Stamps:Where Happiness Blooms

Inks: Archival Black, New England Ivy, Canary

Accessories: Where Happiness Bloom Thin Cuts, Florals and Flutters Thin Cuts, Nestabilites Scalloped Circle Die Cut, Blue Belle Glitter Gems, Gold Embellishing Thread, Clear Shimmer Brush, Thin Foam Tape 

Enjoy,

Alyson

Monday, June 28, 2021

Marker Background Heart Cards

A while ago, I posted several cards that had backgrounds created using alcohol markers and rubbing alcohol on vellum. It is an easy technique and the results look like true alcohol inks. Another thing that is awesome is even though the background is vellum, adhesive doesn't show though so it is easy to adhere to any part of a project.

These two cards come from one die cut of the inked vellum and two others - one each from Willow and Pansy cardstock. I needed all the little hearts to fill in the spaces! 

The first card is the vellum background with the other two colours inserted in the heart openings. I die cut a sentiment with a lighter pink background and added a few purple glitter gems. 

The second card has a green base and the hearts are filled in with purple and vellum hearts. I chose a different sentiment this time and added a few purple glitter gems around the card. 

Products used are Close To My Heart unless otherwise indicated:

Paper: White Daisy Cardstock, Willow Cardstock, Pansy Cardstock, Light Pink Cardstock (misc.), Vellum, White Cards and Envelopes 

Stamps: Smile (Photoplay), Blessings (Photoplay)

Inks: Pansy

Accessories: Hearts Background Thin Cut, Smile Die (Photoplay), Blessings Die (Photoplay), Tri-Blend Markers, Rubbing Alcohol (misc.), Purple Glitter Gems

Enjoy,

Alyson

Sunday, June 27, 2021

Rainbow Hugs

Stencils and Distress Oxide inks... what a great combination! 

This stencil is a very detailed one and it was difficult to keep in place. I believe I will need to invest in a product that is designed to adhere a detailed stencil in place during the inking process... I used a variety of Distress Oxide inks to create a rainbow effect. The front was adhered to three pieces of cardstock, then to black cardstock and finally to the card base. The sentiment was die cut and stacked as well. The last step was to stamp, colour and fussy cut the flower. I added some gold shimmer to the flower along with some gold embellishing thread. Gold Stickles were added around the card. 


Products used are Close To My Heart unless otherwise indicated: 

Paper: Black Cardstock, Neenah Solar White Cardstock

Stamps: Every Bit of Wonderful 

Inks: Intense Black, DO Inks - Candied Apple, Spiced Marmalade, Mustard Seed, Twisted Citron, Mowed Lawn, Peacock Feathers, Blueprint Sketch, Wilted Violet

Accessories: Phrase Builder: Sending (Pink Fresh Studios), Flora Stencil (SSS), Tri-Blend Markers, Gold Shimmer Brush, Goldenrod Stickles, Gold Embellishing Thread, Foam Tape 

Enjoy,

Alyson

Saturday, June 26, 2021

Olive Branches and Diamond Grid Designs

This is the last of the background cards... I didn't post a few others I created as they are similar to previous cards. 

These two cards each have a die cut front on them and the backgrounds were created using markers on vellum with rubbing alcohol. 

The vellum background here was adhered to the card base and the olive branches thin cut was die cut from Evergreen cardstock and placed over top. The center section of this die is hard to work with if you want a different colour - and I did. I went to my Cricut and using basic shapes, I welded together a shape that fit inside the oval section. I stamped and embossed a sentiment with Lagoon pigment ink but the photo doesn't show the colour well. A few turquoise gems were added around the sentiment.

The second card has a diamond grid that was die cut from silver glitter paper. I used the same blues and greens to create the two part sentiment and used silver foil for the inside hello. In hindsight, it probably would have been better to use either silver glitter paper or a brighter colour for that piece. 

Products used are Close To My Heart unless otherwise indicated: 

Paper: Evergreen Cardstock, Pixie Cardstock, Bluebird Cardstock, Green Apple Cardstock, Silver Foil, Silver Glitter Paper, Vellum

Stamps; You Brighten My Day, A Little Hello (Gina K Designs) 

Inks: Archival Black, Lagoon Pigment Ink

Accessories: Cricut - Basic Shapes, Olive Branches Background Thin Cut, Diamond Grid Die (GMD), A Little Hello Dies (Gina K Designs), Tri-Blend Markers, Rubbing Alcohol (misc.), Turquoise Glitter Gems, Silver Glitter Gems, Clear Detail Embossing Powder, Heat Tool, Foam Tape 

Enjoy,

Alyson

Friday, June 25, 2021

Stencilled Distress Oxide Background Sunburst

Wow - that title is a mouthful! 

Many moons ago, I created a 12x12 background using distress oxide inks, a stencil and some Stickles Glitter Gel. I used parts of it but still had a reasonable size piece left and that piece forms the background for this card. 

I was able to arrange the inked piece so the center of a large floral burst sat right under the circle in the sunburst. I love how that worked out! I wanted the background here to take centre stage so I didn't add anything else to this card except the sentiment which was stamped in pink. The sunburst was die cut from Black Ore Paper, which has a terrific shine to it. It's all about the bling, right? 

Products used are all Close To My Heart: 

Paper: White Daisy Cardsotck, Black Ore Cardstock, White Cards and Envelopes

Stamps: Spot-On Sentiments

Inks: Pixie, DO Inks - Peacock Feathers, Picked Raspberry, Mustard Seed, Black Soot

Accessories: Sunburst Thin Cut, Asteroid Stickles Glitter Gel, Stencil Pack 1

Enjoy,

Alyson

Thursday, June 24, 2021

Alcohol Inked Sunburst Cards

I have been holding onto a lot of backgrounds that were created while instructing others. In many cases, that results in more than one piece as a sample is needed plus I end up with another finished product after the session. Time to use those pieces! There will be a few posts in the coming days using various backgrounds I have created. 

I really enjoy playing with alcohol inks as the result is always a surprise. This background was one I wasn't sure I was ever going to use until I paired it with the sunburst thin cut. I die cut the sunburst from both the alcohol ink piece and black ore paper (it has a shine to it). I kept all the black inner pieces for the second card as you will see below. 

The first card is simple - I just inserted the inked pieces into the sunburst and stamped a sentiment in yellow for the centre. I didn't want to add anything else to this card as the focal point is the alcohol ink background. 

For the second card I used the alcohol inked sunburst outline and I alternated the insert pieces with the black ore paper and a small dotted black patterned paper. I stamped a different sentiment in red this time and added a few enamel gems to the black sections. 

Products used are Close To My Heart unless otherwise indicated:

Paper: Mix-In Paper Pack, White Daisy Cardstock, Black Ore Cardstock, Yupo Paper (Ranger), White Cards and Envelopes 

Stamps: Spot-On Sentiments

Inks: Candy Apple, Sundance, Various Alcohol Inks (Ranger) 

Accessories: Sunburst Thin Cut, Yellow Enamel Gems 

Enjoy,

Alyson

Wednesday, June 23, 2021

AH 426 - Birthday Poppies

Welcome to Atlantic Hearts Sketch Challenge 426!

The sketch is shown in horizontal orientation - I changed it to vertical and kept the elements in  approximately the same places.

The beautiful poppy paper drove my idea for my card. I used the front and back of that paper and added some embossed cardstock (red and green). The poppies were stamped and die cut and added to the front. The sentiment was also die cut and added to the bottom of the card. I brushed the centres of the poppies with the Black Shimmer Brush and the sentiment with the Clear Shimmer Brush. No other embellishments were added as I felt the card was busy enough with the poppies. 

Come and join us at Atlantic Hearts and show us how you interpret the sketch shown above. 

You have until Sunday evening to link up your project. 

We can’t wait to see what you create! 

Products used are Close To My Heart unless otherwise indicated:

Paper: Blue Skies Embossed Cardstock, Flowers and Fields Paper (SU), White Daisy Cardstock, Black Cardstock, Yellow Cardstock (scrapbook.com), Neenah Solar White Cardstock 

Stamps: Painted Poppy (Altenew) 

Inks: Archival Black, Candy Apple, Pomegranate, Green Apple, Evergreen

Accessories: Painted Poppy Dies (Altenew), Happy Birthday Die (Creative Expressions), Clear Shimmer Brush, Black Shimmer Brush

Enjoy,

Alyson

Tuesday, June 22, 2021

Make the Cards Challenge - Daisy Hugs

There is a slimline sketch at the Make the Cards challenge this week. The sketch is shown below. 

I started by creating a stencilled plaid backgound using two shades of grey ink. That piece, along with green and white pieces, were cut using slimline dies. The daisies and leaves were stamped using four shades of purple, three shades of yellow and two shades of green (and yes, that took some serious time!) They were die cut and layered along the right side of the card. The sentiment was die cut and stacked for more dimension. A few silver Liquid Pearls were added around the card and I brushed the flower centres and the sentiment with shimmer brushes. 

Check out the Make the Cards challenge - they have a terrific challenge every week! 

Products used are Close To My Heart unless otherwise indicated: 

Paper: White Daisy Cardstock, Willow Cardstock, Pewter Cardstock, Slimline Cards and Envelopes 

Stamps: Beloved Daisies (Altenew) 

Inks: (all Pink Fresh Studio) - Misty Coast, Rocky Slope, Lemon Whip, Sunshine, Sweet Mustard, Grassy Knoll, Key Lime, Soft Lilac, Candy Violet, Lavender, Regal Kiss

Accessories: Beloved Daisy Dies (Altenew), Stitched Slimline Dies (Pink and Main), Layered Slimline Dies (Pink and Main), Hugs Die (Pink Fresh Studio), Slimline Diamond Plaid Stencils (Pink Fresh Studio), Lemonade Shimmer Brush, Clear Shimmer Brush, Silver Liquid Pearls 

Enjoy,

Alyson

Monday, June 21, 2021

DT 87 and TSOT 512 - Christmas Sparrow

Welcome to Double Trouble Challenge 87!

This week, it's all about the squares (or circles) and embossing. The small graphic is shown here - please check the Double Trouble challenge blog for detailed information. 

There is a sketch to follow as an optional component this week. 

I supposed I fall into the category of a square as I chose to use squares on my card. I have to say that this is the first time I have ever made a Christmas card in the month of June! It just seemed to be what worked best with what I had on my desk at the time...

The stitched rectangle was cut in two colours - white and sapphire. The sapphire piece was embossed with a holly leaf embossing folder and I sanded it to bring out the images. The pine branches were stamped in two colours - darker for the inside and lighter at the ends. Those were die cut, as was the bird and the stitched square. I coloured the bird and placed the branches around the inside squares. I added a sentiment that was stamped and die cut on a stitched bracket. The last step was to add a couple of trees (they really are arrows but I thought they could pass as trees) in the bottom corner. 

Come and join us at Double Trouble and show us how you interpret this challenge. 

I am also linking up my card with Try Stampin' on Tuesday in the design team section as I am a design team member for that challenge. 

You have two weeks to link up your project. 

We can’t wait to see what you create! 

Products used are Close To My Heart unless otherwise indicated: 

Paper: White Daisy Cardstock, Sapphire Cardstock, Sage Cardstock, Evergreen Cardstock, Neenah Solar White Cardstock 

Stamps: Spruced Up Cardmaking, Christmas Love 

Inks: Intense Black, Sage, Evergreen

Accessories: Stitched Rectangle Thin Cuts, Stitched Square Thin Cuts, Stitched Brackets Thin Cuts, Spruced Up Cardmaking Thin Cuts, Holly Vines Embossing Folder (Darice), Sanding Block, Tri-Blend Markers, Thin Foam Tape, Wooden Arrows 

Enjoy,

Alyson


H2H - Sunburst Star Birthday Card

Welcome to Heart 2 Heart! 

The theme for this challenge is Let's Hear it for the Boys. 

I always struggle with masculine projects... I wanted to do something fairly simple but make sure it still made a statement. 

One of the Cricut images from the Artbooking collection is the sunburst that I used. I cut that from some patterned paper and adhered it with foam tape on the same colour of cardstock. I also cut two ovals - one for the background and a second for the sentiment. The sentiment was stamped with Peacock ink along with some little stars stamped with Lemonade ink. The large stars were die cut and added to the front of the card. I also decorated the inside of the card using the stars. 

Come and join us at Heart 2 Heart and show us how you interpret this theme. 

You have until the end of June to link up your project. 

We can’t wait to see what you create! 

Products used are all Close To My Heart: 

Paper: Aurora Paper Pack, White Daisy Carsdstock, Peacock Cardstock, Lemonade Cardstock, Glacier Cardstock 

Stamps: On Your Birthday 

Inks: Peacock, Lemonade

Accessories: Artbooking Cricut Collection, Basic Stars Thin Cuts, Foam Tape 

Enjoy,

Alyson

Sunday, June 20, 2021

Vellum Leaves with Distress Oxides

I had some vellum leaf die cuts in my "to work with" folder and decided to use those for a clean and simple card. This came together really quickly.

I used three Distress Oxide inks to blend a green background. The sentiment was stamped in black and I added the vellum leaves along the left side. I tied a small bow from black twine and placed it at the top of the leaves. The inked piece was mounted on craft foam, black cardstock and finally on a white base. The last step was to add some white Liquid Pearls around the leaves. 

Products used are Close To My Heart unless otherwise indicated: 

Paper: Black Cardstock, Neenah Solar White Cardstock, Vellum

Inks: Archival Black, Distress Oxide Inks: Twisted Citron, Mowed Lawn, Pine Needles

Stamps: Greetings Mix 2 (SSS)

Accessories: Leaf Stem Die (Melissa Frances), Black Twine (misc.), White Liquid Pearls, Craft Foam 

Enjoy,

Alyson

Saturday, June 19, 2021

Just Saying Hello - Spanner Card

I recently watched another video for an interactive e card - this one is called a Spanner Card. A link to the video by Lisa Curcio is here

The concept of this card is pretty simple and it is the acetate that allows it to function the way that it does. 

I chose to use the Blossom papers and coordinating cardstock. The main floral image was stamped, coloured and die cut for the front of the card. The rest of this came together very quickly. I added a few drop of Liquid Pearls to keep the card flat for mailing purposes. 


Products used are Close To My Heart unless otherwise indicated:

Paper: Blossom Paper Pack, White Daisy Cardstock, Lagoon Cardstock, Nectarine Cardstock

Stamps: Stitched Florals, Create with Heart, Happy Heart

Inks: Intense Black, Lagoon

Accessories: Stitched Together Thin Cuts, Scalloped Border Punch, Acetate (not CTMH), Tri-Blend Markers, Juniper Liquid Pearls (not CTMH)

Enjoy,

Alyson

Friday, June 18, 2021

Three Purple Flowers

Welcome to Colour Dare Challenge 449! 

I chose Lagoon and Mint (plus black and white) as my two colours in addition to the shades of purple .

The background was stencilled using a set of layering stencils. I stamped the flowers and leaves, coloured them and fussy cut each of them. The leaves were coloured in both Lagoon and Mint plus the inside section of each flower was coloured in Mint. I arranged the leaves and flowers in the upper corner and adhered them with thin foam tape and regular foam tape. The lines on the flowers were brushed with the Clear Shimmer Brush. 

The sentiment was stamped and mounted on Wisteria cardstock. I added a few turquoise gems to finish off my card. 

Come and join us at Colour Dare and show us how you interpret the challenge shown above. 

You have two weeks to link up your project.

We can’t wait to see what you create!

Products used are Close To My Heart unless otherwise indicated: 

Paper: White Daisy Cardstock, Black Cardstock, Wisteria Cardstock, Neenah Solar White Cardstock 

Stamps: Poppy (CTMH Rewards), Word Up (Reverse Confetti), Painted Poppy (SU)

Inks: Archival Black, Intense Black, Ocean Breeze (Pink Fresh Studio), Aquamarine (Pink Fresh Studio)

Accessories: Diagonal Plaid Stencils (Pink Fresh Studio), Tri-Blend Markers, Turquoise Gems (misc.), Foam Tape, Thin Foam Tape, Clear Shimmer Brush

Enjoy,

Alyson

Thursday, June 17, 2021

Flip Over Gift Card Holder

There are a lot of videos out there that show how to create this type of card. I call this a Flip Over Gift Card Holder but it is also known as a Jacob's Ladder Card. 

It appears to be magic when the card is flipped over in the same direction - the gift card moves from side to side. The video shows this much better than I can explain it. 

I used a colour scheme of black, white, red, yellow and blue. I kept the patterned papers the same on both sides so the magic continues with every flip. The sentiment was also adhered in the same spot for that reason. 

Check out the photos and the video of the card below. 


Products used are Close To My Heart unless otherwise indicated: 

Paper: Happiest Place Paper Pack, Black Cardstock, White Daisy Cardstock

Stamps: Word Up (Reverse Confetti)

Inks: Archival Black

Accessories: Corner Rounder, Red Ribbon 

Enjoy,

Alyson

Wednesday, June 16, 2021

Smiles with Roses - Craft Roulette

I like to play along with Craft Roulette on Friday evenings and you have until Sunday evening to link up a project. 

There are always 4 parameters for each challenge. Last week, those parameters were as follows: 

    - card using patterned paper

    - any 4 colours

    - smile or smiles

    - tone on tone

I pulled out one of my favourite new stamp sets from The Ton Stamps and stamped these gorgeous roses in shades of pink. The leaves were stamped in two shades of green. All pieces were die cut and set aside until I had the base ready. That was splattered with the same Shimmer Brush colours - Black, Raspberry and Green Apple. I added strips of paper along the left side - two of them are tone on tone patterns. The roses were added and a sentiment was die cut from black and white papers. I added some pink Pops of Colour around the roses and brushed the darkest part of the flowers with the Clear Shimmer Brush. 

Craft Roulette can be found on You Tube every Friday evening (730pm ET) and it's a lot of fun to watch the guests create a card using the parameters. 

Products used are Close To My Heart unless otherwise indicated: 

Paper: Misc. Patterned Paper, White Daisy Cardstock, Black Cardstock, Green Apple Cardstock, Neenah Solar White Cardstock

Stamps: Rose Labels (The Ton Stamps)

Inks: Ballerina, Pixie, Raspberry, Green Apple, Clover

Accessories: Rose Labels Dies (The Ton Stamps), Sending Dies (Pink Fresh Studios), Black and White Dots, Pop of Colour - Pink (scrapbook.com), Shimmer Brushes - Clear, Black, Raspberry, Green Apple 

Enjoy,

Alyson

Tuesday, June 15, 2021

Try Stampin' on Tuesday - 3-D Flower Card

Welcome to Try Stampin' on Tuesday Challenge 511!

In addition to the sketch, the optional theme this week is "beach".

I am not at all a beach person so I decided to focus on the sketch only for this challenge.  I have had  these flower dies for a while and this was my chance to try them out. There are three sizes of the flower and two leaf sizes. All pieces were die cut from white cardstock and then I used Distress Oxide inks to colour the edges of the pieces. A green spot was inked in the centre of each flower piece. The flowers were then sprayed with water which caused the ink to spread and they were shaped and left to dry. Once they were completely dry, they were reshaped and placed in layers to create a 3-D flower. Some clear seed beads were added in the center of each flower. 

The leaves were also inked and shaped and I die cut some white berry branches. Once the patterned paper was placed on the card, the flowers, leaves and berry stamps were added. I stamped a sentiment using two shades of green ink and finally added some holographic sequins to the card. 


Come and join us at TSOT and show us how you interpret the sketch shown above. 

You have two weeks to link up your project. 

We can’t wait to see what you create! 

Products used are Close To My Heart unless otherwise indicated: 

Paper: Bright Stack Paper Pack, White Daisy Cardstock, Evergreen Cardstock, Woodland Textures Paper (SU), Neenah Solar White Cardstock

Stamps: Sentiment Collection (Penny Black)

Inks: Green Apple, Clover, Espresso, Distress Oxide Inks - Kitsch Flamingo, Picked Raspberry, Mowed Lawn, Lucky Clover

Accessories: Floral 1 Dies (Elizabeth Craft Designs), Frosted Bouquet Dies (SU), Seed Beads (misc.), Holographic Sequins 

Enjoy,

Alyson

Monday, June 14, 2021

Birthday Cascading Gatefold Card

I posted a cascading gatefold card a while ago and this is the second one I have made. They aren't difficult... more time consuming than anything else. 

This one was created with the Party Time paper pack and the related stickers. I almost never use stickers but they came with the paper pack and I thought it was a good way to use them up. The base of the card is green and this particular paper pack has two colour schemes within the papers. I chose the blue/green/yellow colour scheme. 

The inside cascading piece has a variety of birthday images and the centre piece is an oval "hip, hip, hooray" message. I used the same oval dies to cut the sentiment on the belly band. Since this card is thick already, I only brushed the images with the Clear Shimmer Brush, rather than adding any bulky embellishments. 


Products used are all Close To My Heart:

Paper: Party Time Paper Pack and Stickers, White Daisy Cardstock, Green Apple Cardstock, Lemonade Cardstock, Sapphire Cardstock

Stamps: Wishing You Everything

Inks: Lagoon, Green Apple, Sapphire, Lemonade

Accessories: Wishing You Everything Thin Cuts, Basic Oval Thin Cuts, Stitched Oval Thin Cuts, Tri-Blend Markers, Clear Shimmer Brush

Enjoy,

Alyson

Sunday, June 13, 2021

I Just Miss You... in Yellow

Back to the same layering stencils for a second card... I love these stencils! 

Yesterday, I posted a card using the same stencils but done in blue. Today, it's a yellow card. I stencilled the flowers using Canary and Sundance inks and the greenery with Fern and New England Ivy inks. The outline image was stamped in black. I stamped the sentiment and added a small piece of New England Ivy cardstock underneath. Some White Liquid Pearls were placed around the images. 

Products used are Close To My Heart unless otherwise indicated: 

Paper: White Daisy Cardstock, New England Ivy Cardstock

Stamps: Miss Your Smile (Pink Fresh Studios) 

Inks: Archival Black, Canary, Sundance, Fern, New England Ivy

Accessories: Slim Stitched Rectangle Essentials Dies (Pink Fresh Studios), Miss Your Smile Layering Stencils (Pink Fresh Studios), White Liquid Pearls

Enjoy,

Alyson

Saturday, June 12, 2021

Miss Your Hugs Slimline

I love layering stencils and this one from Pink Fresh Studio is designed for slimline cards. It has two layers for the flowers and two layers for the greenery. 

The colours I used were Bluebird and Sapphire for the flowers and Green Apple and Clover for the greenery. Once the image was stencilled, I stamped the outline in black. The first part of the sentiment was stamped on white cardsotck and I added a small piece of Bluebird cardstock underneath. The word "hugs" was die cut from Green Apple (x3) and Black and the top part was stacked to add some dimension.

The entire card front was die cut using a stitched slimline rectangle and I added some White Liquid Pearls around the flowers. I love the intensity of these colours!

Products used are Close To My Heart unless otherwise indicated: 

Paper: White Daisy Cardstock, Black Cardstock, Green Apple Cardstock, Bluebird Cardstock 

Stamps: Miss Your Smile (Pink Fresh Studio)

Inks: Archival Black, Sapphire, Bluebird, Green Apple, Clover 

Accessories: Slim Stitched Rectangle Essentials (Pink Fresh Studio), Phrase Builder - Sending (Pink Fresh Studios), Miss Your Smile Layering Stencils (Pink Fresh Studios), White Liquid Pearls 

Enjoy,

Alyson

Friday, June 11, 2021

Top Fold Card #2

I posted one of these cards several days ago... I created another one using the You Are Enough papers but with a completely different colour scheme. 

This time, I focused on the blues and greens in the paper collection. I die cut the large butterfly in three layers and that is on the first inside section of the card. I didn't add anything to the top flap this time as the paper was fine on its own. I suppose you could use that space to write more than in just the designated writing section. 

A belly band was created and one of the zip strips from the paper collection was wrapped around the band. I die cut the wreath and the two layered butterfly for the front. A few clear sparkles were coloured and added to the body of the butterfly.


Products used are all Close To My Heart: 

Paper: You are Enough Paper Pack, You are Enough Coordinating Cardstock, White Daisy Cardstock, Sapphire Cardstock, Glacier Cardstock Blue Belle Cardstock, Blue Belle Glitter Paper

Stamps: You are Enough

Inks: Sapphire, Sapphire Pigment Ink

Accessories: You are Enough Thin Cuts, Layered Butterfly Thin Cuts, Clear Embossing Powder, Heat Tool, Clear Sparkles, Tri-Blend Marker

Enjoy,

Alyson


Thursday, June 10, 2021

Floral Fun Fold Card - Roses

I love creating interactive cards or cards with special folds. This is another of those cards... 

Recently, I ordered a very cool stamp and dies set from The Ton Stamps. They have group layering stamps and that means that all the floral and leaf images are stamped as one unit and then die cut together as one piece. The flowers look so realistic! 

I chose a blue and green colour scheme for this card. The flowers were stamped with three shades of blue and the leaves with two shades of green. I had to stamp and die cut two sets to have enough flowers for this card. I used sentiments from a stamp and die set that I received as part of a weekend virtual crop a few months ago. The sentiments were stamped with Bluebird ink and die cut using stitched brackets. The back page has a place to write a message and that background was stamped with a stamp from the Strokes of an Artist stamp set. 

I brushed the darkest parts of the flowers with the Clear Shimmer Brush and then added some Stickles dots around the images. I'm really happy with how this turned out! 


Products used are Close To My Heart unless otherwise indicated: 

Paper: Mix-In Paper Packs, White Daisy Cardstock, Bluebird Cardstock, Green Apple Cardstock 

Stamps: Strokes of an Artist, Photoplay Special Stamp, Rose Labels (The Ton Stamps)

Inks: Carolina, Bluebird, Sapphire, Green Apple, Clover

Accessories: Rose Labels Dies (The Ton Stamps), Stitched Brackets, Stitched Fancy Brackets, Clear Shimmer Brush, Waterfall Stickles

Enjoy,

Alyson

Wednesday, June 9, 2021

AH 424 - You are Everything Wonderful


Welcome to Atlantic Hearts Sketch Challenge 424! 

I LOVE the sketch this week - wreaths are always so pretty and fun to create! 

I started by creating the background using two layering stencils. The flowers and leaves were stamped and die cut - those are 6 step stamping flowers! The wreath was die cut twice to provide a little more fullness. It barely fit on the card front - I was going to leave a larger border around the outside but the wreath was wide enough that I had to leave just a small border instead. I stamped the sentiment on vellum and embossed it in silver. The centres of the flowers were brushed with the Clear Shimmer Brush and I added a few Silver Glitter Gems and some Silver Embellishing Thread to finish off the card. 


Come and join us at Atlantic Hearts and show us how you interpret the sketch shown above. 

You have until Sunday evening to link up your project. 

We can’t wait to see what you create! 

Products used are Close To My Heart unless otherwise indicated: 

Paper: Charcoal Cardstock, Pewter Cardstock, Neenah Solar White Cardstock, Vellum

Stamps: Beloved Daisy (Altenew), Greetings Mix 1 (SSS) 

Inks: Versamark, Pebble, Pewter, Altenew Inks (Firefly, Grass Field, Shadow Creek, Wisteria, Hydrangea, Ultraviolet), Pink Fresh Studio Inks (Sunshine, Sweet Mustard, Marigold, Coral Reef, Passion Fruit, Berrylicious, Sparkling Rose, Bubblegum, Raspberry Bliss)

Accessories: Beloved Daisy Dies (Altenew), Stylish Frame Trio Dies (Memory Box), Diagonal Plaid Stencils (Pink Fresh Studio), Clear Shimmer Brush, Silver Glitter Gems, Silver Embellishing Thread, Silver Embossing Powder, Heat Tool 

Enjoy,

Alyson

Tuesday, June 8, 2021

Cascading Gatefold Card - Friendship

You may have looked at the title and wondered how a gatefold card and a cascading card could be used together... Check out this video for more information. 

I used the Lovely paper pack and coordinating cardstock to create my card. My first attempt at this ended up tossed out as I forgot to cross the cascading pieces and consequently adhered the patterned paper to the wrong side of half of it. The second attempt was much better! 

The base of the card is Canary cardstock and I used the Florals and Flutters stamp and die set to create the images (flowers, leaves, hearts, butterflies). Those were all coloured and die cut. Rather than using patterned paper for all the inside pieces, I embossed some Blue Belle cardstock using a floral embossing folder. The sentiments are from the Friendship is a Blessing stamp set. This card folds down into a 6x6 square with a belly band. I purposely didn't add any bulky embellishments for mailing purposes.


Products used are Close To My Heart unless otherwise indicated:

Paper: Lovely Paper Pack, White Daisy Cardstock, Canary Cardstock, Blue Belle Cardstock, Sage Cardstock 

Stamps: Friendship is a Blessing, Florals and Flutters

Inks: Intense Black, Charcoal

Accessories: Florals and Flutters Thin Cuts, Stitched Bracket Thin Cuts, Basic Oval Thin Cuts, Stitched Oval Thin Cuts, Flower Garden Embossing Folder, Tri-Blend Markers, Copic Markers (not CTMH), Touch Markers (not CTMH)

Enjoy,

Alyson