Tuesday, October 27, 2020

TSOT - Winter Trees

Welcome to this week's Try Stampin' on Tuesday challenge! 

In addition to the sketch, the theme is to use navy, teal and pink. 

Since teal and pink are two of my favourite colours, I knew what I wanted to do for my card. 

I started by stamping a tree border and colouring the trees. I layered all the pieces as per the sketch and then trimmed the edges of my card base. The two largest trees were stamped and die cut and the centre one was die cut from white glitter paper with foam tape added under the raised sections. I stamped a small sentiment and die cut that using stitched circles and then brushed it with the clear shimmer brush. I added some bitty sparkles above and alongside the trees to simulate tiny stars. This card came together very easily. 

Come and join us at Try Stampin' on Tuesday and show us how you interpret the sketch shown above. 

You have two weeks to link up your project. 

We can’t wait to see what you create! 

Products used are Close To My Heart unless otherwise indicated: 

Paper: Mix-In Paper Pack, Bright Stack Paper Collection, White Daisy Cardstock, Sapphire Cardstock, Raspberry Cardstock, Lagoon Cardstock, White Glitter Paper, Neenah Solar White Cardstock 

Stamps: Jolly Characters, Holiday Trimmings, Winter Woods (SU)

Inks: Intense Black, Sapphire, Lagoon

Accessories: Stitched Circle Dies (GMD), In the Woods Thinlets (SU), Border Punch (misc.), Clear Shimmer Brush, Bitty Sparkles, Foam Tape, Tri-Blend Markers, Sharpie Marker (not CTMH)

Enjoy,

Alyson

Monday, October 26, 2020

AH 392 - Hello Friend Distress Oxide Background Card

Welcome to Atlantic Hearts Sketch Challenge #392!

I decided to rotate the sketch to create a portrait card instead of a landscape card. I chose to create my own background for my card using Distress Oxide Inks and Stickles Glitter Gel. I began by using three colours of Distress Oxide inks to create my background. I then placed a stencil on top of that and covered the cardstock with Black Soot Distress Oxide ink. I then covered the cardstock with Moondust Stickles Glitter Gel with the stencil still in place. I think that the Moondust Glitter Gel took on a dark colour due to the black ink still being wet. 

When the background was dry, I trimmed it to the size I wanted. The card base is Charcoal cardstock and there is a stitched rectangle mounted on top of that with craft foam. Keeping with the stitched theme, I die cut two stitched rectangles - one for the sentiment and one for the frame. I stamped a sentiment on the Glacier piece and added two thin pieces of cardstock as per the sketch. Finally, I added a silver bow and some sparkles around the sentiment. 


Come and join us at Atlantic Hearts and show us how you interpret the sketch shown above. 

You have until Sunday evening to link up your project. 

We can’t wait to see what you create! 

Products used are Close To My Heart unless otherwise indicated: 

Paper: White Daisy Cardstock, Charcoal Cardstock, Glacier Cardstock, Lagoon Cardstock 

Stamps: Budding Peony

Inks: Charcoal, Distress Oxide Inks: Peacock Feather, Speckled Egg, Cracked Pistachio, Black Soot 

Accessories: Stitched Rectangle Thin Cuts, Craft Foam (not CTMH), Silver Ribbon (not CTMH), Clear Sparkles, Bitty Sparkles, Moondust Stickles Glitter Gel, Garden Vines Stencil (Memory Box) 

Enjoy,

Alyson


Friday, October 23, 2020

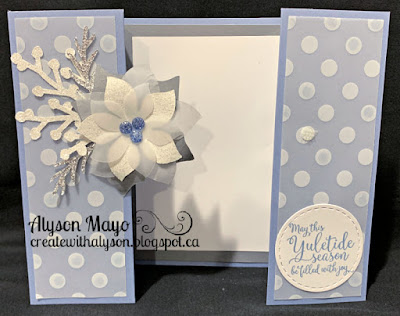
CD 417 - Poinsettia Gatefold Card

Welcome to Colour Dare Challenge #417! 

This week, it's all about selection - check out the graphic for more information. 

I chose to use Blue Belle as my colour, Pewter as my neutral and silver as my metallic. Since white is free, I used white cardstock, white glitter paper and regular vellum plus some vellum with white dots. 

The dotted vellum been in my stash for some time and it was time to use it! I created a gatefold card attached in the centre by a poinsettia. The vellum was attached on each side of the card. I used my Cricut to cut a poinsettia (not the same one I usually cut) and I also cut some branches from both white and silver glitter paper. The base of the poinsettia is Pewter cardstock. I shaped the leaves and created the poinsettia, mounting it on just the left side of the card. I had to add a hook and loop dot on the right side to keep the card closed. Blue Belle Glitter gems were added to the centre of the flower. The sentiment was stamped with Blue Belle ink and then die cut using the Stitched Circle thin cuts.


Come and join us at Colour Dare and show us how you interpret the colour info above. 

You have two weeks to link up your project. 

We can’t wait to see what you create! 

Products used are Close To My Heart unless otherwise indicated: 

Paper: White Daisy Cardstock, Blue Belle Cardstock, Pewter Cardstock, White Glitter Paper, Silver Glitter Paper, Vellum with Dots, Vellum

Stamps: The Greatest Part of Christmas (SU)

Inks: Blue Belle 

Accessories: Flower Market Cricut Collection, Stitched Circle Thin Cuts, Foam Tape, Blue Belle Glitter Gems, Hook and Loop Dots

Enjoy,

Alyson


Wednesday, October 21, 2020

Grateful for You

I have been playing with a new stamp from Altenew - Japanese Mum. It is a four layer stamp - and definitely one of the more difficult layering stamps I have used. Both the flower and the leaf require four layers... 

Purple was my colour of choice for this card. I set the flowers and leaves on a woodgrain background and AFTER they were adhered, along with the sentiment, then I decided I wanted to splatter the background. I created masks for every image and with all of them covered, I splattered the woodgrain paper with the Charcoal Shimmer Brush. The background was adhered to a card base using craft foam and I outlined the raised piece with a black journaling pen. A few glitter gems were added next to the sentiment. 

Products used are Close To My Heart unless otherwise indicated: 

Paper: White Daisy Cardstock, Wood Textures (Craft Consortium), Neenah Solar White Cardstock

Stamps: Japanese Mum (Altenew), Giving Thanks 

Inks: Lilac, Pansy, Eggplant, Black, Green Apple, Clover, Evergreen, Pewter

Accessories: Japanese Mum Dies (Altenew), Charcoal Shimmer Brush, Little Dreamer Glitter Gems, Thin Foam Tape, Foam Tape, Craft Foam, Black Journaling Pen 

Enjoy,

Alyson

Monday, October 19, 2020

DT 69 - Monster Peeking...

Welcome to Double Trouble Challenge #69!

Halloween is around the corner and this is your chance to create a project for that purpose. 

Take a look at the graphic below - this provides basic information only. To view the detailed requirements for the challenge, please visit the Double Trouble Challenge Blog.


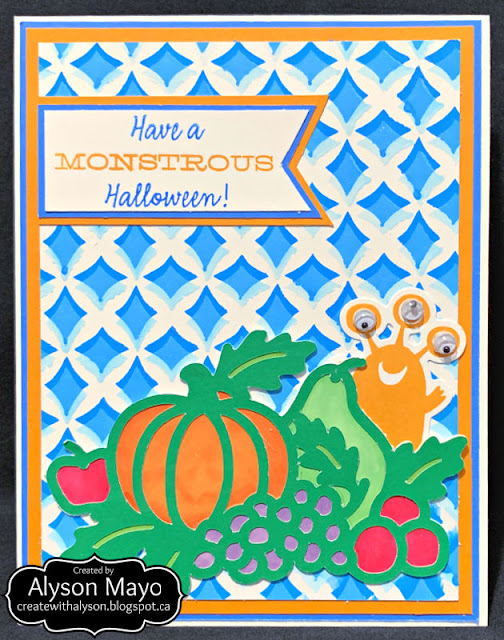
I started by creating the blue and white background - a stencil, Distress Oxide Ink and White Pigment Ink were used to create the 3-D effect. There is a close up of part of that card further down in this post. I used my Cricut to cut the group of produce and coloured in the back sections in the appropriate colours for the challenge.  I went back to a very old stamp set - the only stamp I have that represents anything at all for Halloween - and used a monster from that set along with the sentiment. The monster is peeking out from behind the pear and I added googly eyes to his eyeballs as well. The sentiment was masked so I could stamp it in two colours. 


Come and join us at Double Trouble and show us how you use the colours provided to create some Halloween artwork. 

You have two weeks to link up your project. 

We can’t wait to see what you create! 

I am also linking up my card with the Halloween challenge at The Paper Girls

Products used are Close To My Heart unless otherwise indicated: 

Paper: White Daisy Cardstock, Nectarine Cardstock, Bluebird Cardstock, Clover Cardstock, Green Apple Cardstock, Neenah Solar White Cardstock 

Stamps: Monstrous Halloween

Inks: Bluebird, Nectarine, White Pigment Ink, Salty Ocean Distress Oxide Ink (not CTMH) 

Accessories: Cricut Artbooking Cartridge, Cricut You Are Here Cartridge, Monstrous Halloween Thin Cuts, Tri-Blend Markers, Stencil Sheets, Googly Eyes (not CTMH)

Enjoy,

Alyson

H2H - Christmas is Coming Early

Welcome to this week's Heart 2 Heart challenge! 

The theme this week is Christmas is Coming Early. That very thought may terrify some of you... but it's a reminder that Christmas truly is right around the corner. 

I have been working on Christmas cards for a few weeks already, although I feel like I will never have enough made by early December. This challenge allowed me to create yet another one to add to my total. 

I used the Comfort and Joy poinsettia paper as the background and created a shaker along the side. I wanted the images to be coloured in similar colours to coordinate with the paper so I chose a holly sprig, an ornament and a group of pinecones. All were coloured using Tri-Blend markers and each square was made into a small shaker to which I added some artificial snow. The sentiment was stamped in Candy Apple and cut with the Stitched Rectangle Thin Cuts. It was mounted within the outer stitched frame. I brushed the veins on the poinsettias with the clear shimmer brush but that isn't visible in the photograph. 

Come and join us at Heart 2 Heart and show us your Christmas projects. 

You have until the end of October to link up your project. 

We can’t wait to see what you create! 

Products used are Close To My Heart unless otherwise indicated: 

Paper: Comfort and Joy Paper Pack, Black Cardstock, Candy Apple Cardstock, Avocado Cardstock, White Daisy Cardstock, Neenah Solar White Cardstock 

Stamps: Traditional Holiday, Yuletide Greetings 

Inks: Intense Black, Candy Apple 

Accessories: Stitched Rectangle Thin Cuts, Stitched Square Dies (GMD), Red Enamel Dots, Tri-Blend Markers, Black Sharpie Marker (not CTMH), Acetate (not CTMH), Craft Foam (not CTMH), Artificial Snow (not CTMH), Clear Shimmer Brush 

Enjoy,

Alyson

Sunday, October 18, 2020

Core Catalog Blog Hop

Welcome to the Core Catalog Blog Hop! This hop is all about featuring products from the CTMH core catalog. 


You should have arrived here from Haley Dyer's blog.

If you get lost, a list of all participants can be found on Melinda Everitt's blog

Blue Belle is the Colour of the Year and it is a beautiful blue-grey shade. I wanted to highlight that in my project so I chose to use the Stitched Lattice Background Thin Cut to cut the card front. I placed a piece of white glitter paper behind the die cut although that is hard to see in the photos. 

The sentiment along with the flowers were Cricut cut from the Flower Market collection. The flowers are a combination of Blue Belle glitter paper, white glitter paper and vellum. The branches were also cut from Blue Belle glitter paper. I used the negative space for the sentiment and cut both pieces using the Stitched Simple Brackets Thin Cuts. I cut off the right edge so the sentiment would fit right against the edge of the card. Aside from placing a Blue Belle Glitter Gem in the centre of each flower, no shimmer or extra glitter was added to the flowers as the glitter paper provides enough bling! 


I hope you enjoyed my card. 

The next blog on this hop is Katy Taylor's blog. I am sure she has something awesome to share with you! 

Products used are all Close To My Heart:

Paper: White Daisy Cardstock, Blue Belle Cardstock, White Glitter Paper, Blue Belle Glitter Paper, Vellum

Stamps: none

Inks: none

Accessories: Flower Market Cricut Collection, Stitched Simple Brackets Thin Cuts, Stitched Lattice Background Thin Cut, Blue Belle Glitter Gems

Enjoy,

Alyson

Thursday, October 15, 2020

Plastic Patterns Technique Blog Hop


Welcome to the October Technique Blog Hop!
This month, the featured technique is to use stencils - hence the title of Plastic Patterns. 

You should have arrived here from Katy Taylor's blog.

I love the Distress Oxide inks and I combined those with Solar Flare Glitter Gel to create the backgrounds for both of my cards. I began by using three inks to create a random background on White Daisy cardstock. I then placed the stencil over the inked background and covered it with Black Soot Distress Oxide ink. Keeping the stencil in place, I then covered it with the Solar Flare Stickles Glitter Gel. 

While that background piece was drying, I stamped, coloured and cut the images I wanted to use. I wanted to show an autumn coloured background can also work for a Christmas card. 

Here is the autumn based card - it is a mini slimline card measuring 3" x 6". I used a sunflower and some associated images to match a beautiful sentiment. The leaves of the sunflower and the sentiment were brushed with the Gold Shimmer Brush although that doesn't show in the photo. I used the extra background piece to decorate part of the envelope. 

The Christmas card uses the same background but I fussy cut and coloured images of a fireplace with a few extras. Since this is the only current Christmas stamp I own (more are coming), I had to use a retired stamp for the sentiment. Some of the images on the fireplace and the sentiment were also brushed with the Gold Shimmer Brush. Again, I used the leftover piece to decorate the envelope. 

I hope you enjoyed my projects.

The next blog on this hop is Miss Carrie's Creations

I know she has something fabulous to share with you! 

Products used are all Close To My Heart:

Paper: White Daisy Cardstock, Black Cardstock, Sundance Cardstock, Candy Apple Cardstock, Twinkle Toes Holographic Paper 

Stamps: Say it in Style, With a Thankful Heart, By the Fireplace

Inks: Espresso, Sundance, Nectarine, Charcoal, Candy Apple, Distress Oxide Inks: Black Soot, Candied Apple, Spiced Marmalade, Mustard Seed

Accessories: With a Thankful Heart Thin Cuts, Stitched Bracket Thin Cuts, Stitched Fancy Bracket Thin Cuts, Stencil Pack 1, Tri-Blend Markers, Gold Shimmer Brush, Gold Glitter Gems, Gold Embellishing Thread, Solar Flare Stickles Glitter Gel

Enjoy,

Alyson

Wednesday, October 14, 2020

Gnome for Christmas!

 It's time to bring out the gnomes for Christmas! 

There are four fairly simple Christmas cards here - two of each design. These cards are based on some awesome cards created by a fellow consultant, Trina Wirihana. 

I chose to use primarily red and green and bring in a few other colours here and there. The shakers are embedded in the fronts of the cards. Before adding the sequins inside the shakers, I brushed the sentiments with the Clear Shimmer Brush. I also used that brush to accent the shading on the gnomes.


Products used are Close To My Heart unless otherwise indicated: 

Paper: Bright Stack, Feels Like Frost (SU), White Daisy Cardstock, Willow Cardstock, Candy Apple Cardstock, Black Glitter Paper, Neenah Solar White Cardstock 

Inks: Intense Black, Candy Apply, Willow

Stamps: Garden Gnomes, Festive Trees, Love with All the Trimmings

Accessories: Stitched Rectangle Thin Cuts, Garden Gnomes Thin Cuts, Circle Shaker and Window Thin Cuts, Scalloped Border Punch, Holly Jolly Dots, Red Gems, Tri-Blend Markers, Sharpie Markers (not CTMH), Holiday Loose Sequins, Silver Loose Sequins, Shaker Window and Acetate, Foam Tape, Clear Shimmer Brush

Enjoy,

Alyson


Tuesday, October 13, 2020

TSOT 479 - Poinsettia Rocker Card

Welcome to this week's Try Stampin' on Tuesday challenge! 

You can choose between the sketch or the rocking card for this challenge. 

A rocking card was new to me, but sounded interesting so that is the approach I used for this challenge. 

The sketch doesn't work well with a rocker card since the sketch shows a full circle and a rocker card requires a half circle but I did manage to get the rectangle and the small circle onto my card. I had to alter the direction of the sketch to do that - and the circle is obviously cut in half. 

I am in the midst of creating cards for Christmas so I wanted this one to be a Christmas card as well. I relied heavily on my Cricut for most of the cuts on this card. I used a deep red cardstock - Scarlet - for the card base. One sheet of green patterned paper was used for the front of the half circle. There is a small section on the right side that is inlaid for the purpose of creating depth on the card. The sentiment was masked to be stamped in two colours and then cut from the Stitched Rectangle Thin Cuts. The poinsettia leaves were Circut cut and then shaped into somewhat realistic looking flowers. I added some white berry branches cut from White Glitter Paper. The pearls inside the poinsettias were coloured yellow and I brushed the leaves with the Clear and Red Shimmer Brushes. 


Come and join us at TSOT and show us how you interpret the sketch shown above. 

You have two weeks to link up your project. 

We can’t wait to see what you create! 

Products used are Close To My Heart unless otherwise indicated: 

Paper: Comfort and Joy Paper Pack, French Vanilla Cardstock, Scarlet Cardstock, Candy Apple Cardstock, New England Ivy Cardstock, White Glitter Paper 

Stamps: Merry & Bright 

Inks: Scarlet, New England Ivy

Accessories: Cricut Flower Market Collection, Stitched Rectangle Thin Cuts, White Pearls, Sharpie Marker (not CTMH), Clear Shimmer Brush, Red Shimmer Brush

Enjoy,

Alyson

Monday, October 12, 2020

AH 390 - Extra Special Friend

Welcome to this week's Atlantic Hearts Sketch Challenge! 


The sketch this week is pretty specific, particularly around the edges. A layered border of some type is definitely expected. 

I used a rectangle die set with very close dies to create the three frames. I wanted a muted colour scheme and I used a grey (Pewter) background with Lilac, Wisteria and Sage as the other colours. The floral image was stamped using three-step stamping and then die cut. That image was mounted on foam tape and the sentiment was also mounted on foam tape, slightly offset from the floral image so as not to cover the lowest flower. I coloured some sparkles and added them to the centres of the flowers and around the image. The flowers were brushed with the Clear Shimmer Brush - they look so pretty in real life. 


Come and join us at Atlantic Hearts and show us how you interpret the sketch shown above. 

You have until Sunday evening to link up your project. 

We can’t wait to see what you create! 

Products used are Close To My Heart unless otherwise indicated: 

Paper: White Daisy Cardstock, Pewter Cardstock, Lilac Cardstock, Wisteria Cardstock, Sage Cardstock 

Stamps: Extra Special (Altenew)

Inks: Black, Lilac, Wisteria, Sage, Fern, Pewter

Accessories: Rectangle Basics Dies (Memory Box), Extra Special Die (Altenew), Tri-Blend Markers, Clear Shimmer Brush, Wisteria Shimmer Brush, Clear Sparkles, Bitty Sparkles, Foam Tape 

Enjoy,

Alyson

Sunday, October 11, 2020

Double Tri-Fold Christmas Card

I love creating interactive cards and this is another one! 

The Comfort and Joy paper collection was a perfect choice for this card. I love creating poinsettias and there is a sheet with a gorgeous poinsettia pattern in that paper pack. The poinsettias and branches were all Cricut cut and the snowflakes were cut from dies. I mixed up the colours of the poinsettias for more interest. This card is surprisingly easy to create - it was the decorating that took so much time. It folds down to a 6" x 6" card although mine is pretty dimensional so it would have to be mailed in a protective container so as not to damage the flowers. 

This is the card looking at it straight on. 

This is a slight side view.

This is what the card looks like when it is completely unfolded. 

And finally, this is the view when it is folder together for mailing purposes.

A link to the tutorial I followed can be found here

Products used are all Close To My Heart:

Paper: Comfort and Joy Paper Pack, Scarlet Cardstock, Candy Apple Cardstock, White Daisy Cardstock, New England Ivy Cardstock, Glacier Cardstock, White Glitter Paper, Red Glitter Paper, Vellum

Stamps: none

Inks: none

Accessories: Flower Market Cricut Collection, Winter Flurries Thin Cuts, Snowflake Thin Cuts, Gold Glitter Gems, Sparkles Collection, Foam Tape

Enjoy,

Alyson

Friday, October 9, 2020

CD 415 - Peaceful Poinsettia

Welcome to Colour Dare Challenge #415!

The colour grid this week is taken from colours in the Lovely paper collection - very soft colours. You need to choose at least 3 colours from the grid.

Christmas is sneaking up on me faster than I would like... and Christmas cards take me forever to create. This challenge was a good way to get one more added to my collection.

I used the striped patterned paper from the Lovely paper pack for the background of my card. The poinsettia was cut with my Cricut as was the scalloped border. The sentiment was stamped on white cardstock, die cut and mounted on Evergreen cardstock using a larger die of the same shape. I added Julep Glitter Gems inside the flower and around the card - surprisingly, those gems look the same colour as Sage (Julep cardstock is considerably darker). Finally I brushed the poinsettia leaves with the Clear Shimmer Brush and drew a border line around the edge of the card base. 

Come and join us at Colour Dare and show us how you use the colour grid shown above. 

You have two weeks to link up your project. 

We can't wait to see what you create! 

Products used are Close To My Heart unless otherwise indicated: 

Paper: Lovely Paper Pack, White Daisy Cardstock, Sage Cardstock, Evergreen Cardstock, Ballerina Cardstock, Blue Belle Cardstock

Stamps: First Noel

Inks: Evergreen, Sage, Ballerina

Accessories: Cricut Flower Market Collection, Cricut Art Philosophy Collection, Stitched Simple Brackets Thin Cuts, Julep Glitter Gems, Foam Tape, Clear Shimmer Brush, Blue Sharpie Marker (not CTMH)

Enjoy,

Alyson

Monday, October 5, 2020

Double Trouble 68 - Santa's Nice List

Welcome to Double Trouble Challenge 68!

This is an interesting challenge... Slimline cards are all the rage right now and this challenge requires a slimline card. The additional elements include using something with a visible TAIL and linking up to one of the challenge partners for Double Trouble. All the details can be found on the Double Trouble Challenge Blog.

Since I really need to work on Christmas cards, I decided to go that route. Finding a tail... that was another story. I located an old stamp that has a "rein-dog" with a short little tail. Hey, it's a tail, right? 

I started by Cricut cutting the trees for the background. They were layered along the top 2/3 of the card. I stamped and coloured Santa and the rein-dog. Those images were fussy cut. I used a shaped die to cut the snowbanks and layered them using craft foam. Santa and his rein-dog were placed between the top two layers of snow. I added a sentiment and brushed the centres of the large trees and the tops of the snowbanks with the Clear Shimmer Brush. I also coloured some Bitty Sparkles and added them around the tree tops. 


Come and join us at Double Trouble and show us how you interpret the elements of this challenge. 

I am also linking my card with Colour Dare #414 - that colour grid is shown below. 

You have two weeks to link up your project. 

We can’t wait to see what you create! 

Products used are Close To My Heart unless otherwise indicated:

Paper: White Daisy Cardstock, Scarlet Cardstock, Julep Cardstock, Lagoon Cardstock, Glacier Cardstock

Stamps: Santa's List (Your Next Stamp)

Inks: Intense Black, Scarlet

Accessories: Cricut Complete Creativity Collection, Stitched Nested Label Dies (SU), Fancy Borders Thin Cuts, Bitty Sparkles, Sharpie Marker (not CTMH), Clear Shimmer Brush, Craft Foam (not CTMH), Thin Foam Tape, Tri-Blend Markers

Enjoy,

Alyson

H2H - New to You!

 Welcome to this week's Heart 2 Heart challenge. 

The theme this week is "New To You", meaning try something that is new. It may not be new to others but as long as it is new to you and you let us know what aspect of your project is new, all is good. 

I am just starting to dabble in some mixed media and gloss sprays are totally new to me. I used three of them for the background of my card - Fuchsia, Ocean and Turquoise. I simply sprayed them on a piece of White Pearl Paper and they blended together to create the background with such interesting patterns.

I used an old pre-cut card base and stamped a sentiment which was layered on a square and then the same die as I used to cut the sentiment but in a larger size. I added some Silver Embellishing Thread and I also die cut a floral border to fit across the bottom. Some white pearls were coloured with Sharpie markers and added to the flowers and around the sentiment. 

Come and join us at Heart 2 Heart and show us your "New to You" project.

You have until the end of October to link up your project. 

We can’t wait to see what you create! 

Products used are Close To My Heart unless otherwise indicated: 

Paper: White Pearl Paper, 6x6 Bright Stack, White Daisy Cardstock, Lagoon Cardstock, Peacock Cardstock, White Daisy Card Base

Stamps: You Brighten My Day

Inks: Lagoon, Intense Black 

Accessories: Gloss Sprays - Fuchsia, Ocean and Turquoise, Stitched Brackets Thin Cuts, Decorative Borders Thin Cuts, Corner Rounder, Silver Embellishing Thread, White Pearls, Sharpie Markers (not CTMH), Lagoon Shimmer Brush

Enjoy,

Alyson

Thursday, October 1, 2020

October SOTM Blog Hop

Welcome to the October Stamp of the Month blog hop! 

We are featuring the stamp set "With All My Love" on this hop. The stamp set has some beautiful floral images including a large heart and terrific sentiments. 

You should have arrived here from Brenda Lapp's blog.

If you get lost on this blog hop, a complete list of participants can be found on Melinda Everitt's blog

I wanted to use some of the new mixed media products to create my card. The Distress Oxide inks blend so perfectly and I used 3 colours to create the background. I also spritzed a bit of water on the paper before I dried it. Then I added a stencil over top and brushed over that with Asteroid Glitter Gel. I expected the gel to retain the silver colour but surprisingly, it turned out more gold than silver. Once the background piece was dry, I added the heart which was stamped, coloured and fussy cut with a blue border added. The sentiment was stamped using 2 ink colours and die cut. I brushed the small orange flowers with the Gold Shimmer Brush, added some gold gems and gold embellishing thread.


The next blog on the hop is Darlys Recker's blog

I'm sure she has something awesome to share with you!

Products used are all Close To My Heart:

Paper: Distress Watercolour Cardstock, White Daisy Cardstock, Bluebird Cardstock 

Stamps: With All My Love 

Inks: Distress Oxide Inks (Mustard Seed, Spiced Marmalade, Candied Apple), Intense Black, Smoothie, Sundance 

Accessories: Stitched Rectangle Thin Cuts, Stitched Simple Brackets Thin Cuts, Artbooking Cricut Cartridge (stencil), Asteroid Stickles Glitter Gel, Tri-Blend Markers, Gold Glitter Gems, Gold Embellishing Thread, Gold Shimmer Brush 

Enjoy,

Alyson