Thursday, November 30, 2023

Coneflower Hugs

 This card was the result of another Tuesday evening cardmaking stash and dash. 

The parameters this week were as follows: type of card: A2 landscape, colours: pink and brown, embellishment: die cut and technique: dry embossing.

I used my coneflower dies and cut them from white cardstock. I inked the petals in shades of pink and the leaves in shades of brown. I splattered them with water and assembled the flower when the pieces were dry. The background was embossed with a 3D basket weave embossing folder and I added two hot foiled sentiments in the bottom corner with some metallic thread underneath. I added some gold gems to the card to finish it off. 

Enjoy, 

Alyson


Birthday Birdies

 I recently purchased the Tweet Life set from Concord and 9th and this was my first play with it. Those birdies... I just love them! 

I stencilled the nine birdies onto a card front and added details with black ink. The sentiment was stamped and I dragged a green ink pad around the edges of the card base and a piece of white cardstock to go behind the sentiment. I didn't add any embellishments to this card - it was cute enough on its own! 

Enjoy,

Alyson

Wednesday, November 29, 2023

Triangular Birthday Card

 This is a card that I found on Pinterest and I loved the geometric appearance so I had to try it myself. 

The background was splattered with a yellow and a purple shimmer brush and adhered to a purple mat and then a yellow card base. The triangles were die cut and assembled. I heat embossed the sentiment in white and used that as a guide for the placement of the triangles. I coloured some clear sparkles with a purple marker and added them to the card. 

Enjoy,

Alyson

Tuesday, November 28, 2023

Birthday Floral Fun Fold Card

 I posted a different birthday card in this same style a while ago. This is the one that I taught in my Facebook group - same design, just a completely different look! 

The blooms are from two sets of Spellbinders dies and the paper is from a paper pad from scrapbook . com. It took a long time to die cut and assemble the blooms but the end result is worth it. I love how this turned out! There is a panel on the back to write a message. 


Enjoy,

Alyson

Monday, November 27, 2023

Variegated Scene Card

There are so many posts of cards in this style - it's called a variegated scene. I chose patterned paper from Honey Bee Stamps for the scene component. 

The scene part was cut into the size needed and I ran that plus the white background though a very subtle embossing folder - just enough to add some texture. The scene pieces were cut to maintain the integrity of the image and I also cut borders for each piece. One the pieces were adhered, I stamped a small sentiment at the bottom. I used cardstock mats in coordinating colours behind the white front. 

Enjoy,

Alyson

Sunday, November 26, 2023

Snowmen Snow Globe - Traditional Colours

 I posted one of these snow globe cards a while ago... this one was made in traditional Christmas colours of red and green. 

There are three layers on the base and each one has a different scene on it. The card folds flat to 5x7 for mailing purposes. 


Enjoy,

Alyson

Saturday, November 25, 2023

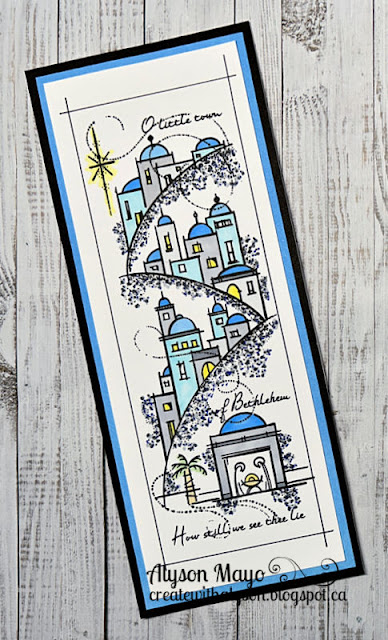
Peaceful Night in Blue

 Peaceful Night is the name of this gorgeous stamp and I used it to create a blue-themed slimline card. 

The image was stamped in black and I used shades of blue, grey and yellow to colour the buildings and the ground. I used a fine tip black marker to draw lines around the image but no embellishments were added as this image really speaks for itself! 

Enjoy,

Alyson

Friday, November 24, 2023

MTTCC 74 - Open Snowflake Card

Welcome to My Time to Craft Christmas Challenge 74!

The theme for this challenge is snowflakes. 

I chose to make a white card. The base was embossed with a snowflake embossing folder and I die cut two of the snowflake image from shimmery white cardstock. Those were adhered together and a second open circle panel was placed on the back to cover the edges of the snowflake. I used a silver hot foiled sentiment and placed it on a strip of vellum. Some silver glitter gems were added to the centre of the snowflake and on each side of the sentiment. Easy! 

Come and join us at MTTCC and show us your snowflake projects. 

You have two weeks to link up your project. 

We can't wait to see what you create!

Enjoy,

Alyson

Thursday, November 23, 2023

Black and White Open Flowers

 Black and white can be so stark but also very pretty, depending on the approach. This is kind of a combination of stark and pretty :) 

I die cut a floral outline from white cardstock and adhered it to a black base. The images in the centre were die cut as well and I lightly inked the centres of the flowers with a very light shade of green ink before filling them with tiny silver stars. Those pieces were arranged in the centre and I added a silver hot foiled sentiment across the centre. I used a white gel pen to add tiny dots around some of the leaves. 

Enjoy,

Alyson

Wednesday, November 22, 2023

Hummingbirds and Roses

 These two pretty cards were created with a stamp, stencil and die set from LDRS Creative. 

The flowers, leaves and birds were stamped, stencilled and die cut. There are two very different backgrounds - one was die cut in white and I placed a piece of black cardstock behind that piece. I inked a stitched rectangle and a stitched square to provide borders for the images. Tiny clear gems were placed in each of the point openings. 

The second background was stencilled in shades of light pink and green and then I spread glitter gel on top. Once that was dry, the images were arranged in the circle (which was purposely offset) and a sentiment was added at the bottom. A few dew drops were added on the flowers. 

Enjoy,

Alyson

Tuesday, November 21, 2023

TSOT 634 - Birthday Wishes Trees

 Welcome to Try Stampin' on Tuesday Challenge 634!

The optional theme this week (in addition to the sketch) is trees. 

I inked a small rectangle with orange, pink and purple oxide inks and then embossed three trees in black. A white gel pen was used to draw dots in the sky. The circles in the background were die cut and arranged according to the sketch. The back needed something so I embossed the black cardstock with a woodgrain embossing folder before adding the foiled sentiment under the rectangle. 

Come and join us at TSOT and show us how you interpret this week's sketch.

You have two weeks to link up your project. 

We can't wait to see what you create!

Enjoy,

Alyson

Monday, November 20, 2023

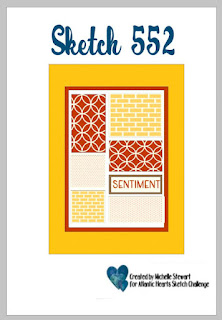
AH 552 - Joy Sectioned Card

 Welcome to Atlantic Hearts Sketch Challenge 552!

This was a tough sketch for me... just a personal thing, I think. I tried creating a scene with the different sections and that card is shown below. My second attempt is the first card posted. 

I sectioned off the rectangles and ink blended two in each colour. I used small, solid images and silver embossed them in each section The sentiment was embossed in light red and I coloured in the open sections with a green marker. Some silver Stickles were added on each side of the sentiment and I matted the front on a black mat, a silver foil mat and then on a red card base. 

This was my first attempt... I carefully cut the pieces on the scene so they would fit together without leaving any gaps and removed only the section for the sentiment. 

Come and join us at Atlantic Hearts and show us how you interpret this week's sketch.

You have until Sunday evening to link up your project. 

We can't wait to see what you create!

Enjoy,

Alyson

DT 154 - Merry Christmas

Welcome to Double Trouble Challenge 154! 

It's all about stitching details this week - the small graphic is below. Please visit the Double Trouble Challenge Blog for detailed information. 

We are pairing with Tuesday Morning Sketches. This is the sketch for their challenge.

I rotated the sketch ninety degrees. I chose some red and green Christmas papers and matted each of them with dark red cardstock. The oval and the oval border were both die cut with a stitched oval die. I stamped a bunch of snowflakes on the front piece and adhered a hot foiled sentiment across the centre. A few gold gems were added around the oval. 

Come and join us at Double Trouble and show us your projects. 

You have two weeks to link up your project. 

I am also linking up my card with the challenge at Tuesday Morning Sketches

We can't wait to see what you create! 

Enjoy,

Alyson


Sunday, November 19, 2023

Triple Panel Centre V-Fold Birthday Card

 Wow - that title is a mouthful - Triple Panel Centre V-Fold Card... for lack of a better description, that's what I chose to call this card. 

The card folds closed to just slightly smaller than an A2 card size but opens to be 12" wide. I chose a birthday theme and stamped all the images with blue pigment ink and embossed them before they were coloured. Some were die cut and some were fussy cut. I used two patterned papers - one that looks like an alcohol inked background and a polka dot paper. Stickles were added to the images to create some shimmer. There is a panel to write a message on the back. 


Enjoy,

Alyson

Saturday, November 18, 2023

SS 739 - Warm Winter Wishes

Welcome to Sketch Saturday Challenge 739!

The optional theme for this challenge is to include an image of a person. 

I chose to use three Christmas characters on my card. I stamped the images and coloured them before placing them behind the openings. The red background piece was embossed with a snowflake pattern and I added a piece of gold foil cardstock behind the green cardstock and adhered it to the background with craft foam. I wrapped a piece of thin gold thread around the card and tied a bow at the side. A hot foiled sentiment with a gold border was added and I placed three gold gems near the bow. 

Come and join us at Sketch Saturday and show us how you interpret this week's sketch. 

You have two weeks to link up your project. 

We can't wait to see what you create! 

Enjoy,

Alyson


Friday, November 17, 2023

CD 575 - Thinking of You

 Welcome to Colour Dare Challenge 575!

Choose one other colour from the group to go with Rosy. Details are below. 

I chose to use Journey as my second colour. 

The card front was die cut with a pretty rectangle shape and a piece of Journey cardstock was placed behind. The flowers and leaves were die cut and arranged in each corner and I added a hot foiled sentiment. I added some Stickles to the buds, some gems around the flowers and brushed the lines of the flowers with a clear shimmer brush. 

Come and join us at Colour Dare and show us how you interpret this week's challenge.

You have two weeks to link up your project.

We can't wait to see what you create! 

Enjoy,

Alyson
MTTC 521 - Have a Wonderful Christmas

 Welcome to My Time to Craft Challenge 521!

The theme for this challenge is "Got to be Christmas".

I am still in the midst of creating my Christmas cards - I make over 200 to mail - so this was a welcome challenge. 

I embossed a piece of dark green cardstock with a poinsettia embossing folder and then silver embossed a few poinsettia images. Those were coloured and die cut. I arranged them along the left side and added a silver embossed sentiment at the right. Some silver gems were added and I used a white gel pen to draw some details on the images. 

Come and join us at MTTC and show us your Christmas projects.

You have two weeks to link up your project. 

We can't wait to see what you create!

Enjoy,

Alyson

Thursday, November 16, 2023

Stencilled Fun Fold Christmas Cards

 These two card designs are ones that I used from the recent Crop and Create event. I chose traditional Christmas colours of red and green with a touch of grey. 

These are both fun fold cards and they fold flat for mailing. Each card uses stencilled images for the flowers and leaves. I also lightly stencilled grey backgrounds for each. 

The first one stands up and has the flowers crossing over the centre opening. There is a thin panel on the back that allows the card to lean backwards and also provides a place to write a message. I added two foiled sentiments at the bottom and some clear dew drops around the card. 

The second card is an easy fun fold with a panel that is attached only on one side. There is a place to write a message inside. I also added a foiled sentiment and some dew drops to this card. 

Enjoy,

Alyson

Wednesday, November 15, 2023

Reason to be Happy

 This pretty floral image is from an Altenew set that includes a stamp, dies, stencils and an embossing folder. I used the embossing folder and stencils for this card. 

The image was embossed and the layering stencils were used to add colour. The image was trimmed and I stamped the first part of the sentiment inside the frame.The word "happy"was die cut from silver foil and vellum and attached over the frame border. A dark blue mat was added before I adhered that to the card base. Some dew drops finished off this pretty card. 

Enjoy,

Alyson

Tuesday, November 14, 2023

Winter Critters Card Set

 These Lawn Fawn images captured my heart - they are just adorable! There are five rows of animals (I used four of them for these cards). There is a secondary stamp set available that has punny sentiments to match the various animals and I used that to fill in the text clouds. The backgrounds behind each row of critters is holographic paper and I used scraps of patterned papers for the top and bottom of each card. 

I made two sets of eight cards each for donation to my church's Christmas Market. I am always asked for more Christmas cards... it's the time of year! 

Enjoy,

Alyson

Monday, November 13, 2023

Let's Stamp Together - Pumpkin Spice Cards

 I subscribe to the Let's Stamp Together program and every second month, participants receive a stamp set, dies and a stencil along with a full teaching class. The theme for this month was pumpkin spice and the company was The Stamps of Life. 

These three cards were created with the products. Each involved creating a background. The images are ones that I will definitely use again as I don't have many food/drink stamp sets. 

Enjoy,

Alyson

Sunday, November 12, 2023

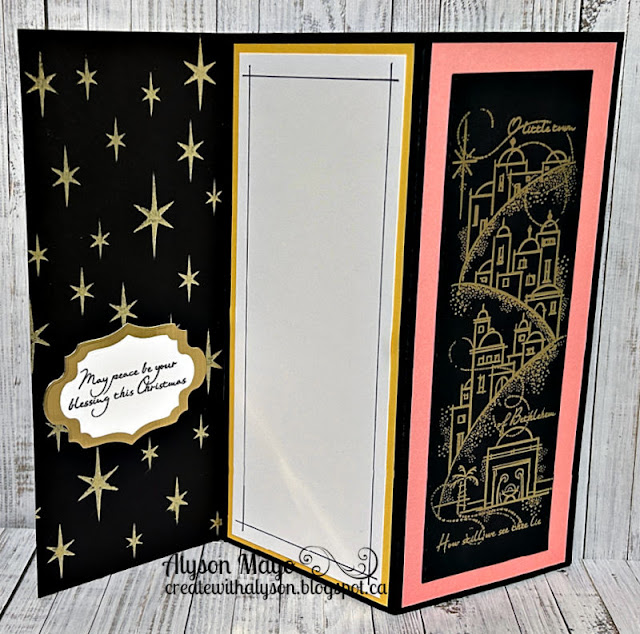
Peaceful Night Triple Slimline

 This slimline card has an image on the front and when fully opened, there are three other panels. 

The front panel was stamped and coloured with markers. I drew lines around the image, purposely not meeting the ends. Inside the card, I spread gold paste on a star stencil and added a small sentiment, then there is the writing panel and the back panel was heat embossed in gold. 


Enjoy,

Alyson

Saturday, November 11, 2023

Front Open Frame Birthday Card

 This card idea has been around for a while - it has taken me this long to get around to making one! It's a basic gatefold card but with a twist. 

The front panels have a shape die cut into them, allowing you to see through to the inside of the card. I chose a floral circle shape. The papers are old CTMH papers with a birthday theme. I die cut the shape from the front of the card and then created side panels for both the outside and the inside using the same die. I cut the same shape again for the inside of the card - that is the part that is visible when the card is closed. The cake and some other birthday elements were stamped, coloured and die cut and I added them either inside or on the closed front. Aside from some Stickles, no other embellishments were added so this card would sit flat. 


Enjoy,

Alyson

Friday, November 10, 2023

MTTCC 73 - Paper Pieced Red Poinsettias

Welcome to My Time to Craft Christmas Challenge 73! 

The theme for this challenge is poinsettias (one of my favourites)! 

I love this die from Spellbinders - it cuts the most gorgeous detail into the outline image and the centre leaves fall out. I die cut two each in gold and white and inked the white pieces to paper piece them back into the outline images. The background was embossed with a 3D embossing folder and I adhered that to a black mat and then a white card base. The sentiment was hot foiled and I added a smaller sentiment above. Some gold metallic thread was placed under the sentiment - no other embellishments were added. 

Come and join us at MTTCC and show us your projects using poinsettias. 

You have two weeks to link up your project. 

We can't wait to see what you create! 

Enjoy, 

Alyson

Thursday, November 9, 2023

Better Press Pine Branch Christmas Cards

 There are six cards shown here - I actually made two of each for twelve cards in total. 

Each of these cards was created using the Better Press system - it impresses the images into the cardstock. That is very hard to see in the photos but the effect is so pretty! 

I used a few colours and stamped some parts of sentiments and die cut one of them as well. Some edges were inked and flat embellishments or Stickles were added to a few cards. 


Enjoy,

Alyson

Wednesday, November 8, 2023

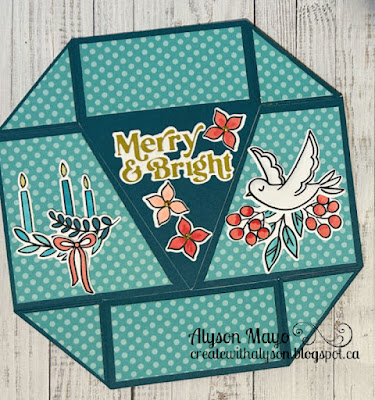
Christmas Tree Never Ending Card

 Never ending cards are a lot of fun because you can keep flipping them over and over. This one starts like an octagon but folds into a Christmas tree shape. 

I used the same polka dot pattern paper for each of the panels because direction-oriented paper can be very challenging with this type of card. The doves and other images were all stamped, coloured and die cut and adhered to the largest panels. A hot foiled sentiment was placed in the centre and I added some Stickles to the flowers and the candles. There is a small panel on the back to write a message. 

I have only photographed the flat card front and the tree fold - three are several other folds along the way. 


Enjoy,

Alyson

Tuesday, November 7, 2023

Christmas Owls

 This gorgeous owl image was part of Crop and Create event a while ago. I saw ideas for cards like these and wanted to try them myself. 

The backgrounds were ink blended - one in red and another in blue - and then splattered with white paint. The owl pieces were die cut in white and inked with shades of grey before being added to branches and pine boughs. A hot foiled sentiment was placed at the top of each card. 


Enjoy,

Alyson

Card Donation

Every year in early November, I gather up the cards I have made for the last several months and donate them to my church. They run a Christmas Market and sell the cards there so all the proceeds go back to the church. I always receive several calls and messages after the market, asking if I have more cards to sell... and I don't sell my cards personally. It's nice to know that they are appreciated! That's what matters! 

Enjoy,

Alyson

Monday, November 6, 2023

AH 550 - Blue Poinsettia

Welcome to Atlantic Hearts Sketch Challenge 550! 

The sketch is shown in horizontal format and I stayed very true to the design. 

I chose three grey patterns to use for the stripes across the card. The poinsettia was die cut from white and I inked the sections, each with a progressively darker shade of blue. The pieces were splattered with water and assembled. The pine branches were die cut from silver foil and I arranged the poinsettia on the left side of the card with the sentiment peeking out from underneath. The blue background was created by dragging an ink pad across white cardstock to customize the background colour for the flower. All of that was set on a white card base and some clear dew drops were placed on the poinsettia and around the sentiment. 

Come and join us at Atlantic Hearts and show us how you interpret this week's sketch. 

You have until Sunday evening to link up your project. 

We can't wait to see what you create!

Enjoy,

Alyson