Tuesday, November 30, 2021

TSOT 535 - Gold Foiled Leaves

Welcome to this week's Try Stampin' on Tuesday challenge! 

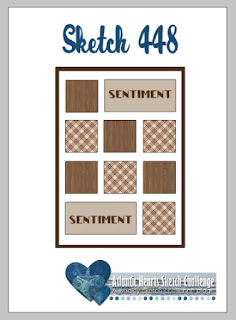
It is an either-or challenge this week - use the technique, the sketch or both. 

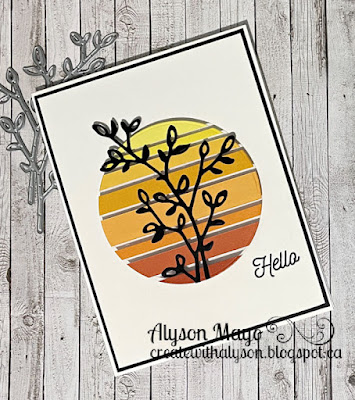
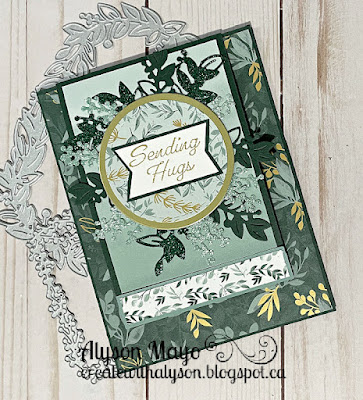
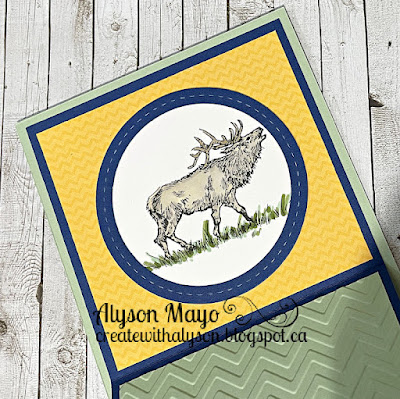
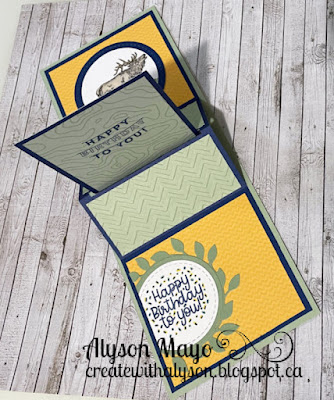
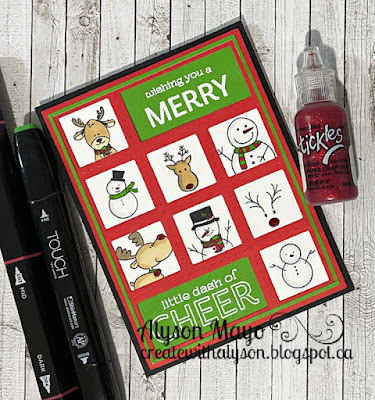
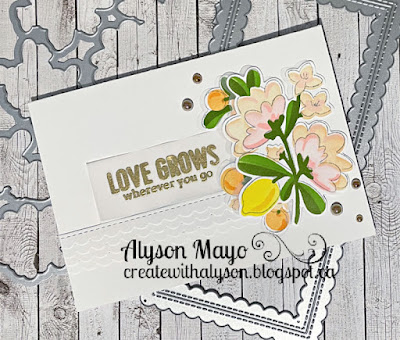
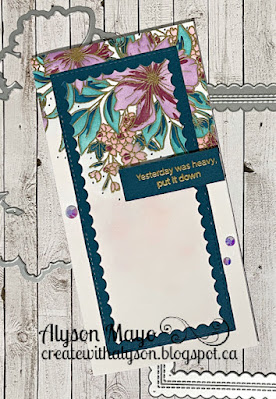
I used both the sketch and the technique - my images are set off center and I used a corner image rather than mixed sized circles. 

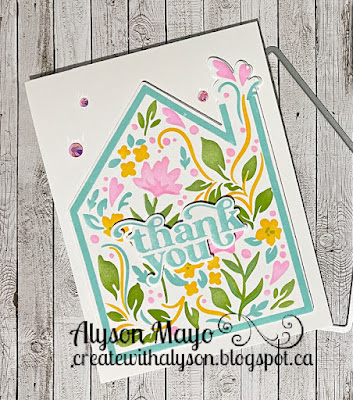
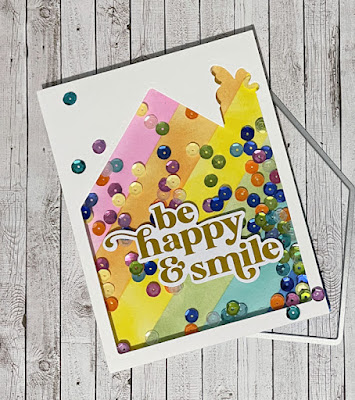
I foiled a piece of black cardstock with gold foil and adhered that to a gold foil cardstock background. I chose pinks to go with the black to create a bold statement. The sentiment was stamped and die cut, along with a border. The same cardstock colours were die cut using narrow strip dies that added a pattern to the paper. They were adhered to a piece of gold foil cardstock and placed in the top corner. I added some gold metallic thread and a few pink enamel dots around the sentiment. 


------------------------

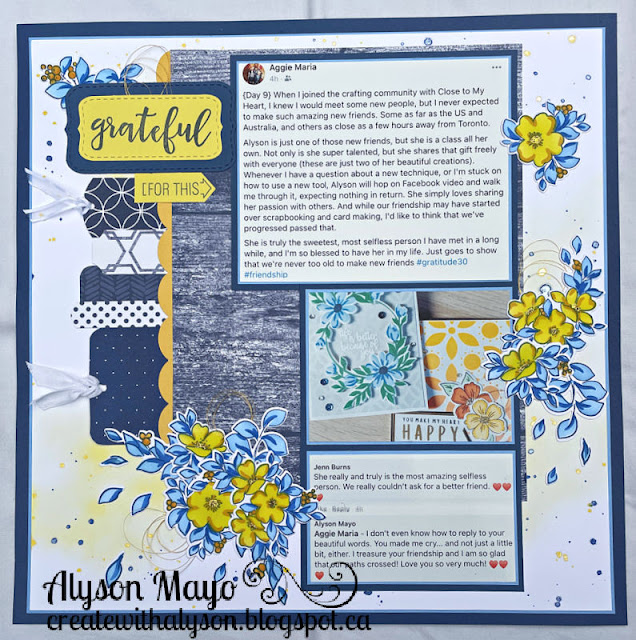
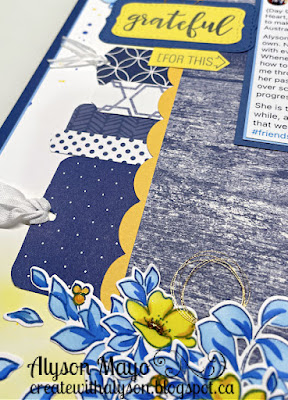
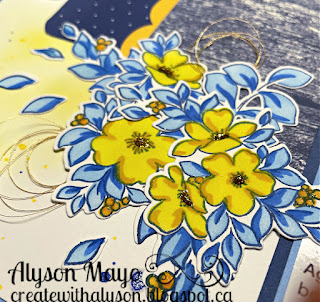
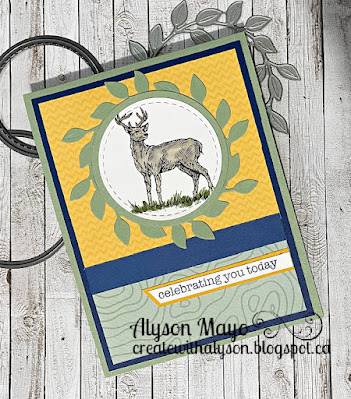
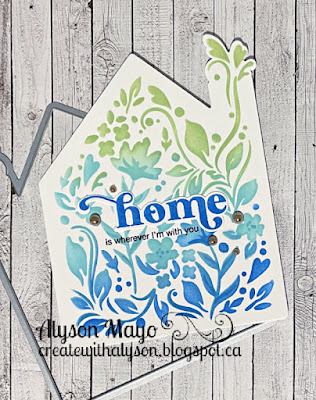
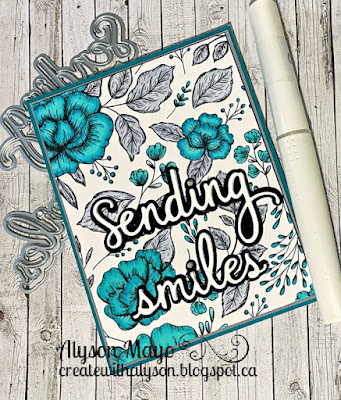
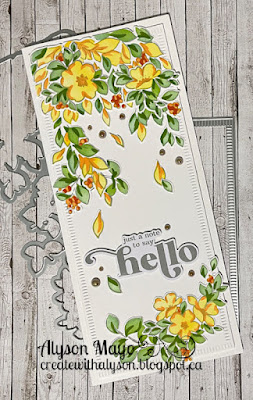
This is the card that I originally created for this challenge and decided I really wasn't happy with it... 

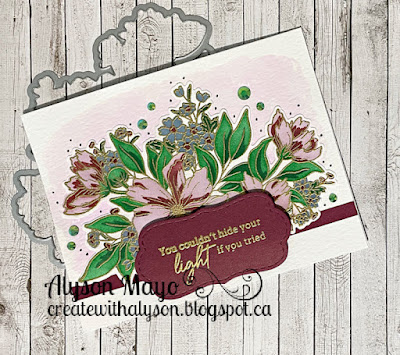
The background was created using a series of three layering stencils and three blue inks. The circles were die cut in four sizes and the flowers were all Cricut cut. Each flower has a dark blue base, a lighter blue middle layer and a vellum top layer. The stamens were Circut cut in two shades of yellow and small enamel dots were added to the centres. I placed some gold metallic thread behind the largest circle and tucked a small sentiment behind the largest flower. 

Come and join us at TSOT and show us how you interpret the challenge shown above. 

You have two weeks to link up your project. 

We can't wait to see what you create! 

Products used are as follows: 

Paper: White Daisy Cardstock, Black Cardstock, Wild Berry Cardstock, Ballerina Cardstock, Blue Belle Cardstock, Bluebird Cardstock, Lemonade Cardstock, Gold Foil Cardstock, Vellum  (all CTMH), Hammermill White Cardstock 

Stamps: Always Uplifting (PFS), Word Up (Reverse Confetti) 

Inks: Bluebird (CTMH), Summer Shower, Storm, Blue Jay (PFS), Black (Gina K. Designs) 

Accessories: Flower Market Cricut Collection, Basic Circle Thin Cuts, Stitched Circle Thin Cuts, Decorative Borders Thin Cuts, Stitched Simple Bracket Thin Cuts, Yellow Dots, Wild Berry Dots (all CTMH), Stepped Back Blocks Stencils (SSS), Foam Tape, Gold Metallic Thread

Enjoy,

Alyson

Monday, November 29, 2021

Double Trouble 98 and Atlantic Hearts 449 - Peace Poinsettia

Welcome to Double Trouble Challenge 98! 

This week is a "Something, Anything, Everything" challenge so grab your stuff and create along with us! The small graphic is below - visit the Double Trouble Challenge Blog for more information. 

I am also linking up my card with Atlantic Hearts Sketch Challenge where I am a member of the design team. 

My Christmas cards have been finished for a while now but I decided to create just one more as there is always that last minute need for a few extras. I used a holly embossing folder to emboss the background and that was adhered to a few pieces of white cardstock, from which I cut several dies. It added height without the use of foam tape. The embossed panel was adhered to a Glacier card base. I used a piece of plaid patterned paper for the center panel. The poinsettia was mounted on a stitched rectangle die cut and the sentiment was added under the lower leaf. I added some twine along the side of the plaid piece and three enamel dots in the top corner. The last step was to brush the poinsettia with both the Sundance and Clear Shimmer Brushes. 


The extras that I added to my card from Thing 3 (Twisted Sister) are as follows: plaid, embossing, twine, dots (although mine are white instead of black) and a banner.

Come and join us at both Double Trouble and Atlantic Hearts and show us how you interpret each challenge. 

Both of these challenges close on Sunday evening. 

We can’t wait to see what you create! 

Products used are Close To My Heart unless otherwise indicated:

Paper: Daisy Meadows Paper Pack, White Daisy Cardstock, Peacock Cardstock, Glacier Cardstock, Hammermill White Cardstock 

Stamps: Christmas Joy (Hero Arts), Winter Flower plus dies (Gina K. Designs) 

Inks: Intense Black (Hero Arts), Peacock

Accessories: Stitched Rectangle Dies (GMD), Holly Embossing Folder (Darice), White Enamel Dots, Clear Shimmer Brush, Sundance Shimmer Brush, Mint Twine (misc.), Tri-Blend Markers, Touch Markers 

Enjoy,

Alyson

Sunday, November 28, 2021

CAS Acetate Circle Card

This is a floating acetate card - the cardstock pieces appear to be floating on top of the card. 

I found this card on Pinterest but I didn't save the name of the creator and I can't find the pin again... I love the colour scheme of yellows and oranges. 

Several pieces of cardstock were cut in varying widths and placed in order from lightest to darkest. They were adhered to a piece of acetate with a circle die underneath for guidance. The acetate piece with the cardstock strips was die cut, leaving a circle with a clear background. That piece was adhered with foam tape to a white card front, then to black and finally to a white card base. The sentiment was stamped just to the right below the circle. A black die cut was added to the circle and that was it! 

Products used are as follows: 

Paper: Cardstock - Black, Lemonade, Sundance, Nectarine, Paprika (all CTMH), Neenah Solar White Cardstock 

Stamps: Change the World (Scrapbook and Cards Today)

Inks: Black (Gina K. Designs) 

Accessories: Circle Shaker Thin Cut (CTMH), Petal Palette dies (SU), Acetate, Foam Tape 

Enjoy,

Alyson

Saturday, November 27, 2021

Grateful Layout

I haven't scrapbooked for quite a while but this situation really needed a layout! 

November is often a month when people like to do a gratitude exercise. A wonderful friend of mine decided to participate in an online gratitude challenge to post one thing each day for which she was grateful. Imagine my surprise when I opened Facebook and this was the first post in my feed. She had written about me... I was so honoured and this sure made me cry! The first thing that caught my eye was the picture of two of my cards - and then I read her beautiful message. I printed that as well as my reply for this layout. 

I used a blue and yellow theme to go with the colours on the cards. The tags along the side were cut from various patterned paper and I added ribbon to two of them. The background was lightly inked with Squeezed Lemonade DO ink and splattered with shimmer brushes. The flowers were stamped, stencilled and die cut and arranged around the pictures. I added some gold metallic thread, gold shimmer brush accents and gold stickles to the floral groupings. I decided to border everything - the photos and the entire layout - for more emphasis.

This warms my heart every time I read it - and it still moves me to tears. Thank you, my friend! I am so blessed to have you in my life. 


Products used are Close To My Heart unless otherwise indicated: 

Paper: Various Patterned Papers, White Daisy Cardstock, Carolina Cardstock, Sapphire Cardstock, Lemonade Cardstock, Sundance Cardstock

Stamps: Feel So Blessed, In the Meadow stamps plus dies and layering stencils (Pink Fresh Studio) 

Inks: Carolina, Sapphire, Bluebird, Lemon, Sundance, Nectarine, Squeezed Lemonade DO Ink 

Accessories: Art Philosophy Cricut Collection, Stitched Simple Brackets Thin Cuts, Shimmer Brushes - Bluebird, Lemonade, Gold, Goldenrod Stickles, Corner Rounder, Gold Metallic Thread (misc.), Hole Punch, White Ribbon (misc.) 

Enjoy,

Alyson

Ever Eden Flip Top Card

I posted a card in this style a while ago and wanted to make it again because it is such a neat design. This time, my choice of papers were from Stampin' Up - a new collection called Eden's Garden. 

The front was decorated with a piece of gorgeous gold foiled patterned paper and I used an ombre patterned paper for the top flap. I die cut the borders from glitter paper and cardstock and cut them apart so I could place them under the circle where the sentiment sits. That flap is held in place with a strip adhered by foam tape. 


Inside, there is a stamped panel on which to write a message. The opposite side has a piece of patterned paper that coordinates with the circle on the front. 

Products used are as follows: 

Paper: Ever Eden Paper Collection, Evening Evergreen Cardstock, Soft Succulent Cardstock (all SU), White Daisy Cardstock, Gold Foil, Julep Glitter Paper, Evergreen Glitter Paper (CTMH)

Stamps: Eden's Garden plus dies (SU), Hey, Hi, Hello (CTMH)

Inks: Evergreen, Sage, Versamark (CTMH)

Accessories: Basic Circle Thin Cuts, Stitched Circle Thin Cuts, Gold Embossing Powder, Heat Tool, Foam Tape (all CTMH), Sharpie Marker 

Enjoy,

Alyson

Friday, November 26, 2021

Curvy Poinsettia

I wanted to play with a curvy border and a poinsettia... this is the result. The inspiration for this card came from Judy May, a SU demonstrator in Australia.

I used a stitched border die to cut both the red cardstock and the white cardstock and vellum layer. I had to do some careful measuring and cutting to align the pieces to fit and still leave a border around the edge of the card. The white cardstock under the vellum was dry embossed with a holly embossing folder. I stamped, coloured and die cut the poinsettia and leaves and used my Cricut to cut the branches and berries. A sentiment was stamped along the border and embossed in white. Once the flower was assembled, I added some red Stickles around the poinsettia and also brushed the centre of the poinsettia with a gold shimmer brush. The veins of the poinsettia were brushed with a clear shimmer brush. 


Products used are as follows:

Paper: White Daisy Cardstock, Evergreen Cardstock, Gold Foil, White Card Bases and Envelopes (CTMH), Red Cardstock (Gina K. Designs) 

Stamps: Love with All the Trimmings (CTMH), Winter Flower plus dies (Gina K. Designs) 

Inks: Intense Black (Hero Arts), Versamark 

Accessories: Flower Market Cricut Collection, Fancy Border Thin Cuts, White Detail Embossing Powder, Heat Tool, Clear Shimmer Brush, Gold Shimmer Brush, Christmas Red Stickles, Tri-Blend Markers (all CTMH), Holly Embossing Folder (Darice)

Enjoy,

Alyson

Thursday, November 25, 2021

Poinsettia Card Set

Poinsettias in red are so elegant for Christmas. They come in many different colours but red just always works. 

These images were stamped, stencilled and die cut and I used them on three different cards. 

The wreath image was used on the first card. I also die cut a vellum wreath, cut it apart and adhered the leaves behind the wreath. The front was die cut using a stitched rectangle die and then splattered with three shimmer brushes. The wreath was adhered slightly offset and the sentiment was placed across the centre. The splattered piece was adhered to gold foil and then to a red base. On each card, I added gold Stickles to the centres of the flowers and brushed the berries with a gold shimmer brush. 

Here is a close-up photo to show the shimmer and Stickles. 

I used some of the smaller images for the second card. A diamond grid was die cut three times and stacked. The sentiment was die cut from red glitter paper and the poinsettia groups were arranged in opposite corners.  

The reminder of the smaller images were used on the last card. A stitched lattice background was die cut and set on a piece of dark green cardstock. The sentiment was die cut from red glitter paper and the images were adhered in opposite corners. 

I love how these turned out (made two of each for a set of six). This set of cards will be delivered to a lovely lady from my church who sends almost as many cards as I send! 

Products used are Close To My Heart unless otherwise indicated: 

Paper: White Daisy Cardstock, Candy Apple Cardstock, Evergreen Cardstock, Red Glitter Paper, Gold Foil, Vellum, White Cards and Envelopes

Stamps: Poinsettia (plus layering stencils and die) (Pink Fresh Studio)

Inks: Smoothie, Candy Apple, Ruby, Clover, Evergreen, Black 

Accessories: Stitched Lattice Background Thin Cut, Diamond Grid Die (GMD), Stitched Rectangle Dies (GMD), Peace Die (Gina K. Designs), Peace Love Hope Joy Die (SSS), Wreath Die (SU), Christmas Blessings Die (Hunky Dory), Goldenrod Stickles, Shimmer Brushes - Black, Gold, Red, Evergreen

Enjoy,

Alyson

Acetate Insert Card - stamped

I knew I wanted to make another acetate insert card as the last one I created was made using die cuts. Stamping the inside section made it a little easier... just a little. 

I created the card base first - cut the cardstock and inserted the acetate. The floral image is from a slimline stamp and that was stamped across the opening. That section was coloured and I die cut some stitched rectangles for the borders. I also stamped an extra flower and some leaves and those were fussy cut and adhered below the diagonal image. I die cut the hello sentiment three times and stacked it before adhering that to a vellum outline. The last step was to draw a few dots around the lower images using a black marker. 

Products used are as follows: 

Paper: Black Cardstock, Willow Cardstock (CTMH), Vellum, Thick Acetate, Neenah Solar White Cardstock 

Stamps: Miss Your Smile (PFS)

Inks: Intense Black (Hero Arts) 

Accessories: Stitched Rectangle Thin Cuts (CTMH), Scripted Greetings Dies (PFS), Tri-Blend Markers, Copic Markers, Black Journaling Pen

Enjoy,

Alyson


Wednesday, November 24, 2021

Pop-Up Card - Majestic Animals

This is another pop-up card but I decided to use a masculine outdoor theme this time. 

The paper is from the Wander collection from CTMH. I purposely chose the yellow chevron pattern as I used a chevron embossing folder for sections inside the card. 

The animal images were stamped and coloured before being adhered to some circle die cuts. I purposely kept this card simple with no additional embellishments other than the wreath leaves behind the circles. 


Products used are Close To My Heart unless otherwise indicated: 

Paper: Wander Paper Pack, White Daisy Cardstock, Sapphire Cardstock, Sundance Cardstock, Sage Cardstock

Stamps: Nature's Wish, Celebrating You, Happy Birthday Song

Inks: Black (Gina K. Designs), Sapphire

Accessories: Arrange a Wreath Dies (SU), Basic Circle Thin Cuts, Stitched Circle Thin Cuts, Chevron Embossing Folder, Markers 

Enjoy,

Alyson

Tuesday, November 23, 2021

Pink Fresh Studio Event 5 - Built on Dreams

This is the final post for the Pink Fresh Studio event and the collection featured today is called Built on Dreams. 

This collection has a large house image with coordinating stencils and dies. The first card was stencilled, stamped and then die cut. That piece was adhered to an A2 card base with foam tape and the sentiment was stamped, die cut and added to the centre of the house. A few gems were placed at the top of the card. 

The second card is a shaker and the background was created by masking diagonal lines and inking each section in a rainbow colour scheme. The house was die cut from the card front to allow shaker elements to go inside. I used coordinating coloured sequins for the shaker. 

The last card is a shaped card. The large house was partially die cut to create a closed edges along the left side. The stencils were inked in three colours, creating an ombre effect. The sentiment was stamped and added to the front of the card. 

Products used are Pink Fresh Studio unless otherwise indicated: 

Paper: White Daisy Cardstock (CTMH), Acetate

Stamps: Built on Dreams plus layering stencils and dies

Inks: Various PFS inks, Black (Gina K. Designs) 

Accessories: Misc. Sequins, Sparkling Champagne Gems, Bubblegum Gems, Foam Tape, Foiled Sentiments 

Enjoy,

Alyson

Monday, November 22, 2021

AH 448 - Dash of Cheer Window Card

Welcome to Atlantic Hearts Sketch Challenge 448! 

It is such a fun sketch this week - little squares upon little squares offer so many possibilities! 

I decided to go with a Christmas theme and I used a window die to cut the outline and the squares. The patterns of the squares in the sketch determined the placement of my images and I used only snowmen and reindeer. The sentiment was broken into two sections and white embossed on green cardstock. I used that same cardstock to create a very thin border around the blocks. The entire front was adhered to the card base with foam tape. 

Come and join us at Atlantic Hearts and show us how you interpret the sketch shown above. 

You have until Sunday evening to link up your project. 

We can’t wait to see what you create! 

Products used are Close To My Heart unless otherwise indicated: 

Paper: Cardstock - White Daisy, Black, Candy Apple, Willow, Neenah Solar White Cardstock

Stamps: Jolly Characters, The Jubilee Crew, A Dash of Joy, Santa's List (Your Next Stamp)

Inks: Intense Black (Hero Arts), Versamark 

Accessories: Multi-Square Window Thin Cut, White Embossing Powder, Heat Tool, Craft Foam, Sharpie Markers, Touch Markers, Christmas Red Stickles 

Enjoy,

Alyson

Sunday, November 21, 2021

Pink Fresh Studio Event 4 - Citrus Blooms

Today's selection of cards from the Pink Fresh Studio event is all about citrus fruits - the collection is called Citrus Blooms.

This was one of my favourite collections - there are SO many possibilities! 

The first card has yellow shaded blooms and a gold embossed frame. The frame is purposely offset from the centre. It's hard to see in the photos but the images are stacked with a few layers of die cuts and they are offset on vellum die cuts. Some mint coloured ink was added in the centre of the card to draw the eye to the blooms. The sentiment was gold embossed on vellum. 

The second card is a mini slimline and the images were added along the edges, The same mint ink was used to lightly colour the center of the card and the sentiment. 

The last card is my favourite - it is simple but so cute. The scalloped border die was cut and layered offset to create a neat border. The sentiment was gold embossed and some of the images were added along the side. 

Products used are Pink Fresh Studio unless otherwise indicated: 

Paper: White Daisy Cardstock, Vellum (CTMH)

Stamps: Citrus Blooms plus layering stencils and dies, Always Uplifting, Built on Dreams 

Inks: Various PFS inks, Versamark

Accessories: Blanket Stitched Slimline and Mini Slimline Dies, Mini Slimline Scalloped Rectangle Die, Foiled Sentiments, Gold Embossing Powder, Heat Tool, Sparkling Champagne Gems 

Enjoy,

Alyson

Saturday, November 20, 2021

Pink Fresh Studio Event 3 - Celebrate in Style

This is the third post for the Pink Fresh Studio event and today, it is a celebration collection. 

Celebrate in Style is all about cakes - coloured, layered and stacked! 

The first card contains a layered cake that was stencilled and gold embossed. The sentiment was also stencilled with Versamark, embossed and die cut. The background was dry embossed using the hot foil plate included in the package. 

The second card was also stencilled and gold embossed. The sentiment was stencilled right onto the card and two mini slimline dies were added around the base. The scalloped die was inked using an ink that coordinated with the flowers. 

The last card is a slimline, leaving lot of room for two sets of cakes! Yellow and orange flowers on stacked cakes - always good for a celebration! 

Products used are Pink Fresh Studio unless otherwise indicated:

Paper: White Daisy Cardstock (CTMH)

Stamps: Celebrate in Style plus layering stencils and dies

Inks: Various PFS inks, Versamark 

Accessories: Blanket Stitched Slimline and Mini Slimline Dies, Mini Slimline Stitched Scalloped Rectangle Die, Sparkling Champagne Gems, Lush Vines Hot Foil Plate, Glacier Gems, Foam Tape, Gold Embossing Powder, Heat Tool 

Enjoy,

Alyson


Friday, November 19, 2021

CD 471 - Sending Smiles

Welcome to Colour Dare Challenge 471!

This week, we have a specific colour palette with the addition of ONE colour. 

I chose to add turquoise to the required palette (no surprise to anyone who knows me...)

The floral background is a printed patterned paper in black. I coloured the leaves grey and the flowers in shades of turquoise. That piece was adhered to craft foam and then to grey cardstock followed by turquoise cardstock and finally to a top folding card base. The sentiment was die cut from white cardstock and black glitter paper and the words were stacked. I used some liquid dots for the dots on the letter "I". The shaded lines on the flowers were brushed with a clear shimmer brush. 


Come and join us at Colour Dare and show us how you interpret this week's challenge. 

You have two weeks to link up your project. 

We can’t wait to see what you create!

Products used are as follows: 

Paper: Love Story - Black Paper Pack, White Daisy Cardstock, Pewter Cardstock, Black Glitter Paper (CTMH), Teal Cardstock (scrapbook.com), Neenah Solar White Cardstock 

Stamps: none

Inks: none

Accessories: Phrase Builder - Sending (PFS), Pearl Pop of Colour (scrapbook.com), Tri-Blend Markers, Clear Shimmer Brush (CTMH), Craft Foam 

Enjoy,

Alyson


Thursday, November 18, 2021

Pink Fresh Studio Event 2 - Cosmos Bunch

This is the second post for the Pink Fresh Studio virtual event. Today's cards feature the Cosmos Bunch bundle. 

This class was actually a watercolour class but I have never had success with that medium. I know it takes a lot of practice and it is something I would like to try down the road. I chose to use the layering stencils for these cards instead of watercoloring the images.

I used the layering stencils for all three cards. I did paint a background for the first one using just inks and water. The sentiment was gold embossed on cardstock to match the inks. 

The second card was stencilled right onto the card front and a scalloped border die was added on top. A very gentle touch was used to add some pink shading below the flowers. 

The large stamp was stamped around the outside border of the last card and then the stencilled image was die cut and cut apart so it could be placed over the stamped image. A foiled sentiment was added along with some gems. 

Products used are Pink Fresh Studio unless otherwise indicated: 

Paper: White Daisy Cardstock, Sangria Cardstock, Peacock Cardstock (all CTMH), Watercolour Paper 

Stamps: Cosmos Bunch plus layering stencils and dies, Always Uplifting

Inks: Lagoon, Peacock, Lilac, Grape, Flamingo, Willow, Clover, Blue Belle, Lilac, Sangria (all CTMH), Various PFS inks, Versamark

Accessories: Stitched Scalloped Brackets Thin Cuts, Gold Embossing Powder, Heat Tool (CTMH), Mini Slimline Stitched Rectangle Die, Fold Sentiments, Glacier Gems, Lavender Gems, Emerald City Gems, Foam Tape

Enjoy,

Alyson

Wednesday, November 17, 2021

Pink Fresh Studio Event 1 - In the Meadow

I recently participated in a virtual event by Pink Fresh Studio. I have come to love their products especially the layering stencils. We received a terrific mix of products for the event and I have sorted the finished cards into groups based on the products. There will be a few posts for this event. 

None of the products that we received are available to the public yet... they will be released soon if you are interested. 

This first set of cards was created using a combination of layering stencils, stamps and dies. This set also included some 4" wide washi tape - yes, washi tape! The tape has a beautiful design on it and the die cuts the images perfectly. The first two cards were created using the washi tape images. The leaf card has a beautiful embossed background that was done using a hot foil plate as an embossing image. The last card was created using the layering stencils.


Products used are Pink Fresh Studio unless otherwise indicated: 

Paper: White Daisy Cardstock (CTMH)

Stamps: In the Meadow (plus layering stencils, dies and washi tape), Always Uplifting

Inks: Various PFS inks, Black (Gina K. Designs) 

Accessories: Blanket Stitched Slimline and Mini Slimline Dies, Mini Slimline Stitched Scalloped Rectangle Die, Lush Vines Hot Foil Plate, Foiled Sentiments, Sparkling Champagne Gems, Ballet Slippers Gems, Foam Tape 

Enjoy,

Alyson

Tuesday, November 16, 2021

Spotlight Floral Card Set

I make quite a few sets of cards to give as gifts and this is a set featuring the spotlight technique. 

The white front was temporarily adhered to the card base and the floral image was stamped over both pieces. The smaller white piece was removed and the flowers were coloured. That piece was then adhered to a piece of black cardstock and back onto the card base. I added a die cut sentiment to each card and also some coordinating Liquid Pearls. I made two of each card for a set of eight. 


Products used are Close To My Heart unless otherwise indicated: 

Paper: White Cardstock, Black Cardstock, White Cards and Envelopes 

Stamps: Happiness Never Grows Old

Inks: Intense Black (Hero Arts) 

Accessories: Tri-Blend Markers, Phrase Builder - Sending Dies (PFS), Phrase Builder - Hello Dies (PFS), Liquid Pearls - Bisque, Lavender, Juniper, Dazzle

Enjoy,

Alyson