Tuesday, January 31, 2023

TSOT 592 - Happiest of Birthdays

 Welcome to Try Stampin' on Tuesday Challenge 592! 

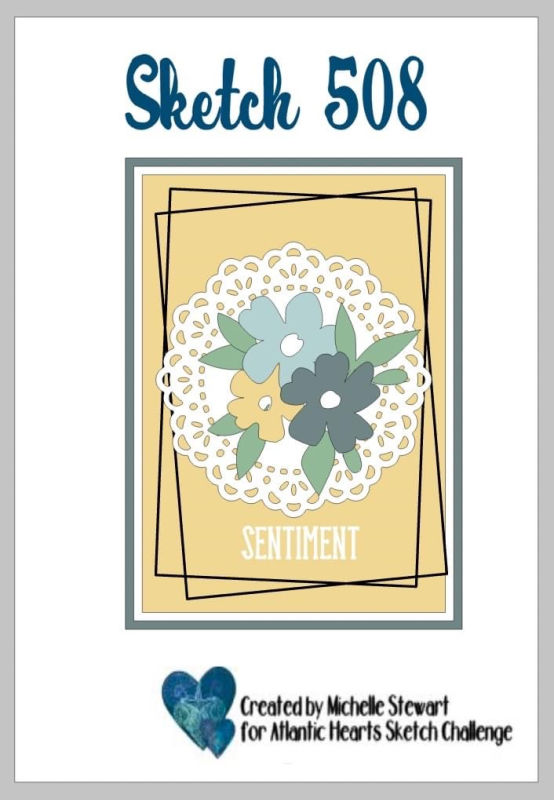
The optional theme (in addition to the sketch) is ink blending. 

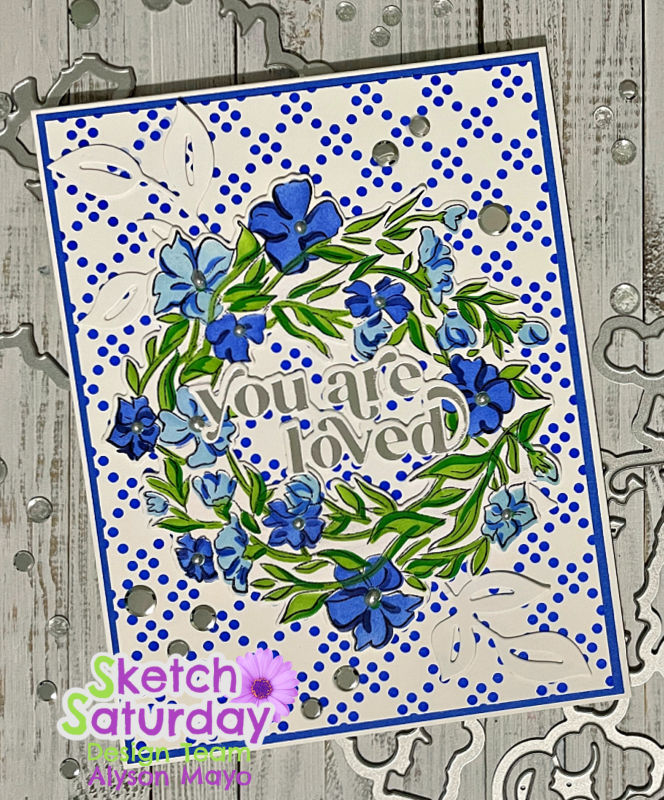
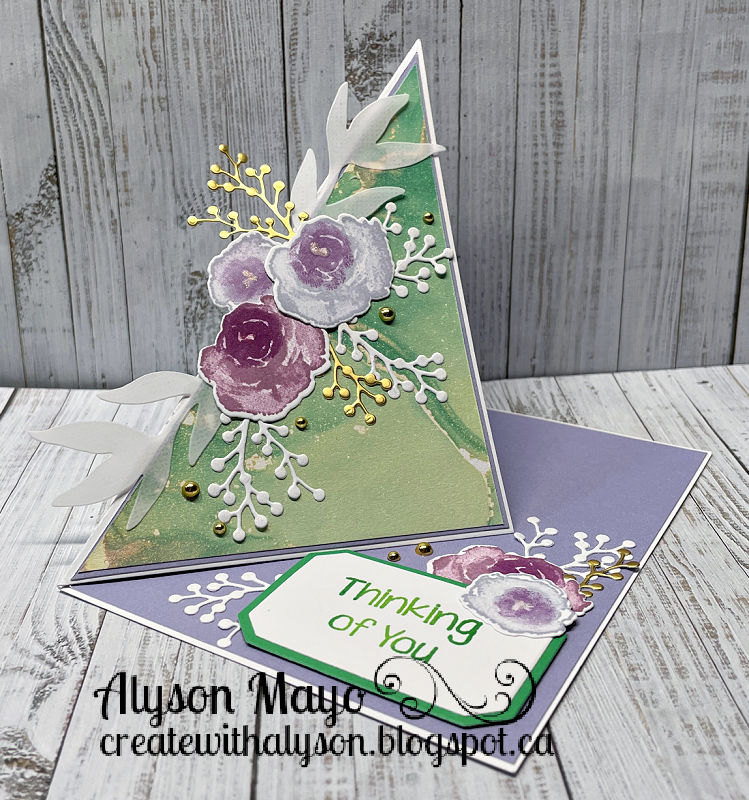
This was a fun card to make! I had to move to a 5x7 card size due to the size of the wreath, but it worked out. I die cut a white circle along with several leaf and berry elements. I inked the base of each piece and then arranged them around the circle before cutting it in half. I did flip the sketch horizontally as it worked better for me. 

I used three shades of purple oxide inks and blended a background which was then splattered with water. That piece was adhered to green cardstock, gold foil and finally to the white card base. The wreath was added to the left side and I tucked a foiled sentiment under the wreath. Some gold gems were added to finish off the card. 


Come and join us at TSOT and show us how you interpret this week's sketch.

You have two weeks to link up your project. 

We can’t wait to see what you create! 

Enjoy,

Alyson

Monday, January 30, 2023

AH 510 - Wonderful Day Peonies

Welcome to Atlantic Hearts Sketch Challenge 510!

The sketch is shown in vertical format - that can certainly be changed if desired. I used the sketch as it is shown. 

I used two hot foiled backgrounds - the leaf background was foiled in silver and the stripes were foiled in a light aqua colour. I added thin strips of silver foil to separate the centre panel from the background. I stamped, stencilled and die cut several peony images and they were arranged around the white embossed sentiment. I added some clear dew drops around the card and adhered the front to a blue card base. 

Come and join us at Atlantic Hearts and show us how you interpret this week's challenge.

You have until Sunday evening to link up your project.

We can't wait to see what you create! 

Enjoy,

Alyson

Sunday, January 29, 2023

Woven Wonderful Card

 The title for this post sounds strange... until you see the card with the sentiment! 

I used a colour guide to choose a very different colour scheme - one that I would not have chosen myself! I cut several strips of five cardstock colours in various widths and wove them together. That was adhered to a piece of white cardstock, then to a green background and finally to a white card base. The sentiment was stamped in three of the same colours and die cut before being adhered to the front. Some metallic thread was added under the sentiment and I added several dew drops around the card. 


Enjoy,

Alyson

Saturday, January 28, 2023

Sketch Saturday 718 - You are Loved Wreath

Welcome to Sketch Saturday Challenge 718! 

The optional theme (in addition to the sketch) is love. 

I had created a different card for this sketch but decided to do something else instead. The original card and info are posted below. 

I mixed texture paste with ink from a blue shimmer brush and spread it over a stencil onto a piece of white cardstock. That was adhered to a blue mat and then to a white card base. 

The wreath was stamped, stencilled and die cut and some white leaves were added in opposite corners (they are a little hard to see...) I placed a foiled sentiment across the centre of the wreath and added some silver Liquid Pearls to the centres of the flowers and silver gems around the card. 

The card below is the first one that I made for this challenge. It's a colour scheme that I never would have put together myself - it came from a resource that I own. 

I inked white cardstock with the colours I wanted to use (two shades of purple and two shades of blue). The circles and hexagon were die cut and I embossed the sentiment in white on the hexagon. I also die cut some purple and white hearts to scatter around the card. The black background was embossed with a 3D embossing folder and adhered to the card base. The last step was to add tiny silver gems around the circles. 

Come and join us at Sketch Saturday and show us how you interpret the sketch shown above. 

You have two weeks to link up your project. 

We can’t wait to see what you create! 

Enjoy,

Alyson


Friday, January 27, 2023

CD 533 - Stencilled Butterfly Card

 Welcome to Colour Dare Challenge 533!

Choose at least three colours from the graphic shown below. Neutrals and metallics are free to use. 

I chose Capri, Avocado and Nectarine. 

I started by stencilling the butterfly onto a card front. It took me a few attempts to get this to work... my first attempt was to mask each section of the butterfly. It looked great - until I realized that the ink had bled under the stencil. My second attempt was to splatter water to give the butterfly more dimension but that also bled under the stencil. I finally decided it was going to be just orange - no water, no masking - just orange! I also die cut the butterfly image from scrap paper and with that piece temporarily adhered, I splattered the background with Avocado and gold shimmer brushes. 

The flowers required multiple layers of stamping so I used one ink pad but in different ways. I stamped in second generation, then single stamped, double stamped, triple stamped and finally stamped multiple times to get the depth of colour for each layer. The flowers and leaves were die cut and adhered across the centre of the butterfly. I added a hot foiled sentiment at the bottom and some gold gems to the centres of the flowers. 

Come and join us at Colour Dare and show us how you interpret this week's challenge. 

You have two weeks to link up your project. 

We can’t wait to see what you create! 

Enjoy,

Alyson


Thursday, January 26, 2023

Love Your Smile Heart Card

 This cute card was fun to make - stamping, colouring, die cutting, marker detailing... lots of aspects to it. 

I die cut a heart from a white card base and used a second piece of white cardstock to build the floral scene. The flowers were stamped, coloured and die cut and I cut some of the images apart to fit them where I wanted inside the heart opening. The card front was trimmed and adhered to the base with foam tape. I drew black dots around the heart with a fine tip marker. 

The word "love" was die cut from a piece of white cardstock where I used markers to blend several shades of coral together and that was mounted on vellum (coloured) and adhered under the heart. The second part of the sentiment was stamped and coloured with shades of green to create an ombre effect. 

Enjoy,

Alyson

Wednesday, January 25, 2023

Accordion Card with a Coneflower

 Tuesday Evening 30 Minute Card Making Stash and Dash... It was a fun one this week. I did not finish in 30 minutes this time! 

The parameters were as follows: accordion card, 3 colours, use a border and dovetailing. 

I used turquoise, purple and green and the border is the two lines of sentiments stamped at the bottom of the centre piece. My sentiment is dovetailed on both sides. 

I used some printed papers for the sides of the accordion. The background was stencilled in turquoise and I die cut the flower and leaves from white cardstock. Those pieces were inked in shades of purple and green. The border at the bottom was stamped in two shades of purple. I didn't add any embellishments to this card as it is already quite bulky when the sides are folded in toward the centre. 

Enjoy,

Alyson

Tuesday, January 24, 2023

Rainbow Triangle Sketch Card

 I did a sketch challenge created by a friend of mine - the sketch is shown below. 

My first attempt was not overly successful - but I will post it toward the bottom. Triangles can be difficult as they are much like ovals - there are many sizes and possibilities and they don't play nicely with each other! 

I chose one part of a two part layering stencil for this card. I used distress oxide inks and created a rainbow of colours and sprayed it with water. I also inked a piece of white cardstock and die cut the rainbow word from that. The front was adhered to a black card base and I used a black border for the sentiment. A smaller sentiment piece was adhered just under the larger one. 


My first attempt... I figured out the size I needed to cut triangles to fit my card. I inked a piece of white cardstock in the same rainbow effect but once the pieces were cut into triangles, I had several pieces left over and had to fit them together the best I could to create the rainbow effect. Those were adhered to black cardstock and then to a white base so the sentiment is opposite the first card. 

Enjoy,

Alyson

Monday, January 23, 2023

Layered Tunnel Polar Bear

If you look closely, you can see a polar bear inside the tunnel!

The layers were created using three dies and I used white plus two layers of turquoise shaded cardstock for that. The back panel was ink blended with oxide inks and splattered with blue, turquoise and white craft paint. The front of the card was spattered with a few shimmer brushes. I added a white glitter snowbank and a small polar bear in the background, The sentiment was stamped and added to the top corner. A few clear gems were added around the card. 

Enjoy,

Alyson

Sunday, January 22, 2023

Heart Cover Card

 This cute card with two overlapping hearts would be perfect for Valentine's Day. 

I chose a colour scheme of pink and turquoise. The hearts were die cut and adhered to the side of the card base, followed by the patterned paper. I stamped and fussy cut the flowers and die cut the greenery. That was all arranged on the front panels. I realized after I had assembled everything that I needed a ribbon to hold the front two hearts together... I cut a small slit on the right side and threaded a ribbon through that to be able to tie the front closed. The inside has a sentiment under the right heart and there are also a few flowers inside the card where a message can be written.


Enjoy,

Alyson

Saturday, January 21, 2023

Watercolour Stripes

 This was my second attempt at watercolouring - just creating a background. 

I used shades of blue and created a series of stripes. I die cut some leaves and flowers and I inked a blue background to coordinate with the watercolouring as I didn't have the right shade of blue cardstock. The images were arranged within the smaller white rectangle and I added a layered sentiment at the bottom. A few iridescent gems were placed around the image to finish off the card. 

Enjoy,

Alyson

Friday, January 20, 2023

DT 130 - Thinking of You Angel

 Welcome to Double Trouble Challenge 130! 

The small graphic is below - please visit the Double Trouble Challenge Blog for more information. 

I used an angel for my mythical element and I stamped, coloured and fussy cut the angel image. The background was die cut with a stitched cover plate die and I added some mint ink in two corners. The stitched frame was die cut from vellum, silver foil and jade cardstock and the angel was adhered in the centre. I added some clear Stickles to her wings. A bow was added along with a hot foiled sentiment and some silver glitter gems. 

Come and join us at Double Trouble and show us how you interpret this challenge.

I am also linking up my card with The Fairy and the Unicorn Challenge.

You have two weeks to link up your project.

We can’t wait to see what you create! 

Enjoy,

Alyson

Thursday, January 19, 2023

Watercolour Scene Cards

 Anyone who knows me well knows that watercolouring terrifies me! I have never had success with that medium - but I wanted to try a different idea. 

I created simple stripes across both of these backgrounds by making sure the paper was wet and choosing rainbow colours to add one after the next. Once they were dry, they looked like sunset and lake scenes to me. I chose silhouette images for each and embossed them in black. Mats were added behind each card front but no embellishments were used - clean and simple!


Enjoy,

Alyson

Wednesday, January 18, 2023

Stay Paw-sitive Card

This cute card was created for the weekly card making stash and dash event that I love to do! 

The parameters this week were as follows: a fun fold card (could not be a gatefold, accordion or easel card), use orange, include a tag and do some colouring. 

This card style is one that I really like because it is very easy to make. There are no strange cuts involved. I used orange and blue patterned papers and I stamped and coloured three dogs with some bones. The doggie images were added to the front panel along with a sentiment. 

The parameters are all obvious except that tag... I included a small tag on the doggie at the very top! 

And I actually finished in 28 minutes! That's a record for me! 

Enjoy,

Alyson


Tuesday, January 17, 2023

TSOT 590 - Crocus Stems

 Welcome to Try Stampin' on Tuesday Challenge 590! 

The optional theme (in addition to the sketch) is to add some shine. 

I started with a background that was hot foiled in purple on a piece of light purple glitter paper. One of the long rectangles was embossed and lightly inked. The flowers were die cut in white and I inked them before adding them to the centre of the circle. A sentiment was tucked under the inside piece of the circle and a few black gems were added around the card. 

Come and join us at TSOT and show us how you interpret this week's sketch. 

You have two weeks to link up your project. 

We can’t wait to see what you create! 

Enjoy,

Alyson


Monday, January 16, 2023

AH 508 - Turquoise and Silver Floral Card


Welcome to Atlantic Hearts Sketch Challenge 508! 

There is a lot of detail to this week's sketch. 

I chose to stay very true to the sketch.

I hot foiled a silver background on black glitter paper. The frame was designed and cut on my Cricut and I used an old silver doily on top. The flowers and leaves were die cut and inked for added dimension and I brushed the lines of the flowers with a clear shimmer brush. The sentiment was also hot foiled and added at the bottom.

Come and join us at Atlantic Hearts and who us how you interpret this week's challenge. 

You have until Sunday evening to link up your project. 

We can’t wait to see what you create! 

Enjoy,

Alyson

Sunday, January 15, 2023

Embossed and Stencilled Backgrounds

 A recent video by Gina K. Designs inspired these cards. Embossing and then stencilling a background is such a simple idea.

I used three different stencils and inked over each one with Versamark ink and then I white embossed the backgrounds. I used three different colour schemes and inked over each background, allowing the white embossing to show. I kept each card simple, adding only a sentiment and a few embellishments to allow the backgrounds to shine. 


Enjoy,

Alyson

Saturday, January 14, 2023

Sketch Saturday 717 - Happiest of Birthdays

 Welcome to Sketch Saturday Challenge 717!

This is a new Design Team for me - and I love working with sketches! I am so happy for the opportunity to join this team! 

The sketch is shown below. The optional theme (in addition to the sketch) is to use a new stamp. 

I have some stamps that I recently purchased and simply haven't had a chance to use much, if at all. This was one of them. I embossed the floral image in silver and coloured it with markers. The circles along the sides were die cut and adhered under the floral panel. I stitched along the lower left side with peach coloured embroidery thread and added a foiled sentiment at the bottom before adding the card front to the base using craft foam. I don't usually stay this true to a sketch but this one was easy to use! 

Come and join us at Sketch Saturday and show us how you interpret the sketch shown above. 

You have two weeks to link up your project. 

We can't wait to see what you create! 

Enjoy,

Alyson


Friday, January 13, 2023

CD 531 - Birthday Squares

 Welcome to Colour Dare Challenge 531!

Choose any row or column from the tic-tac-toe board below. You can use additional colours, as long as they are on the grid. 

I chose the left column (Papaya, Sapphire and Glacier) plus Peach and Bluebird.

The small squares were cut and embossed using four different patterns. I die cut the large grid from Glacier cardstock and added the smaller squares inside. There are two leaf images that were die cut from vellum and I pieced them together to look like one long stem. The sentiment was added at the bottom and a few iridescent gems were added around the card. 

Come and join us at Colour Dare and show us how you interpret this week's challenge. 

You have two weeks to link up your project. 

We can’t wait to see what you create! 

Enjoy,

Alyson

Thursday, January 12, 2023

Paper Hug Orange Roses

I recently purchased a wonderful colour guide and I was struggling to use these inked roses that I create a a while ago. The guide contained this colour scheme and I would never have considered using these colours together (orange, dark red and yellow).

The roses were stamped and die cut. I used a green hot foiled background and I die cut a square in the centre. I added a green frame around the opening and placed the roses around the left side. The sentiment was stamped on the yellow background before I added some green, clear and gold loose elements inside the shaker. I matted the front on yellow cardstock and then on dark red cardstock. A few gold gems were added around the card.

Enjoy,

Alyson

Wednesday, January 11, 2023

Doodled Birdies

 I saw a card like this on Pinterest and thought it would be fun to try myself. I am NOT a drawing artist so it took me a few times to get it right. 

I drew a thick line across the card and marked the line for spacing purposes. I drew the legs first and then added the bodies. The images above the line were coloured solid and I drew lines across the birdie hanging upside down so I could use the same colours but create a pattern on the body. The sentiment fit perfectly for this card! 

Enjoy,

Alyson

Tuesday, January 10, 2023

Simply - Just Simply...

 Sometimes clean and simple just works!

The stamp used to create this card is a different one - the tree image is designed to be stamped once and then the stamp is rotated 180 degrees and the trees are stamped a second time. It gives the fullness to the base of the forest. 

I created a blue background by lightly inking a piece of white cardstock and then stamped the trees in two shades of green. The birds in the centre and the sentiment were stamped in dark grey. I added a couple of cardstock mats behind the trees and adhered the sentiment at the bottom. Easy! 

Enjoy,

Alyson

Monday, January 9, 2023

Sunflower Hugs

 Sunflowers always make me smile! 

This card ended up being 5x7 in size due to the offset squares. I don't make card that big very often! 

The die cut squares were intertwined and adhered together. I ink blended a purple background and splattered it with water before cutting it to fit behind the squares. I also ink blended a larger piece to use as one of the layers. The sunflower images (washi tape) were added in the centre of the squares. I stamped a background pattern on a piece of green cardstock and adhered that to brown cardstock and then to the embossed background. A foiled sentiment was placed in the lower corner along with some gold metallic thread. I used several mats behind the embossed piece and added some purple gems to finish off the card. 

Enjoy,

Alyson

Sunday, January 8, 2023

Floating Butterfly Card

This is a cute card with a nice surprise inside.

I used some alcohol inked patterned paper for the card panels. On the front, I embossed a piece of bright pink cardstock and added some purple ink along the edges. The sentiment was stamped and die cut and I added a die cut butterfly at the top. A flight trail was created using a fine tip black marker. 

Inside, I used glitter paper for the cross piece and adhered the butterflies using jewellery cord. The bodies of all the butterflies were brushed with Stickles to add some shine. There is a place on the back of the card to write a message. 


Enjoy,

Alyson

Saturday, January 7, 2023

Birthday Cuties

 This is another card I saw on Pinterest and thought the concept was so neat! It really is very simple. 

The bodies were die cut using three sizes of circle dies. I fussy cut the caps, noses and wings. The wings were adhered with foam tape and I added a nose and hat to each bird. The legs were drawn using a ruler and I stamped a tiny sentiment at the top. 

Enjoy,

Alyson

Friday, January 6, 2023

DT 129 and CD 530 - Trio of Dogs

 Welcome to Double Trouble Challenge 129 and Colour Dare Challenge 530! 

The small graphic for Double Trouble is below. We are pairing with Colour Dare for this challenge so their graphic is also shown. 


I chose to create a slimline card with three shakers. My 3-2-1 recipe includes the three colours from the challenge (plus gold, brown, black and white), 2 layers (I have several layers on my card) and 1 cuddly item (doggies are cuddly, for sure!)

Inside each shaker, there is a stamped and coloured doggie image, a Sage stitched circle and a Desert Sand glitter base. I added gold stars and clear sequins inside each shaker. The front was die cut and adhered over the shakers. I stamped the sentiment in two colours and fussy cut two words to highlight them. A few gold sequins were added around the card to finish it off. 

Come and join us at both Double Trouble and Colour Dare and show us how you interpret this challenge. 

Both challenges are open for two weeks.

We can't wait to see what you create!

Enjoy,

Alyson

Thursday, January 5, 2023

Side Easel Card

 I have made this card style before but it was time to try it again! 

A side easel fold is very easy to make - it is a standard A2 card base with the left side scored and folded diagonally. For this one, I die cut several branch images from white and gold cardstock as well as a few leaf clusters from vellum. The vellum leaves were adhered together to make them thicker. I stamped the flowers in shades of purple and added some gold shimmer to the centres. The images were arranged on the card and I used a sentiment adhered with foam tape as the stopper for the easel. A message can be written inside the folded flap. 

Enjoy,

Alyson

Wednesday, January 4, 2023

You're Awesome Pocket Card

 This card was created for the Tuesday Card Making Stash and Dash which is run by a friend of mine. The goal is to create a card using four defined parameters within a 30 minute time frame. 

I wasn't able to finish within 30 minutes this time (the timer is only there as a guide....) but the parameters were as follows: pocket card, wooden, purple and grey colours plus crafter's choice for a technique. 

My wooden element was to use woodgrain paper. The flowers and greenery represent the purple theme (other colours are allowed). I used grey for my tag base and the woodgrain paper is also grey. The technique was simple - inking (around the centres of the flowers and on the stems). I added a few silver gems and tied a white and silver ribbon at the top of the tag. 


Enjoy,

Alyson