Showing posts with label Interactive cards. Show all posts

Monday, June 22, 2026

Interactive Music Thank You Cards

 I always make thank you cards for the director and accompanist of my church choir as they both put in so much time and effort throughout the year. I try to incorporate a music theme but that's not always easy... This year, I bought some specific music dies!

Both cards are the same inside but the outsides have different colours and bases. I die cut all the elements and arranged them on the front. Once all the pieces were assembled, I added clear Stickles to some of the music notes. The backs of both cards are blank so the choir members can write their messages there. 


Enjoy, 

Alyson

Friday, February 20, 2026

Cut It Up 350 - Seas the Day

 Welcome to Cut It Up Challenge 350!

The theme for this challenge is "by the river" so anything ocean, sea or lake related works.

I love this lighthouse die and I also have the coordinating stencil set. I used the stencils to create the background and then die cut all the pieces to form the lighthouse and the rocks. The lighthouse has a tiny light behind it and there is a spot to press on the card front to make the light work. I stamped a sentiment on the front and aded a couple of birds in the sky. 


Come and join us at Cut It Up and show us how you interpret this challenge. 

You have until Monday, March 2 to link up your project. 

We can't wait to see what you create!

Enjoy, 

Alyson

Friday, November 8, 2024

MTTCC 99 - Have your Elf a Merry Christmas

 Welcome to My Time to Craft Christmas Challenge 99!

The theme for this challenge is elves. 

I have only one elf in my collection and it's a set of dies - TINY dies! And yes, the title of my post is correct - it is supposed to say "elf" and not "self".

I die cut the pieces for the elf and assembled him. The background was covered with gold paste through a stencil and once that was dry, I added the die cut oval and the sentiment. The elf is kinetic, meaning his legs swing from side to side. I am including two additional photos that show that. 


Come and join us at MTTCC and show us your projects with elves. 

You have two weeks to link up your project. 

We can’t wait to see what you create!

Enjoy, 

Alyson

Sunday, November 3, 2024

DD November - Snowflake Spinner

 Welcome to the November challenge for Dragonfly Dreams!

The theme this month is winter birthday. 

Snowflakes always work for winter cards so I chose that route. 

A piece of snowflake vellum was adhered to blue cardstock and the circle was die cut from the card front. I created a snowflake spinner element and added dark blue cardstock on the inside panel. Silver gems were placed in the centres of the snowflakes and I added a birthday sentiment at the bottom. 

Come and join us at Dragonfly Dreams and show us how you interpret this challenge. 

You have until the end of the month to link up your project. 

We can't wait to see what you create!

Enjoy, 

Alyson

Thursday, July 11, 2024

Lighthouse at Sunset

 I have been having a log of fun playing with these lighthouse dies! This time, I die cut almost everything in black except two windows and the light at the top. 

The background was ink blended using an oval stencil and Distress Oxide inks. Before I adhered anything, I stamped the sentiment at the bottom. I carefully rounded the edges of two "land" pieces and added them to the bottom of the oval. The lighthouse was placed off to one side. I adhered a light at the back so it would shine through the small circle opening at the top of the lighthouse. Using a black pen, I wrote the word PUSH off to the right side so the recipient can see the light turn on! 

The front was adhered to a thin black mat and then to the white card base. 


Enjoy, 

Alyson

Tuesday, July 9, 2024

Lighthouse Scene Card

 I recently bought two Spellbinders die sets - one with a lighthouse and the other with a sailboat. I used dies from both sets to make this card, which was based on one I saw on the Spellbinders website. 

The lighthouse pieces were die cut from coloured cardstock and I cut the shore and waves from white cardstock and inked them. Everything was adhered together and I attached it all to a light blue piece of cardstock. A small light was placed behind the lighthouse and I added a small oval with the word push written on it. When that area is pushed, a light lights up at the top of the lighthouse. It is VERY bright! The blue background was then adhered to a white layer and finally to a dark blue card base. 


Enjoy, 

Alyson

Friday, March 10, 2023

MTTC 503 - Pop-Up Birthday Card

 Welcome to My Time To Craft Challenge 503!

The theme for this challenge is birthday - and who doesn't need birthday cards?

I made a card like this a couple of months ago and really liked the style. It folds flat for mailing but it pops up when it is opened. I chose to use four colours plus black and white. 

The images were stamped and coloured. I die cut some images and others were fussy cut (no dies for them). I placed a balloon border across the front of the box and stamped the word BIRTHDAY using the same four colours. The background was stencilled with a turnabout confetti stencil and the images were arranged on two inside panels. A message can be written on the back of the card. 


Come and join us at MTTC and show us your birthday projects. 

You have two weeks to link up your project. 

We can’t wait to see what you create! 

Enjoy,

Alyson

Monday, February 20, 2023

DT 132 - Birthday Fun Fold Card

 Welcome to Double Trouble Challenge 132! 

It's all about fun fold cards this week - and there are so many types of fun fold cards. The small graphic is below - please visit the Double Trouble Challenge blog for detailed information.

I made one of my favourite fun folds ever - the inside is a big surprise when the card is opened. 

I have some gorgeous washi tape sunflower images and those were perfect for this card. I based the colours around those images - purple, yellow, green and gold. The outside panels were made first and I die cut gold frames to go around the inside squares. The front was decorated with the same frame and the word Celebrate. Inside, the individual panels spell BIRTHDAY with a small Happy die cut at the top left. I added sunflower images around each of the letters as well. There is a place to write a message on the back of the card. 


Come and join us at Double Trouble and show us your fun fold cards! 

We are also parting up with the Creative Creases challenge so I am linking my card up there. 

You have two weeks to link up your project. 

We can’t wait to see what you create!

Enjoy,

Alyson

Wednesday, February 15, 2023

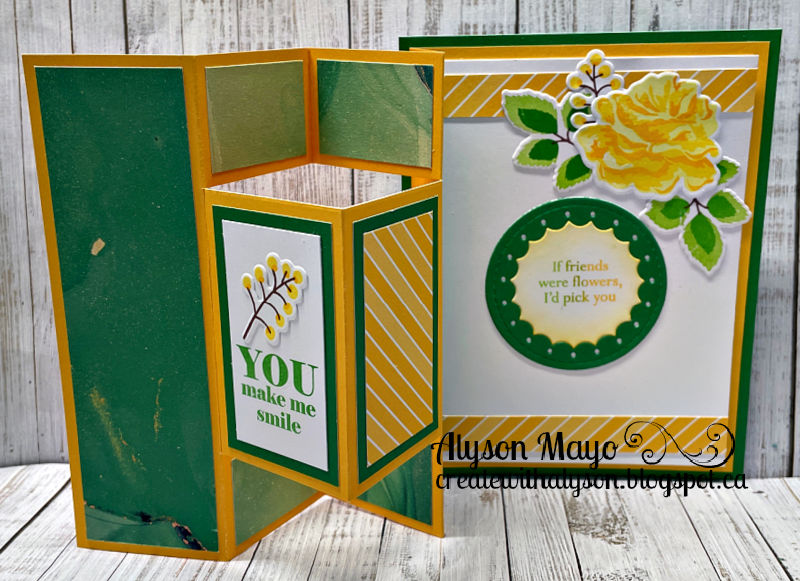
Friend Pop-Up Fun Fold Card

This is an easy fun fold card with a bold and bright colour scheme. 

I chose green and yellow patterned papers along with coordinating cardstock. The images were stamped (layered stamping) and I also ombre stamped the two inside sentiments. The flower was placed at the top so it would be partly visible when the card is closed. There is a separate card that opens on the right side and there is another sentiment inside that section, along with a floral cluster at the bottom. The card folds flat for mailing. 


Enjoy,

Alyson

Saturday, February 4, 2023

Sunflower Open Wreath Card

 This was a fun and surprisingly easy card to create! The circle is open on both sides so the card can sit up properly. 

The purple background was stencilled and added to a white card base. The sunflower images are from a roll of washi tape and they were arranged along the left side of the circle. I added a hot foiled sentiment, some gold metallic thread and gold gems to finish off the card. 


Enjoy,

Alyson

Friday, February 3, 2023

Z-Fold Easel Card

 This card was designed based on an idea by Lynn Dunn. The card sits upwards with a piece at the base to hold it in standing position. 

I used shades of blue for my card. The white background and the bottom of the easel card were embossed with a basket weave embossing folder. I arranged the leaves on the front and added a sentiment that was die cut with oval dies. A few blue enamel gems were added as well. Inside the card, I used some of the extra leaf die cuts and drew a thin blue line around the sentiment panel. The friend sentiment at the bottom front was adhered with foam tape to allow the card to stand up properly.


Enjoy,

Alyson

Thursday, February 2, 2023

Doggie Box Card

 I had so much fun creating this card! It folds down to 4x9 - perfect for a slimline envelope. 

I stencilled the background with a brick pattern and also ink blended two panels with green inks. The doggies were stamped, coloured and die cut. I drew the bowl and fussy cut that, along with lots of bones. Everything was arranged inside the box and the sentiment was added to the front, along with some hearts. I just think it's so cute! 

Enjoy, 

Alyson

Wednesday, February 1, 2023

Double Twisted Easel Card

 This card is so neat but I think it would require a photo and instructions if it was to be mailed to someone - it folds flat for mailing but has to be assembled.

I used white and dark blue - the patterned paper is all old CTMH paper. I embossed the front base piece with a dotted embossing folder to keep the same idea as the dotted patterned paper. The centre section with the message was embossed in white and I die cut several small branch images to place behind that piece. The scalloped ovals were layered using the same colours as the pattered papers.

Enjoy,

Alyson

Wednesday, January 25, 2023

Accordion Card with a Coneflower

 Tuesday Evening 30 Minute Card Making Stash and Dash... It was a fun one this week. I did not finish in 30 minutes this time! 

The parameters were as follows: accordion card, 3 colours, use a border and dovetailing. 

I used turquoise, purple and green and the border is the two lines of sentiments stamped at the bottom of the centre piece. My sentiment is dovetailed on both sides. 

I used some printed papers for the sides of the accordion. The background was stencilled in turquoise and I die cut the flower and leaves from white cardstock. Those pieces were inked in shades of purple and green. The border at the bottom was stamped in two shades of purple. I didn't add any embellishments to this card as it is already quite bulky when the sides are folded in toward the centre. 

Enjoy,

Alyson
Sunday, January 22, 2023

Heart Cover Card

 This cute card with two overlapping hearts would be perfect for Valentine's Day. 

I chose a colour scheme of pink and turquoise. The hearts were die cut and adhered to the side of the card base, followed by the patterned paper. I stamped and fussy cut the flowers and die cut the greenery. That was all arranged on the front panels. I realized after I had assembled everything that I needed a ribbon to hold the front two hearts together... I cut a small slit on the right side and threaded a ribbon through that to be able to tie the front closed. The inside has a sentiment under the right heart and there are also a few flowers inside the card where a message can be written.


Enjoy,

Alyson

Wednesday, January 18, 2023

Stay Paw-sitive Card

This cute card was created for the weekly card making stash and dash event that I love to do! 

The parameters this week were as follows: a fun fold card (could not be a gatefold, accordion or easel card), use orange, include a tag and do some colouring. 

This card style is one that I really like because it is very easy to make. There are no strange cuts involved. I used orange and blue patterned papers and I stamped and coloured three dogs with some bones. The doggie images were added to the front panel along with a sentiment. 

The parameters are all obvious except that tag... I included a small tag on the doggie at the very top! 

And I actually finished in 28 minutes! That's a record for me! 

Enjoy,

Alyson


Sunday, January 8, 2023

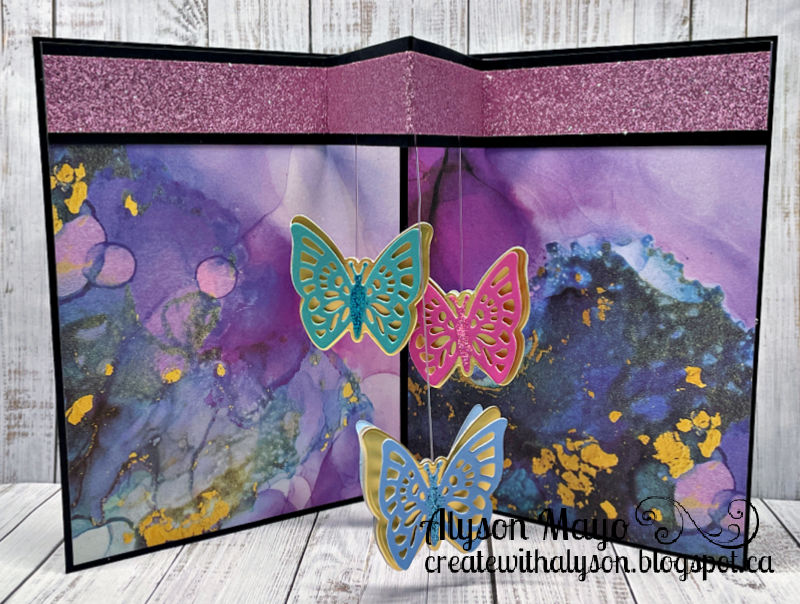
Floating Butterfly Card

This is a cute card with a nice surprise inside.

I used some alcohol inked patterned paper for the card panels. On the front, I embossed a piece of bright pink cardstock and added some purple ink along the edges. The sentiment was stamped and die cut and I added a die cut butterfly at the top. A flight trail was created using a fine tip black marker. 

Inside, I used glitter paper for the cross piece and adhered the butterflies using jewellery cord. The bodies of all the butterflies were brushed with Stickles to add some shine. There is a place on the back of the card to write a message. 


Enjoy,

Alyson

Thursday, January 5, 2023

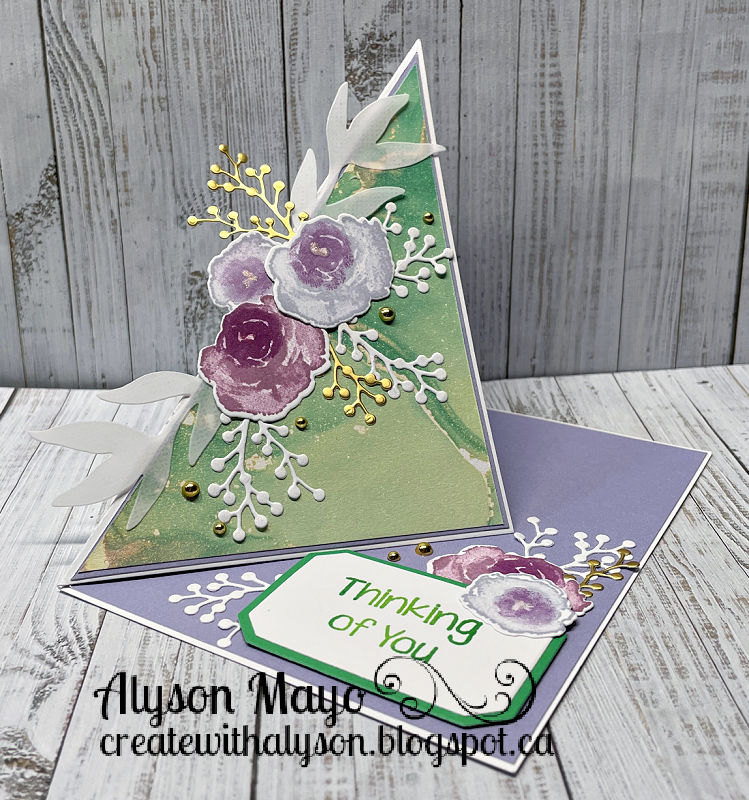
Side Easel Card

 I have made this card style before but it was time to try it again! 

A side easel fold is very easy to make - it is a standard A2 card base with the left side scored and folded diagonally. For this one, I die cut several branch images from white and gold cardstock as well as a few leaf clusters from vellum. The vellum leaves were adhered together to make them thicker. I stamped the flowers in shades of purple and added some gold shimmer to the centres. The images were arranged on the card and I used a sentiment adhered with foam tape as the stopper for the easel. A message can be written inside the folded flap. 

Enjoy,

Alyson

Sunday, January 1, 2023

Triple Fold Shaped Card

 I watched an older video from Jennifer McGuire and wanted to try the same technique. 

I used an older Altenew layering stamp to create the flowers and leaves. I actually made two of these cards so I did a lot of stamping. The images were die cut and then adhered to a card base, overlapping the folded side. I fussy cut around the images to make the front of the card the same shape as the floral cluster. 

The second part was to die cut half of a second card base with a stitched die. That piece was adhered to the first card base to create a triple fold card. There is a piece of coloured cardstock inside for a place to write a message. I die cut the sentiment three times and stacked it before adding it to a vellum shadow. That was adhered on the front and I used some ready made sentiment strips on the second panel. I wanted the background for the small sentiments to match the flowers so I dragged some of the same coloured ink pads  that I used for the flowers across white cardstock and cut them accordingly. 

I love how this turned out! 


Enjoy,

Alyson


Friday, December 23, 2022

Triple Easel Cards

 I haven't made a triple easel card for many years... time to pull out the old files! 

There are two of these cards - the first one was created using images and papers from a Gina K. Designs kit. The sentiment is the "block" at the bottom and the images are from the ephemera that came with the kit. 

The second one is a birthday card. I chose papers with cakes, balloons and banners for a birthday celebration and stamped, coloured and fussy cut some small images. I hd a small birthday sentiment that I die cut for the front and I arranged the other images on the middle panel. 

Enjoy,

Alyson