Monday, September 30, 2019

Butterfly For You

I am loving the Double Trouble challenges - they offer a lot of variety and different types of challenges to spark your creativity. 


Thing 1 - create what you want as it is an open challenge.

Thing 2 gives you the option to link up with any of a number of listed challenges. 

Thing 3 is to use pink as the dominant colour on your project.


I used a sketch I found on Pinterest for the basis of my card. 

I random stamped the background paper and then used my Cricut to create the scalloped piece and the frame. The leaves were brushed with the Julep Shimmer Brush and the butterfly was coloured using Touch markers (although it is very light...) and then the centre was brushed with the Clear Shimmer Brush. 

Two pieces were embossed and then it didn't take long to assemble the card, after which 
I added a few pink gems.


I am linking my card up with the Double Trouble challenge as well as The Paper Girls 
(their theme is anything goes). 

Products used are Close To My Heart unless otherwise indicated: 

Paper: Neenah Solar White Cardstock, Pixie Cardstock, Raspberry Cardstock, Julep Cardstock, White Daisy Cardstock
Stamps: Butterflies for You, Every Little Thing Scrapbooking
Inks: Raspberry, Pixie
Accessories: Cricut Artbooking Cartridge, Cricut Art Philosophy Cartridge, Butterflies for You Thin Cuts, Stitched Circles Embossing Folder, Rosy Posey Embossing Folder (Taylored Expressions), Every Little Thing Vellum Die Cuts, Every Little Thing Complements, Touch Markers (not CTMH), Julep Shimmer Brush, Clear Shimmer Brush, Pink Gems

Enjoy,
Alyson


AH 336 - Glitter Snowflakes


Welcome to Atlantic Hearts Sketch 336!


Instead of using butterflies (the image on the sketch, which can be changed to anything), I chose to use snowflakes. I am tying to get a little head start on my Christmas cards, so this is a good way to do that. 

I chose to use a dark turquoise base so the white glitter snowflakes would be the focal points. The centre of each has a glitter gem that has been coloured to match the paper. The other gems were randomly placed on top of snowflakes from the embossing folder. I embossed the word Noel in White Tinsel embossing powder to give it a bit of extra sparkle. 


Come and join us at Atlantic Hearts and show us how you interpret the sketch shown above. 
You have until Sunday evening to link up your project.
We can’t wait to see what you create!

Products used are Close To My Heart unless otherwise indicated: 

Paper: Peacock Cardstock, White Glitter Paper, Neenah Solar White Cardstock
Stamps: Christmas Joy
Inks: Versamark
Accessories: Snowflake Embossing Folder, Snowflakes Thin Cuts, Silver Glitter Gems, Touch Markers (not CTMH), White Tinsel Embossing Powder (WOW), Heat Tool

Enjoy,
Alyson


Tuesday, September 24, 2019

TSOT 427 - Always Time for Tea

Welcome to this week's Try Stampin' on Tuesday sketch! 


There is the option with this sketch of including coffee, tea or another warm beverage as part of your design. 

I went back to some older paper and a stamp set to create my card. I wanted to include a cup of tea and still l had a paper pack that coordinated with the stamp set that I chose. I didn't have to use that paper but the colours worked so well...

The cup and teapot actually have dies available but I wanted to cut right along the stamped line since I was doing some paper piecing of these images. I like the look of the flowered cup and teapot but with solid coloured handles, a saucer and the inside of the cup. 

The sentiment was combined with a piece from one of the zip strips in the paper pack and wrapped with Sapphire Crochet Thread. 


Come and join us at TSOT and show us how you interpret the sketch shown above. 
You have two weeks to link up your project. 
We can’t wait to see what you create

Products used are all Close To My Heart 

Paper: Beautiful Friendship Paper Pack, Bashful Cardstock, Sapphire Cardstock, Canary Cardstock
Stamps: Beautiful Friendship - Cardmaking
Inks: Sapphire
Accessories: Sapphire Crochet Thread, Thin Foam Tape 

Enjoy,
Alyson


Monday, September 23, 2019

H2H - Sapphire Poinsettia

Welcome to this week's Heart 2 Heart challenge!


If you own a Cricut machine - or can use someone else's machine - this challenge is for you! It's all about the Cricut this week at Heart 2 Heart. 
Use your Cricut to create something - anything - for this challenge.

I love the Flower Market cartridge as it has so many flowers that can be changed and manipulated. I chose a poinsettia and by ungrouping the pieces and then copying and pasting the ones I wanted, I was able to create this beautiful poinsettia for my card. There are SO many possibilities with the Cricut - and now, Close To My Heart has brought back all of the retired cartridges again! 
I am THRILLED! I use images from those cartridges so often - it's great that they are back.

So - with some paper from the Every Little Thing paper pack, Sapphire cardstock (both front and back for the lighter colour on the reverse) and some Silver Glitter Paper, aside from shaping the flower, this card came together quickly. The pattern is from Make It From Your Heart - Vol. 4. I embossed the sentiment and used the Clear Shimmer Brush on the poinsettia petals. 


Come and join us at Heart 2 Heart and show us your Cricut project! You have until the end of September to link up with this or any of the other September challenges. 
We can't wait to see what you create! 

Products used are all Close To My Heart unless otherwise indicated: 

Paper: Every Little Thing Paper Pack, White Daisy Cardstock, Sapphire Cardstock, Pewter Cardstock, Silver Glitter Paper, Neenah Solar White Cardstock 
Stamps: Blessings of Peace
Inks: Sapphire, Pewter, Sapphire Pigment Ink
Accessories: Flower Market Cricut Cartridge, Clear Shimmer Brush, Silver Glitter Gems, Clear Detail Embossing Powder, Heat Tool

Enjoy,
Alyson

Friday, September 20, 2019

Share the Seasons Blog Hop

Welcome to the Share the Seasons Blog Hop. 


As you read through the blogs along this hop, you will see various ways to use the Share the Seasons stamps and Thin Cuts that are on special during the month of September. 

You should have arrived here from Ronda LaDuke's blog.

This blog hop is a circular hop and if you follow it around, you will eventually come back to where you began. If you get lost, a list of all participants can be found here

I realize that the stitched rectangle thin cut can be used in smaller sections but for this bog hop, I chose to create three cards using the entire thin cut, along with the clip thin cut - the same way it is shown in the catalog. However, I tried three different colour schemes and ideas. 

The first is a collection of reindeer and lights with a Nectarine and Lagoon colour combination. I love the way this turned out - the lights were all brushed with the Clear Shimmer Brush for added sparkle. 


My second card is a collection of stars and bows with a Lemonade and Lagoon colour combination. I added a clear sparkle in the centre of each star after colouring it to match the papers. Again, the stars and the centre of the bows were brushed with the Clear Shimmer Brush. This is also one of my personal favourites. 


The last card is a standard red and green Christmas card. I used various images and a few of the shimmer brushes to add some sparkle. 


Which of the three is your favourite? 

Your next stop on this blog hop is Darlys Recker's blog.
I'm sure she has something wonderful to share with you!


Products used are all Close To My Heart

Paper: White Daisy Cardstock, Lagoon Cardstock, Lemonade Cardstock, Nectarine Cardstock, Candy Apple Cardstock, Evergreen Cardstock
Stamps: A Dash of Joy, Giving Thanks 
Inks: Intense Black, Evergreen, Lagoon, Nectarine, Glacier 
Accessories: Share the Season Thin Cuts Bundle, Clear Shimmer Brush, Red Shimmer Brush, Black Shimmer Brush, Clear Sparkles, Tri-Blend Markers, Foam Tape

Enjoy,
Alyson


CD 361 - Green Painted Background with Wreath

Welcome to Colour Dare Challenge #361!

This week, it's all about the greens - any shades of green. You are welcome to add up to 
2 Neutrals and Black and White are also free. 


I recently watched a video by Jennifer McGuire about creating a watercolor background using Versamark and ink pads. My first attempt didn't go very well so I went to actual watercolour paints the second time and that worked much better. The background was stamped using Versamark first and heat set only to dry (but not embossed). Making the paper just damp, and using fairly watered down paint shades, I painted over the background until I had the colours I wanted.

The wreath was cut twice - both using Clover cardstock but taking advantage of the lighter colour on the reverse. They were then mounted slightly offset with the black circle under both wreaths and the white circle with the sentiment mounted with foam tape on top. The card background is simply a few layers of cardstock with some doodling around the edge. 


Come and join us at Colour Dare and show us your love of green! 
You have two weeks to link up your project. 
We can't wait to see what you create! 

Products used are Close To My Heart unless otherwise indicated: 

Paper: White Daisy Cardstock, Black Cardstock, Clover Cardstock, Watercolour Paper 
Stamps: Short and Sweet, Striped Jungle Background (SSS)
Inks: Clover, Versamark
Accessories: Heat Tool, Black Journaling Pen, Watercolour Paints and Brushes, Stitched Circle Thin Cuts, Basic Circle Thin Cuts, Foam Tape, Jasper Leaves Die (Memory Box) 

Enjoy,
Alyson

Tuesday, September 17, 2019

Elephant Baby Card

I was asked to create a baby card for a woman who has just had twins. 
I wanted it to be cute but not overly detailed or difficult so I settled on a stamp that had this awesome elephant with a couple of balloons. 

There are multiple layers to this card but it isn't terribly thick. I used the Every Little Thing paper pack for the papers and the elephant was coloured using the Tri-Blend markers. I didn't think a mint elephant was a wise idea, so I coloured the elephant grey. 

A few embellishments were added - some ribbon, a button and some gems and it's done and ready to be signed. I also added some balloons on the inside. 


Products used are all Close To My Heart

Paper: Every Little Thing Paper Pack, White Daisy Cardstock, Wisteria Cardstock, Julep Cardstock
Stamps: Sweet Baby, Balloon Wishes
Inks: Intense Black, Wisteria, Julep, Black 
Accessories: Sweet Baby Thin Cuts, Grey and White Enamel Gems, Julep Ribbon, Purple Button, Waxy Flax, Tri-Blend Markers, Foam Tape, Thin Foam

Enjoy,
Alyson


Joy in Plaid

It's time to create Christmas cards - and non-traditional ones are my favourite. 
This one, however, is kind of red and green - just unusual shades of red and green. 

The Hawthorn Paper Pack was a good choice for a plaid background and Sage, which is a colour from that pack, worked well for the trees. The base colour isn't White but Pebble - kind of a green/grey colour. I used that for the cardstock to stamp my trees and also the Joy sentiment. 

The trees were arranged so as not to interfere with the frame and some were brushed with the Gold Shimmer Brush - that can be seen in a close-up below. I also went over the word "Joy" with the same shimmer brush. A few gold embellishments were added and this card was completed. 


I am entering my card in the challenge at Double Trouble and Use Your Stuff
Here are the details: 


Thing 1 - Mad for Plaid - add plaid on your project

Thing 2 - Enter your card at Use Your Stuff 

Thing 3 - Add a frame or tag on your project


I have completed all three of the above "things"...

Products used are as follows: 

Paper: Hawthorn Paper Pack, Pebble Cardstock, Sangria Cardstock, Sage Cardstock
Stamps: Holly Jolly Christmas, Festive Trees
Inks: Pebble, Sage
Accessories: Art Philosophy Cricut Cartridge, Artistry Cricut Cartridge, Sangria Ribbon, Gold Glitter Gems, Gold Embellishing Thread, Gold Shimmer Brush, Foam Tape

Enjoy,
Alyson


Monday, September 16, 2019

AH 334 - Friendly Butterfly


Welcome to Atlantic Hearts Sketch #334!


I tried a number of different things with this sketch before settling on my final card. Small flowers, rolled flowers, Cricut cut flowers of various types... all of which turned out ok but not end products that particularly pleased me. They all seemed too busy. That's when I decided to take a completely different approach to this sketch and use an existing floral frame and work in some other elements. 

One of the new stamp and thin cut combinations from Close To My Heart is the Every Little Thing - Cardmaking set. It has this gorgeous frame with various sentiments that fit inside. I didn't want to use one of the included sentiments so I went to the September Stamp of the Month (Random Act of Cardness) and chose part of one sentiment and another and combined the two of them. It fit inside the frame perfectly. 

I cut the inside of the frame separately and mounted that on foam tape. The background paper I chose is from Kaisercraft's Greenhouse collection. I coloured the floral parts with appropriate Touch markers and then did the same with the vellum butterfly. The butterfly is mounted on cardstock so it shows up better. I also brushed the flowers and butterfly with the Clear Shimmer Brush. 


Come and join us at Atlantic Hearts and show us how you interpret the sketch shown above. 
You have until Sunday evening to link up your project. 
We can't wait to see what you create! 

Products used are Close To My Heart unless otherwise indicated: 

Paper: Kaisercraft Greenhouse Collection, White Daisy Cardstock, Sweet Leaf Cardstock, Peach Cardstock, Neenah Solar White Cardstock
Stamps: Every Little Thing - Cardmaking, Random Act of Cardness
Inks: Intense Black, Sweet Leaf, Smoothie
Accessories: Every Little Thing - Cardmaking Thin Cuts, Every Little Thing Vellum Die Cuts, Clear Shimmer Brush, Foam Tape, Touch Markers (not CTMH), Kaisercraft Greenhouse Sticker Collection

Enjoy,
Alyson

Tuesday, September 10, 2019

TSOT 425

Welcome to Try Stampin' on Tuesday - Challenge #425!

This week, we have a choice between a technique or a sketch - or you can combine the two. 
The technique is an interactive card. 


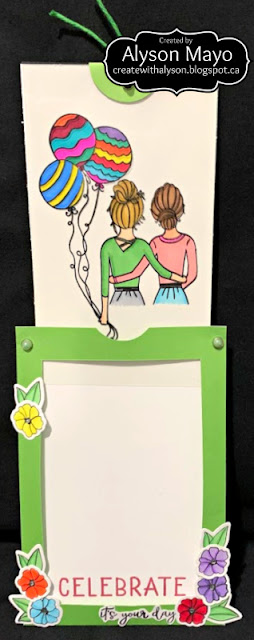
I chose to create an interactive card - and interactive cards are my favourite type of cards to create. I don't make a lot of them now simply due to a lack of time, but I enjoy the challenge of making them.

This one is a Magic Slider Card. Just in case you aren't familiar with how it works, let's take a look at the series of photos... The first photo shows the card as the recipient would receive it. 


This photo shows the card as the top is pulled up - notice the image is coloured as it is pulled up from the top of the card. 


The final photo shows the entire coloured image as the top of the card is pulled up - magic, right? 


This takes a lot of alignment and very precise placement - and I am not going to explain here how it is done because it would take me forever. This is the video I used to create my card. I had to watch it several times as this is the only one of these cards I have ever made so it took me quite a while to complete. 

Come and join us at Try Stampin' on Tuesday and show us your interactive card, your interpretation of the sketch or both! 
We can't wait to see what you create! 

Products used are Close To My Heart unless otherwise indicated: 

Paper: White Daisy Cardstock, Green Apple Cardstock
Stamps: To My Bestie, Chelsea Gardens Cardmaking
Inks: Intense Black, Black Staz-On, Ruby
Accessories: Tri-Blend Markers, Chelsea Gardens Cardmaking Thin Cuts, Bitty Sparkles, Brads (unknown), Green Twine (unknown), Acetate

Enjoy,
Alyson


Monday, September 9, 2019

H2H - Mixed Fonts

Welcome to this week's Heart 2 Heart challenge! 


It's all about fonts this week - but the key is mixing them up. The title of the challenge is Mixed Fonts - so you must use at least two different fonts on your project. 

I chose to use the September Stamp of the Month - called Random Act of Cardness. It has some terrific sentiments and most of them involve mixed fonts, so it is a perfect choice for this challenge. 

The sentiment I chose was "A little dose of happy" and I stamped this in the centre of my card. I then created a mask to cover the sentiment so I could stamp the large floral image from "Every Little Thing - Scrapbooking" above and below the sentiment. The flowers and leaves were coloured using the new Tri-Blend markers. I added a bow with a button and some coloured embellishments to match the orange in the flowers. 


Come and join us at Heart 2 Heart and show us how you use mixed fonts on your project. You have until the end of September to enter this or any of the other September challenges. 
We can't wait to see what you create!

Products used are Close To My Heart unless otherwise indicated: 

Paper: White Daisy Cardstock, Sweet Leaf Cardstock, Neenah Solar White Cardstock 
Stamps: Random Act of Cardness, Every Little Thing - Scrapbooking
Inks: Intense Black 
Accessories: Tri-Blend Markers, Black and White Dots, Green Button, Sharpie Marker (not CTMH), Orange Ribbon (not CTMH)

Enjoy,
Alyson


Friday, September 6, 2019

CD 359 - Gratitude and Autumn Leaves

Welcome to Colour Dare and Challenge #359! 

This week, it's a palette of colours that I associate with autumn. Around my area, the leaves haven't started to change yet - we have had a very hot and humid summer, so everything will likely be late this season. However, it won't be long before the beautiful colours start turning on the trees and people start driving to this area to view the changing colours. Autumn is my favourite season for that very reason.


I went back to some old paper for the background of my card - the Basic Fundamentals from a few years ago. I like the subtle pattern in the paper. I chose to emboss it and then I took my Linen ink pad and lightly brushed it over the embossed trees to make them stand out. 

The leaves are all cut from a new die set called Layered Leaves. I used Peach as my background and the other colours from the palette (some on the light side of the cardstock) to cut the leaves. The sentiment was stamped using three colours of pigment ink and then embossed with clear detail embossing powder. I love how it matches the leaves so perfectly. 


Come and join us at Colour Dare and show us how you interpret the palette shown above. 
You have two weeks to link up your project.
We can't wait to see what you create! 

Products used are Close To My Heart unless otherwise indicated: 

Paper: Basic Fundamentals, Linen Cardstock, Smoothie Cardstock, Peach Cardstock, Goldrush Cardstock, Sage Cardstock, New England Ivy Cardstock, Neenah Solar White Cardstock
Stamps: Always Grateful
Inks: Goldrush Pigment Ink, Smoothie Pigment Ink, New England Ivy Pigment Ink, Linen
Accessories: Clear Detail Embossing Powder, Heat Tool, Foam Tape, Layered Leaves Thin Cuts, Birch Trees Embossing Folder (Darice)

Enjoy,
Alyson


Thursday, September 5, 2019

New Product Blog Hop


Welcome to the New Product Blog Hop. 

As you read through the various blogs along this hop, you will see new products from the September/October mini catalog, along with other new products that have been introduced in the Core catalog. The Core catalog runs all year and the mini catalog is valid for a period of two months only. 

You should have arrived here from Miss Carrie's Creations

This blog hop is a circular hop and if you follow it around, you will eventually come back to where you began. If you get lost, a list of all participants can be found here

My favourite paper pack in the mini catalog is Every Little Thing and I KNOW I am not alone. The combination of colours and patterns is just so awesome! 

I don't usually use the PML cards but I decided to order them this time. My intention was to create a few cards using only the PML cards and not the paper pack. Now, I did make one error with that in the cards shown below. On the LAST card, I used a piece of the patterned paper for the card background (oops)... Other than that, all of the images and even the backgrounds for the sentiments were cut from other PML card pieces. I did use one sheet of Wisteria cardstock and scraps of Black cardstock for some pieces. 

The other items used for these cards can be found in my supply list at the bottom. 

Let's take a look...

Card #1
I had to temporarily adhere the edges of the butterfly down for the photo to avoid shadows - normally it sits up as though in flight. The flowers are brushed with the Clear Shimmer Brush but it doesn't show here. 


Card #2
The PML card had the yellow flowers and some leaves already coloured. I had a hard time trying to match the leaf colour. Colouring the flowers in this same style was really tough as it's not my usual style! The smaller one is definitely better in that way... The card front is mounted on black cardstock. 


Card #3
Four PML cards used plus the sentiment from a fifth... 


Card #4
The inside of this PML card was filled with journaling lines so I cut them out and attached the side piece to the end. I coloured all the elements and brushed the flowers with the Clear Shimmer Brush. Sentiment was added on top of another PML card base.


Card #5
This is the card where I used a piece of patterned paper from the paper pack for the background... Everything else is from PML cards except the vellum die cuts and the Wisteria mat. 


There is much that can be done with the Every Little Thing PML Cards. 
I still have several left over. 
I found that the Mint Shimmer Brush seemed to be a better match for many of the cards than the Julep one - Julep is very dark. I tried using the Sapphire Shimmer Brush on the vellum but it ended up looking black because it was also extremely dark... 

I hope you enjoyed my projects. 

The next blog on the hop is Brenda Lapp's blog
I am sure she has something wonderful to share with you! 

Products used are Close To My Heart unless otherwise indicated:

Paper: Every Little Thing Paper Pack, Every Little Thing PML Cards, Wisteria Cardstock, Black Cardstock, White Daisy Cardstock, White Daisy Card and Envelopes
Stamps: none
Inks: none
Accessories: Every Little Thing Vellum Die Cuts, Clear Shimmer Brush, Julep Shimmer Brush, Mint Shimmer Brush, Wisteria Shimmer Brush, Foam Tape, Prussian Blue Touch Marker (not CTMH), Tri-Blend Markers - Lavender, Jade Green, Green Turquoise, Dull Green, Ice Grey and Light Yellow, Clear Sparkles, Bitty Sparkles

Enjoy,
Alyson