Sunday, October 8, 2023

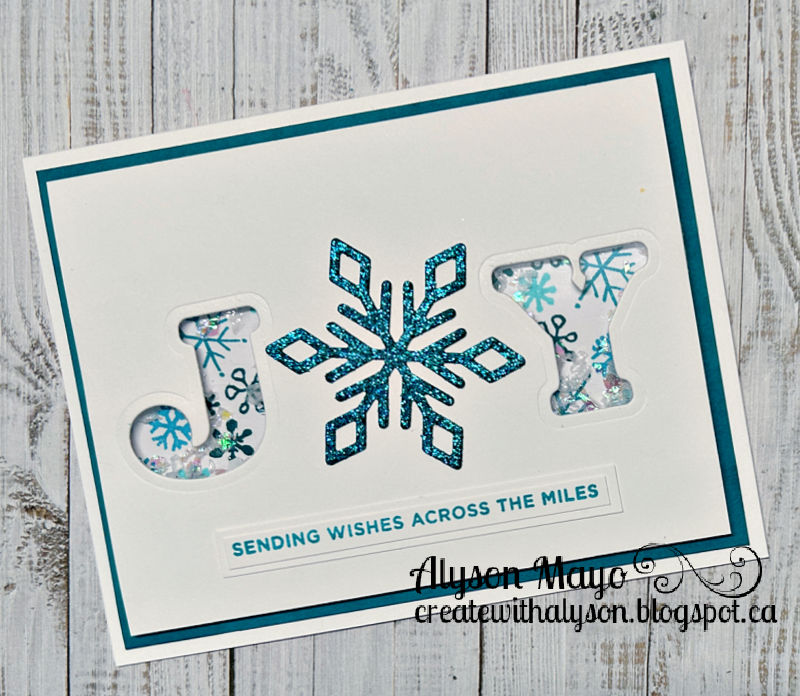
JOY Snowflake Cards

 These two cards were CASEd from one I found on Facebook - such a simple idea but so cute! 

I die cut the letters from a piece of white cardstock. One card has the O cut out and the other does not. I stamped some small snowflakes in shades of turquoise and teal on another sheet of white cardstock to go behind the open letters. A large glittery snowflake was die cut for each card (to replace the letter O) and I added a snow-like filler into the open letters before adding the stamped background behind the openings. A smaller sentiment was stamped and placed across the bottom. The shaker front was adhered to a teal mat and then to a white card base. 

Which do you prefer - with the letter O cut out or not? 


Enjoy,

Alyson

Saturday, October 7, 2023

SS 736 - Birthday Flowers

 Welcome to Sketch Saturday Challenge 736!

The optional theme for this challenge is to use string or twine. 

I rotate and flipped this sketch for what I needed. I dug deep into my stash for some coordinating patterned papers. The purple background was embossed with a dot folder to coordinate with the dotted patterned paper. The pieces were arranged according to the sketch and I chose a hexagon shape for the smaller piece. I  embossed some flowers and leaves and then coloured them before adding them on top of the hexagon. The sentiment was arranged under a flower and off to the right. I added some blue crochet thread at the bottom of the flowers. 

Come and join us at Sketch Saturday and show us how you interpret this sketch. 

You have two weeks to link up your project. 

We can't wait to see what you create!

Enjoy,

Alyson

Friday, October 6, 2023

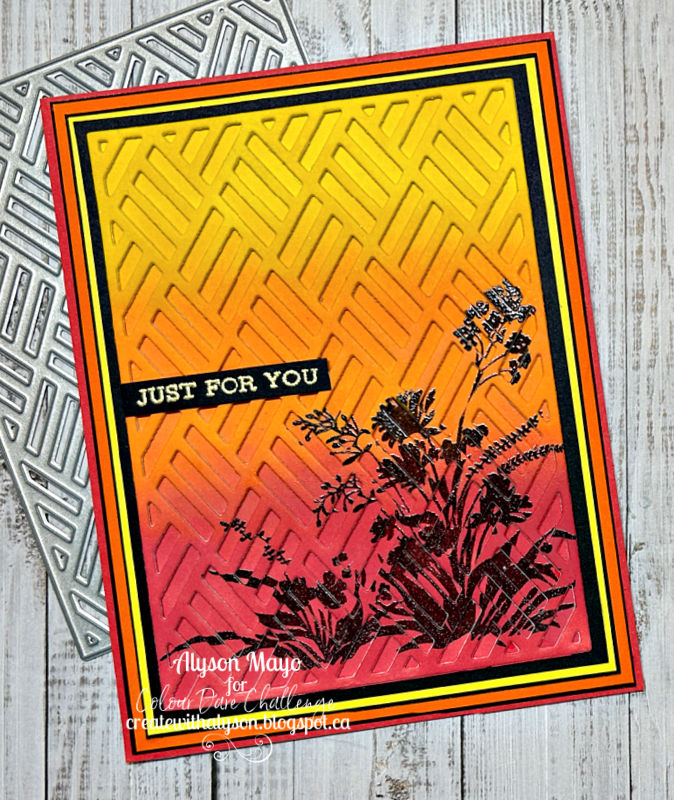
CD 569 - Just for You

Welcome to Colour Dare Challenge 569! 

You must use yellow, orange and red on your project - black, white, metallics and neutrals are free.  

I have done this technique before but wanted to try it with a coloured background instead of just black and white. I inked two backgrounds using yellow, orange and red Distress Oxide inks. They had to be almost identical for this to work. I dried them with my heat gun and then stamped and embossed the same image in the exact same spot on both panels. One was die cut using a background die and I die cut two more pieces from white cardstock. Those pieces were layered and then placed back on top of the original panel, lining up the stamped image. I adhered that piece to black cardstock. 

My next step took me a while... I wanted one layering piece in each yellow, orange and red plus a piece of black cardstock between each. Figuring out those measurements was really tough, but I did manage to do it (working with 1/32 measurements...)  The sentiment piece was embossed in gold on black and added at the side. 

Come and join us at Colour Dare and show us how you interpret this challenge. 

You have two weeks to link up your project. 

We can't wait to see what you create! 

Enjoy,

Alyson

MTTC 518 - Just Because Shaker

 Welcome to My Time to Craft Challenge 518!

The theme for this challenge is "in the garden". 

 I love working with floral stamps and dies but I decided to do something a little different for this challenge. I used an older stamp set that is designed to be stamped on half a card front and then the paper is rotated ninety degrees and the image is stamped a second time on the other side. 

I coloured the flowers and leaves and decided to make a shaker since the centre of the card front was cut out anyways. I embossed a sentiment on black cardstock and added some iridescent sequins and tiny little stars inside. I brushed the flowers with a clear shimmer brush - this was a pretty easy card overall!

Come and join us at MTTC and show us how you interpret this challenge. 

You have two weeks to link up your project. 

We can't wait to see what you create!

Enjoy,

Alyson

Thursday, October 5, 2023

Christmas Floral Stems

 The photo of this card makes it hard to see all the little details... 

The background was hot foiled in red and I cut apart a stencilled floral stem and added parts of it around the top and sides of the foiled background. That was adhered to a light green mat and then a dark green card base. The sentiment was die cut several times, stacked and added at the bottom, along with some red metallic thread. Easy! 

Enjoy,

Alyson

Wednesday, October 4, 2023

HLS Christmas - Blue Poinsettia Wreath

 Welcome to Happy Little Stampers Christmas Challenge for the month of October. 

The optional theme for this challenge is to use stencils. 

I am heavily into my Christmas cards and have been for a while now. The poinsettias and leaves were stamped, stencilled and die cut. I chose blue as I love non-traditional colours for Christmas. The card base was inked with a light blue shade and I placed the snowflake background on top. The wreath is simple a hot foiled circle and I arranged the poinsettia pieces around that. A hot foiled sentiment was added in the centre, along with some blue metallic thread. I added some silver gems to each of the flowers to finish off this card. 

Come and join us at HLS Christmas and show us your Christmas cards. 

You have until the end of the month to link up your project. 

We can't wait to see what you create! 

Enjoy,

Alyson

Tuesday, October 3, 2023

Snow Splattered Christmas Card

 This card didn't turn out at all like I had anticipated... it's very different from what I had in mind. 

I started with a piece of vellum that was die cut with a cover plate die. I wrapped that around a piece of light green cardstock and splattered it with white paint. The splatters ended up covering up all the detail that was embossed into the vellum - such is life. That piece was adhered to a gold card base. 

The flowers were hot foiled in gold, stencilled and die cut. That piece was added to the front and I placed a hot foiled sentiment across the stems. Gold Stickles were added around each flower. 

Enjoy,

Alyson

Monday, October 2, 2023

HLS Birthday - Golden Arch Card

 Welcome to Happy Little Stampers - Birthday Challenge for October! 

This is always an "anything goes" challenge, as long as the theme is birthday.

I used one of my favourite colour schemes for my card - purple and teal. The arch was die cut from gold glitter cardstock and I also die cut a lace background from white cardstock. The flowers were stamped, stencilled and die cut (I needed two sets of them...) and the sentiment was hot foiled in gold. The lace background was adhered behind the arch and I inked the edges of the card with teal ink before adding the arch. The flowers were arranged around the arch and I placed the sentiment at the side along with some gold metallic thread. Gold gems were added around the arch to finish off this pretty card. 

Come and join us at HLS Birthday and show us your birthday projects. 

You have two weeks to link up with this challenge. 

We can't wait to see what you create!

Enjoy,

Alyson

DT 149 - Eek, Eek, Eek!

 Welcome to Double Trouble Challenge 149!

Halloween is around the corner - check out the small graphic below and visit the Double Trouble Challenge blog for detailed information. 

Since part of this challenge is about creating our own backgrounds, I chose a traditional Halloween colour scheme (purple, green, orange, gold and black) and used a hot foiled gold background. I blended purple ink on top of the foiling, making it darker around the edges. Buffing the ink off the foiling allows the gold to still show through. I adhered the background to a black border and then a gold base. The monster images were stamped in orange and green, making them darker at the bottom (ombre). I embossed the word "eek" three times along the bottom of the decked edge die cut and added the monsters above that. Some googly eyes were placed on each monster and that was it! 

Come and join us at Double Trouble and show us how you interpret this challenge. 

You have two weeks to link up your project. 

I am also linking up my card with the Park Hopping - My Happy Place Challenge

We can't wait to see what you create!

Enjoy,

Alyson

Sunday, October 1, 2023

DD October - Today, I am Thankful

Welcome to Dragonfly Dreams and our October challenge! 

The theme for this challenge is autumn. 

I started by stamping some leaf images using two or three shades of ink. Other leaf images were die cut from green and orange/red cardstock. The background was die cut with a slimline die and splattered with gold paint. That piece was adhered to a cream cardstock border and then to a brown card base. The circles were die cut a second time from dark brown cardstock and I die cut a second set of circles from Kraft cardstock. The Kraft pieces were slightly larger than the scalloped circles so they created a border around the scalloped circles. The images were arranged inside the circles and I brushed the cardstock pieces with a gold shimmer brush. The sentiment was embossed in gold and adhered with foam tape. Some gold metallic thread and gold gems were added to finish off the card. 

Come and join us at Dragonfly Dreams and show us your autumn projects. 

You have until the first Saturday of the month to link up your project. 

We can't wait to see what you create!

Enjoy,

Alyson