Thursday, August 17, 2023

Monogram Letters

 A friend of mine asked me to create some large monogram letters for her grandkids. She gave me the colours and I used my Cricut to make these. 

The green and pink letters were created using magical powers - I really love the green pattern. Since I didn't have any of those powders in purple, I ink blended a large panel and cut that. Each letter is 11 1/2" tall.

Enjoy,

Alyson

Wednesday, August 16, 2023

Joyful Cards

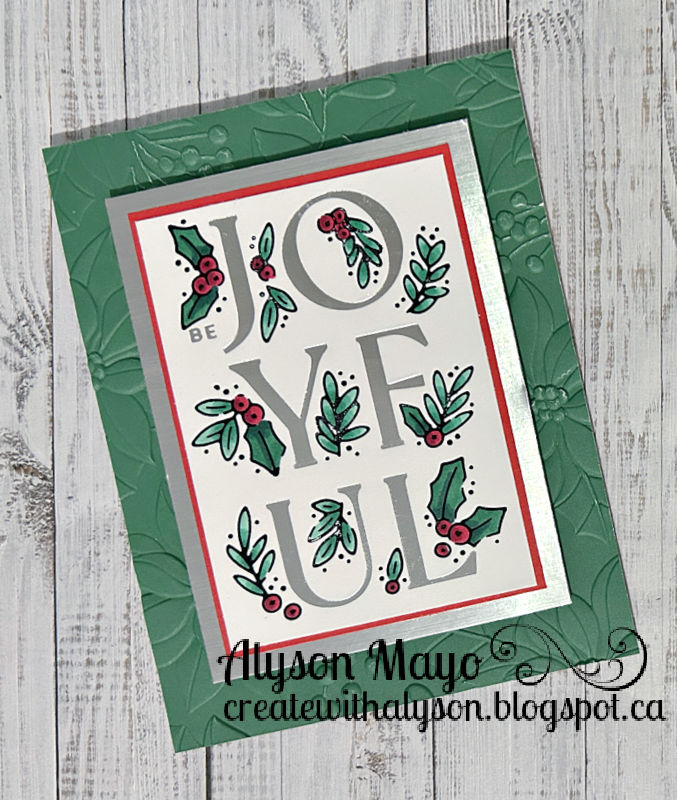
 All of these cards were made from the same set of foil plates - the text is one plate and the greenery is a second plate but they fit together. I love that I can foil the parts in different colours. 

I used the same 3D embossing folder for the background - it's a gorgeous poinsettia pattern. The foiled images were coloured in various combinations. I used metallic pens for the black pieces so some colour would show up. 


Enjoy,

Alyson

Tuesday, August 15, 2023

Smiles Better Press Card

 This is another attempt using the Better Press system. I used the same press plate to create a floral image in the four corners. I used alcohol makers to colour the flowers and leaves and trimmed the card front to fit on a black card base. The sentiment was die cut three times and stacked before being added to the centre of the card. 

Enjoy,

Alyson

Monday, August 14, 2023

AH 538 - Christmas Greetings

 Welcome to Atlantic Hearts Sketch Challenge 538!

I stayed true to the sketch - it took some careful math figuring to determine the sizes of the panels to fit them exactly to the background. 

The background was stamped and stencilled and I cut that into equal size pieces. I added a white embossed sentiment with a border and die cut some holly leaves and berries for the corner of the sentiment piece. I used Stickles on the berries but chose to keep this card pretty simple. 

Come and join us at Atlantic Hearts and show us how you interpret this week's challenge. 

You have until Sunday evening to link up your project. 

We can't wait to see what you create!

Enjoy,

Alyson

DT 145 and TSOT 620 - Peace and Joy

 Welcome to Double Trouble Challenge 145 and Try Stampin' on Tuesday Challenge 620!

The small graphic is below for the Double Trouble challenge and we are pairing with Try Stampin' on Tuesday for this challenge so that sketch is also shown. 


I chose to make a Christmas card as I am always scrambling come the end of October. I used two patterns - one floral and one checks - plus light kraft paper. I embossed the panel behind the flowers with a holly pattern and assembled the die cut flowers and greenery. A black circle brought out the black flower centres on the patterned paper. The sentiment was hot foiled in gold and I inked it with a light green ink to match the rest of the card. I brushed the flowers with a gold shimmer brush and added some gold gems to finish off this card. 

Come and join us at Double Trouble and Try Stampin' on Tuesday for this challenge!

You have two weeks to link up your project. 

Although the TSOT challenge doesn't open until tomorrow, you can back link for the day before ONLY. 

We can't wait to see what you create!

Enjoy,

Alyson

Sunday, August 13, 2023

Triple Diamond Card - Pine Boughs

 This was such a fun card to make, although it was very time consuming! 

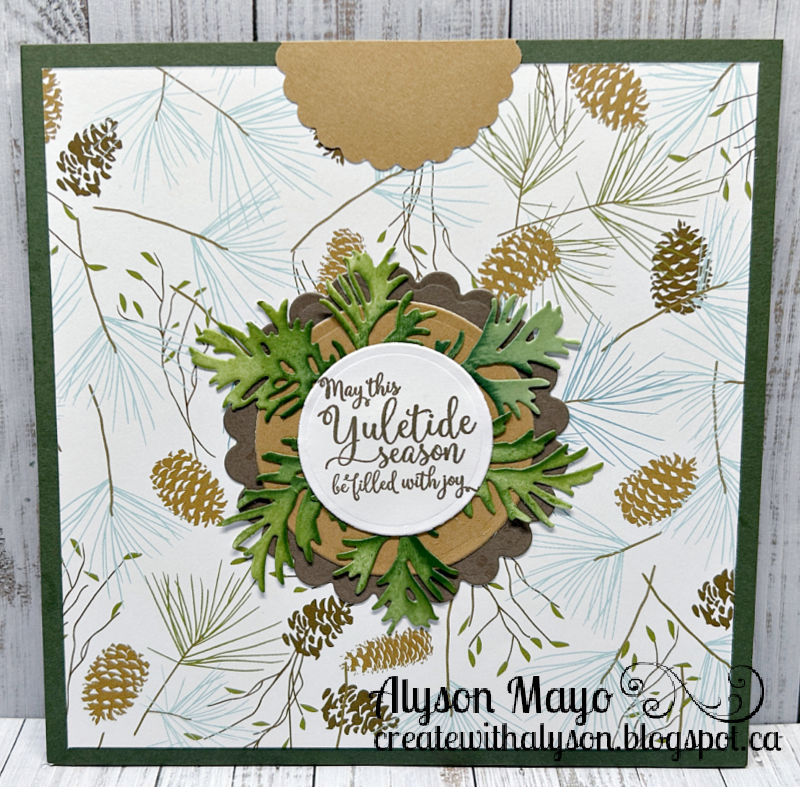
The pinecones and pine boughs were die cut, inked and assembled. They were added to white cardstock that was inked along the edges. The sentiment was heat embossed in white, die cut and added to the centre panel, along with a few pine boughs and pinecones. The background paper is from an old paper pack and I had just one sheet left! There are two panels on the back for a spot to write a message. 

Considering this is quite a thick card, I made an envelope for it as well. There is a notch at the top (from the back) that allows the card to be pulled out. I used some of the same pine boughs to surround another sentiment on the front. 

Enjoy,

Alyson

Saturday, August 12, 2023

SS 732 - Life is Better with Friends

 Welcome to Sketch Saturday Challenge 732!

The optional theme (in addition to the sketch) is to use a doodle. 

I hot foiled, stencilled and fussy cut a large flower for the corner element on my card (I rotated the sketch ninety degrees). The background was die cut and then a grid pattern was lightly stencilled in grey. I die cut two borders - one in green and the other in gold - for the top. The flower was adhered to the corner and I added a stamped sentiment in a circle. Some gold gems finished off this card. 

Come and join us at Sketch Saturday and show us how you interpret this week's sketch. 

You have two weeks to link up your project. 

We can't wait to see what you create! 

Enjoy,

Alyson

Friday, August 11, 2023

CD 561 - Merriest Christmas

 Welcome to Colour Dare Challenge 561!

Close any row or column - you may add additional colours, but ONLY if they appear on the tic tac toe grid. 

I used the middle row (Desert Rose, Pine and Sage) plus Scarlet and Rosemary.

This was a difficult colour scheme for me... these are definitely not my go-to colours! I opted to make a Christmas card using the red and green shades. I used a wreath stencil but adjusted it so I inked only half the stencil on the top and bottom of the card. The leaves were inked with Sage and Rosemary and I used Pine for the branches. Desert Rose was hard - I stencilled the berries using that colour first and then added detail at the base with Scarlet ink. I added a gold hot foiled sentiment with some gold metallic thread to the centre. Gold Stickles were placed in groups of two or three along the sides of the leaves. The card front was adhered to Scarlet cardstock, gold foil paper and finally to a Pine cardstock base. 

Come and join us at Colour Dare and show us how you use the tic tac toe grid shown above. 

You have two weeks to link up your project. 

We can't wait to see what you create!

Enjoy,

Alyson

MTTC 514 - Stencilled Butterfly

 Welcome to My Time to Craft Challenge 514!

The theme of this challenge is stencilling. 

Stencilling is one of my favourite techniques for card making. I chose a butterfly stencil (single layer) for this card. I used three shades of Distress Oxide inks and stencilled the butterfly, leaving the lightest shade at the bottom. Before removing the stencil, I splattered the image with a mix of water and Perfect Pearls, giving it a beautiful shine. The flowers were die cut from white cardstock and I used similar shades of ink to add colour. The leaves were die cut from silver foil, as was the body of the butterfly. Those pieces were adhered and a hot foiled sentiment was placed at the right side. I die cut the butterfly outline into the card base and adhered a second body to the back to hold it in place so when the card is opened, it has a clean appearance inside. 

Come and join us at MTTC and show us your stencilled projects. 

You have two weeks to link up your project. 

We can't wait to see what you create!

Enjoy,

Alyson

Thursday, August 10, 2023

Floral Stencilled Card Set

 I had a lot of fun making this set of cards. The mint background was die cut with a floral pattern die and I used the same die to cut the white background. Those pieces were lined up so the pattern continued across the front of each card. The floral stem was stamped and I used eight different colour schemes to stencil the images before die cutting them. Eight different sentiments were stamped and added to the right side of each stem. Tiny clear heart embellishments were placed around each image to finish off the cards.

Enjoy,

Alyson