Saturday, August 31, 2024

Diamond Front Gatefold Card

 This is a gatefold card with a bit of a twist. The front has a diamond shape instead of the standard rectangle panels. 

I chose scene paper for my card as it worked really well. The front of this card doesn't stay closed when it is standing - it will come apart, but that's fine. The image on the front was cut so the scene continues across the fold. I used the same paper for the centre panel inside the card. The back of the patterned paper was used for the side panels (the dark purple). I random stamped butterflies on two thin panels for the inside of the card. The sentiment was die cut and added inside and I also die cut three butterflies. One was adhered inside the card and the other two were placed on the front diamond. There is a panel on the back to write a message. 


Enjoy,

Alyson

Friday, August 30, 2024

DT 174 - Basket of Apples

 Welcome to Double Trouble Challenge 174!

It's a fruity challenge this week - the small graphic is shown below. Please visit the Double Trouble website for detailed information. 

I die cut several apples from shades of red, yellow and green. The basket was die cut from Kraft paper and inked for dimension. The apples were added both inside and outside the basket. I used yellow gingham paper for the background and adhered the basket to a hexagon die cut. Some gold gems were placed around the image and the sentiment was added at the bottom.

Come and join us at Double Trouble and show us how you interpret this challenge. 

You have two weeks to link up your project. 

I am also linking up my card with Festive Friday Challenge 167. I used the following items from their list: fruity colours, basket, gingham and fruit. 

We can't wait to see what you create!

Enjoy,

Alyson

MTTCC 94 - You're on the Nice List

Welcome to My Time to Craft Christmas Challenge 94!

The theme for this challenge is Santa. 

I don't have many stamps sets with Santa images but the one I used is a cute one! I masked and stamped the images and coloured them with Copics. The sentiment was stamped at the top and I die cut a black stitched frame to go around the scene. That was adhered to a silver hot foiled background and then placed on a black card base. I love that little rein-dog! 

Come and join us at MTTCC and show us how you interpret this challenge. 

You have two weeks to link up your project. 

We can't wait to see what you create!

Enjoy, 

Alyson

Thursday, August 29, 2024

Best Wishes Hearts

 This cute card was designed based on one I saw on Pinterest. 

The hearts were die cut from a white card front and I cut coloured cardstock to fit under each of the open areas. I stamped an image onto each of those pieces and glued them to the card base. I also stamped, coloured and die cut two extra images and a sentiment. They were arranged at the bottom of the largest heart. The open heart card front was attached with foam tape and I added some small white hearts around the openings. 

Enjoy,

Alyson

Wednesday, August 28, 2024

Just a Note Inside Gift Card Holder

 This card is the result of another 30 Minute Cardmaking Stash Dash. 

The parameters for this challenge were as follows: Type of Card - surprise inside, Colour(s) - blue, Embellishment - three of a kind, Technique - splattering and Sentiment - just because (or similar).

I chose a butterfly paper that I have had for ages, along with a photo strip die. The images were stamped on white cardstock and adhered behind the photo strip (one outside and the second inside). I splattered blue ink on the writing panel inside the card and the surprise inside is that the right side holds a gift card. The three of a kind are the stamped and coloured images in each of the photo strips. 


Enjoy, 

Alyson

Tuesday, August 27, 2024

Split Front Butterfly Card

 I saw this card type somewhere - don't recall where - and loved the clean and simple design. 

The card front was die cut with a stitched border die and a piece of green cardstock was placed behind, leaving an opening near the bottom. The sentiment was stamped and I added a butterfly that was die cut twice - once from cardstock and once from vellum - just above the opening. Some clear gems were placed to create a trail for the butterfly. Simple and easy!

Enjoy, 

Alyson

Monday, August 26, 2024

AH 592 - Noel Poinsettia


Welcome to Atlantic Hearts Sketch Challenge 592!

The sketch is shown below.

I love this sketch - it's a great way to showcase special images. 

I chose a single poinsettia for the floral spray shown on the sketch. I die cut all the pieces from white cardstock and inked them in shades of green and turquoise before splattering them with water. Once they were dry, the flower was assembled. I used one of the ink pads and water to splatter colour on the background and then placed a dotted paper piece and black glitter paper on the diagonal. The poinsettia was arranged at the left side and I added a hot foiled sentiment on the glitter paper. Some clear dew drops were placed on and around the flower. 

Come and join us at Atlantic Hearts and show us how you interpret this sketch. 

You have until Sunday evening to link up your project. 

We can't wait to see what you create!

Enjoy, 

Alyson

Sunday, August 25, 2024

Peek-Through Vellum Poinsettia Cards

 I have made this card style before but I love it so much. The shape of the outer card is the same at the back so the four panels are see through. 

I embossed the vellum with a stitched cover plate for each card. The poinsettia spray pieces were die cut and assembled - and some of those pieces were TINY! They were arranged on the front and I added a foiled sentiment across each card. Some flat gold gems were placed around the floral spray and I brushed the yellow parts with a gold shimmer brush.

Enjoy, 

Alyson

Saturday, August 24, 2024

SS 758 - Holiday Wishes

 Welcome to Sketch Saturday Challenge 758!

The alternate theme (in addition to the sketch) is to use sequins. 

I started by making a red background by blending red ink on white cardstock, splattering it with water and then using a coverplate die to add a pattern. The white panel was embossed with a brick background and I added a tree with garland pieces on top. The gifts were placed at the bottom and I added a white heat embossed sentiment. Some silver sequins were placed around the tree and the sentiment. 

Come and join us at Sketch Saturday and show us how you interpret this sketch. 

You have two weeks to link up your project. 

We can't wait to see what you create!

Enjoy, 

Alyson

Friday, August 23, 2024

CD 615 - Birthday Flowers

 Welcome to Colour Dare Challenge 615!

The colour grid is below - choose at least three of the colours shown. 

I used Lemonade, Jade, Sapphire and Capri. 

The geometric background was stencilled from light to dark using Lemonade, Capri and Sapphire inks. That was trimmed down to fit an A2 card with a Sapphire border. The floral image was cut on my Cricut in shades of yellow and green and adhered to a vellum oval to soften the background. The sentiment was white embossed on blue, added to a piece of vellum and then placed across the bottom. A twine bow was tied at the base of the flowers and I added some clear dew drops to finish off this pretty card.

Come and join us at Colour Dare and show us how you interpret this challenge. 

You have two weeks to link up your project. 

We can't wait to see what you create!

Enjoy, 

Alyson

Cut It Up 311 - Deer Silhouette Frame Card

 Welcome to Cut It Up Challenge 311!

This is an anything goes challenge - but you must use dies on your project. 

I saw a card like this recently and wanted to create it myself. I didn't have instructions so I figured out the measurements. It took me a couple of tries to get it right but I did get it to work. This works best with some sort of scene paper behind the die cut. 

The card folds down like a normal A2 landscape card but when it is opened, there is a place to write a message at the top and the lower half opens to a 3D box with a scene inside. I chose to keep the scenes almost identical except just the momma deer is on the front and the momma with the baby is on the inside. I also offset the wooded die (second one was die cut from green cardstock) for the front to give it a bit more interest. A simple sentiment was placed along the bottom. 


Come and join us at Cut It Up and show us your projects!

You have two weeks to link up with this challenge. 

We can't wait to see what you create!

Enjoy,

Alyson

MTTC 541 - Tree Postage Card

 Welcome to My Time to Craft Challenge 541!

The theme for this challenge is to use something tree-related. 

I chose several tree stamps and stamped the images on a postage die cut. I cut out each of the pieces and then stamped some postage images on each piece. The background was die cut from Kraft cardstock and adhered to a black base. The stamps were arranged on the front and a heat embossed sentiment was placed at the bottom. 

Come and join us at MTTC and show us how you interpret this challenge. 

You have two weeks to link up your project. 

We can't wait to see what you create!

Enjoy,

Alyson

Thursday, August 22, 2024

Poinsettia Parade 4

 Welcome to the final post in the Poinsettia Parade series! 

I saved my favourite card for the end. I love non-traditional colours for Christmas and blue and silver is my favourite combination. 

The background was hot foiled in silver and I added the white paint splattered poinsettia at the bottom along with greenery and berries extending from the main flower. A hot foiled banner sentiment was placed across the flower along with some blue metallic thread. I added silver gems and used a white gel pen on the berries. 

Enjoy,

Alyson

Wednesday, August 21, 2024

Poinsettia Parade 3

 Today's poinsettia was made in shades of purple. I used a hot foiled background with an opening in the centre that was covered by the flower. I love where the lines cross on that background. 

The pinecones were placed behind the flower and I added some silver metallic thread and silver gems. Again, the ends of the leaves flower and pinecones were embossed in white to give a snowy appearance. 

Enjoy, 

Alyson

Tuesday, August 20, 2024

TSOT 653 - I Smell a Birthday

 Welcome to Try a Sketch on Tuesday Challenge 653!

I pulled out my skunk stamp set for this challenge. I stamped all the images and coloured them as needed. A small scene was created inside the shaker window and I fussy cut a second skunk as well as a small floral element for the front. The background was split in half according to the sketch and I added a mix of sequins inside the shaker. 

Come and join us at TSOT and show us how you interpret this sketch. 

You have two weeks to link up your project. 

We can't wait to see what you create!

Enjoy, 

Alyson

Monday, August 19, 2024

Poinsettia Parade 2

 Welcome to Poinsettia Parade Post #2!

This poinsettia card was made in shades of pink. The pinecones were placed behind the flower and I added some greenery, metallic thread and silver gems to the hot foiled background. I also embossed white powder onto the edges of the leaves and the poinsettia to make it look sort of like snow. 

Enjoy, 

Alyson 

Sunday, August 18, 2024

Poinsettia Parade 1

I titled this post Poinsettia Parade 1 because I have four poinsettia cards (in the same style) to share over the next few days. I did them in four colour schemes.

The flower and leaves were all inked - some of the greenery was simply ink blended and splattered with paint but the flowers and larger leaves were smooshed into ink mixed with water and then splattered with both water and white paint. They had to dry completely overnight. 

This card was made in traditional Christmas colours of red and green. The background was hot foiled with a red plaid pattern and I chose a gold hot foiled sentiment. In addition to the floral elements, I added red metallic thread behind the sentiment and some gold gems. I also used a white gel pen on the berries to add some interest. 

Enjoy,

Alyson

Saturday, August 17, 2024

Delicate Foliage in Vellum

 I have been playing a fair bit with the Delicate Foliage set from Pinkfresh Studio. 

The image was embossed in silver and I cut away all the excess pieces that would have been filled in with the stencils. I die cut a white rectangle and masked a circle in the centre. That was ink blended using oxide inks and splattered with water. The leaf image was placed on top and the rectangle was adhered to a white card base with foam tape. A hot foiled sentiment was added at the top and some turquoise gems were placed around the leaves. 

Enjoy, 

Alyson

Friday, August 16, 2024

DT 173 and CD 614 - Anemone with Lattice Background

 Welcome to Double Trouble Challenge 173 and Colour Dare Challenge 614!

The graphics for both challenges are below. Double Trouble is pairing with Colour Dare for this challenge.  Please visit the Double Trouble Challenge Blog for detailed information for that challenge.


I have far more than three layers on my card - the card base with a mat and the front plus the lattice make at least three layers and the flower has six layers just by itself. I used silver metallic thread and clear gems for the embellishments and the floral spray is the image. 

I die cut the flower pieces from very light pink cardstock and inked them to make the flower gradually darker toward the back. A silver and black centre was added to that. The leaves were die cut from two shades of green. I inked all the die cut pieces for added interest. I die cut a scalloped frame and created a lattice using white shimmery cardstock. Although I used shades of both light and dark pink plus two shades of green, I added a light purple shimmery paper behind everything to make sure the third colour was included. 

Come and join us at both Double Trouble and Colour Dare and show us how you interpret these challenges. 

You have two weeks to link up your project. 

We can't wait to see what you create!

Enjoy,

Alyson

MTTCC 93 - Joy Poinsettia Wreath

Welcome to My Time to Craft Christmas Challenge 93!

The theme for this challenge is wreaths. 

I embossed a white background with a 3D curved poinsettia image and lightly inked around the edges in red. The wreath was die cut from Kraft cardstock and other elements were die cut from red and green cardstock. Everything was arranged off to the right side. Before adding the gems and sentiment, I splattered gold paint on the entire card. The hot foiled sentiment was placed in the centre of the wreath and I added gold gems to the poinsettias. 

Come and join us at MTTCC and show us how you interpret this challenge. 

You have two weeks to link up your project. 

We can't wait to see what you create!

Enjoy, 

Alyson

Thursday, August 15, 2024

Delicate Foliage Pair of Cards

 This beautiful stamp, stencil and die creates a leaf image where some of the leaves are coloured, some are open and some overlap. I stacked the die three times to add some dimension. 

The backgrounds were sprayed and spattered with Distress Oxide sprays and white paint. Once they were dry, sentiments were stamped at the top and the leaf images were added and trimmed along the right side. I placed those pieces on white cardstock and then on a coloured card base. Some clear gems were added around the cards. 


Enjoy,

Alyson

Wednesday, August 14, 2024

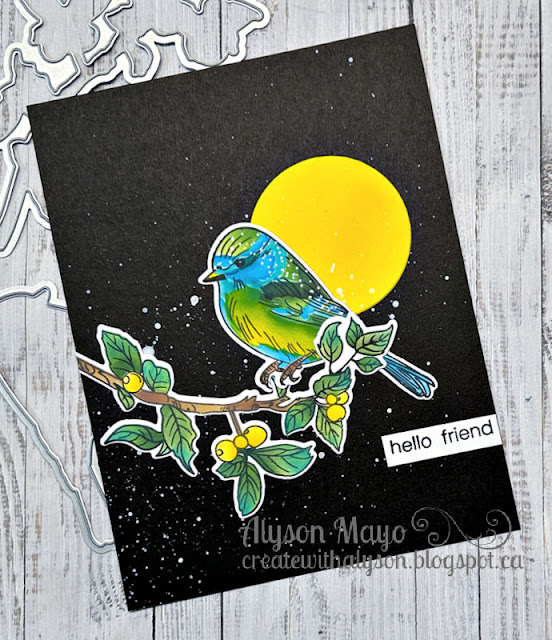
Hello Friend Bird Card

 I recently visited a friend of mine and we had a fun bet on something silly. I lost... and the agreement was to make a card for the other person. She specifically asked for a bird. 

I saw this card on Pinterest and wanted to recreate it. The black background was splattered with white paint and I inked a piece of white cardstock with yellow ink and die cut a circle from that. The bird and the branch were stamped, stencilled and die cut. I arranged them below the sun and added a small stamped sentiment at the bottom. I love the bold colours against the black background. 

Enjoy, 

Alyson

Tuesday, August 13, 2024

Crop and Create - Jolly Holiday Part 2

 The Jolly Holiday virtual card making event was a one day event but there were some cards shown by Jennifer McGuire that I wanted to try myself. Some of these weren't as easy as they appear... 

The first one has a die cut opening for the tree to the right. The card is shown standing open so the tree that is inside is a little hard to see but it sits flush with the rest of the card when the card is closed. 

This is a spinner card - the letters for the word "joy" were taken from the larger word "jolly" and there is also a top folding card inside with a sentiment stamped on the front and a place to write a message inside without interfering with the spinner component. 

The background for this card was stencilled using the pattern on the embossed background as a guide. My first stencilled image was not 100% centred so it's off a bit but the sentiment covers most of that area. 

The last card was made on a vellum card base so the vellum is uncovered at the top. That's hard to see in the photo. The cardstock panels provide support for the card to stand up. 

Enjoy,

Alyson

Monday, August 12, 2024

AH 590 - Doily with Floral Trio

Welcome to Atlantic Hearts Sketch Challenge 590!

The sketch is shown below. 

I stayed true to the sketch because I really liked the design. I created a background using turquoise magical powders and set that aside to dry. The doily, flowers and leaves were all die cut and I inked the bases of the flower petals before assembling them. I arranged them along the edge of the doily and slid the leaves underneath. A hot foiled sentiment was placed under one of the flower petals and I added three sequins around that piece.

Come and join us at Atlantic Hearts and show us how you interpret this sketch.

You have until Sunday evening to link up your project. 

We can't wait to see what you create!

Enjoy,

Alyson

Sunday, August 11, 2024

Crop and Create Jolly Holiday

 I love the events run by Scrapbook and Cards - they are known as Crop and Create events. There was a one day Christmas event at the end of July. The cards from that event are posted below. There are some specific details posted above some of the cards. 

This is a spinner card - really needs to be seen in person. 


The door on this card opens to reveal a scene inside. 
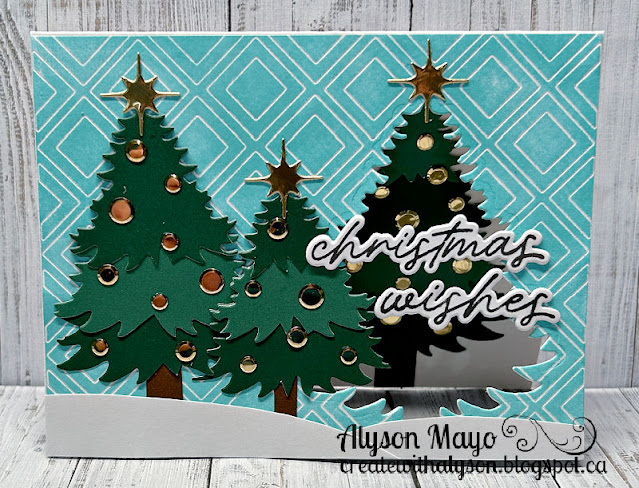
I took the time to inlay every one of those dark green pieces into the white stars. Love the effect but it was extremely time consuming.


Enjoy, 
Alyson