Thursday, November 17, 2022

Sending a Frosty Hello

The mini slimline card size is great for a small scene like this one! 

The images were stamped, coloured and die cut. I splattered a piece Kraft cardstock with white craft paint and then adhered the stitched borders to form the snowbanks. That entire piece was adhered to a red mat and then to the white card base. The images were adhered with thin foam tape and I stamped the sentiment at the bottom. Love the cuteness! 


Enjoy,
Alyson

Wednesday, November 16, 2022

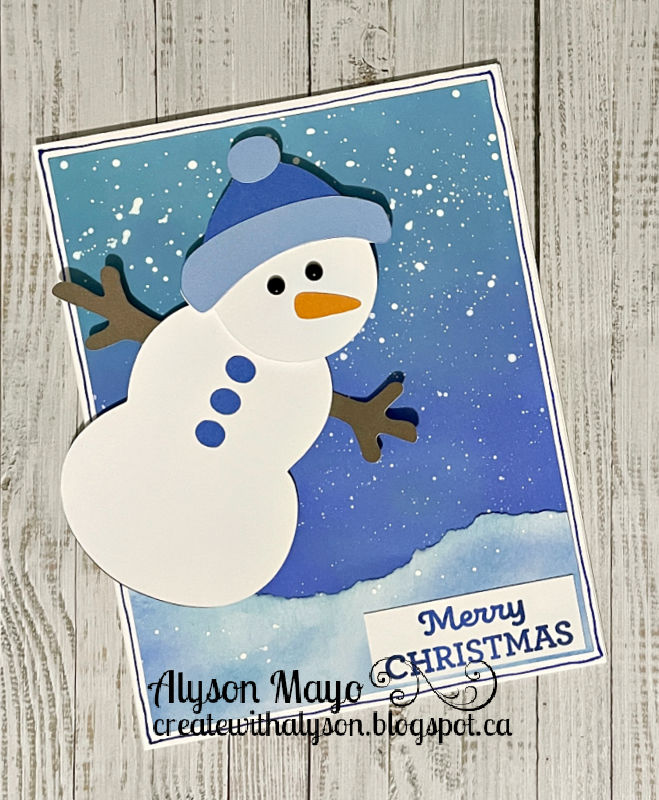
Kinetic Snowman

 This adorable kinetic snowman was created by my friend, Trina Wirihana. This SVG file, along with several other kinetic options, are available on her website, Scrap'n Season. 

I ink blended a background and splattered it with white craft paint to simulate snow. The snowman was assembled and added to the card. A small sentiment was stamped in two shades of blue and added to the lower corner. I drew a line with a thin marker around the edge to finish off the card. The snowman's body swings freely back and forth. 


I made two of these - they will be sent to two special young kids - one boy and one girl. I know they will love them! 

Enjoy,

Alyson

MTC 68 - Hello Winter

 Welcome to Make the Cards Challenge 68!

Winter is on the horizon and this week's theme is just that - winter. 

I created a small shaker card. The background was ink blended with three Distress Oxide inks and I splattered it with water. The sentiment was embossed with a white twinkle embossing powder at the bottom. The shaker image was coloured and I stacked the snow globe die several times to create height. Some tiny silver stars were placed inside the shaker and around the snow globe. A dark blue frame was adhered around the outside of the card. 

Come and join us at Make the Cards and show us how you interpret this winter challenge. 

You have two weeks to link up your project. 

We can’t wait to see what you create!

Enjoy,

Alyson

Tuesday, November 15, 2022

Card Making Stash and Dash - Blue Tulip Gatefold Card

 I participated in an online event called Card Making Stash and Dash - the goal is to use a series of four parameters to create a card in 30 minutes or less. 30 minutes... sure! I took about 38 minutes this time! 

The parameters were as follows: gatefold card, monochromatic colour scheme, border and splattering. 

I chose a blue colour scheme. I die cut the floral pieces and inked them in various shades of blue. The front of the gatefold was splattered using two blue shimmer brushes. I added a belly band with a shimmery border and placed the large tulip on the front. Inside, I did a little more splattering and added a smaller tulip along with a sentiment. 


Enjoy,

Alyson

Cards Sets in Multiples

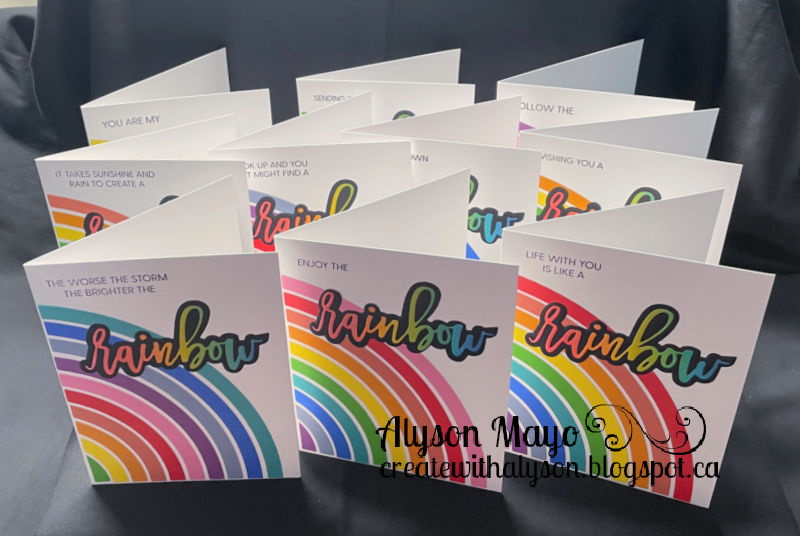
 As some of you know, I make a lot of sets of cards... it's an easy project to take to a crop as I can prepare much of it ahead of time.

Below are a few sets that I recently finished. These will either be given to fellow patients when I attend medical appointments or they will be donated to sell at my church's Christmas Market. 

The bottom photo shows all the sets that I completed at a recent crop event. 


Enjoy,
Alyson

Monday, November 14, 2022

Vellum Embossed Cards

Jennifer McGuire recently did a video using vellum for card bases - I thought I would give it a try!

The base for each of these cards is heavy weight vellum and the front panel was embossed. One was done in a red and green colour scheme (poinsettias) and the other was done in shades of blue with snowflakes. The frame die cuts were placed on the front and back of each section to allow for a place to write inside but also to cover up the messy work from the adhesive. I added a simple black and white sentiment to the poinsettia card along with some gold gems and the snowflake card got a silver foiled sentiment with silver Stickles. 


Enjoy,

Alyson

Sunday, November 13, 2022

Pink Just Because Card

 This card was so fun to create! A friend of mine hosts a sketch challenge every Saturday and my card is based on the sketch shown below.

The background was inked in three shades of pink, then stencilled over with black ink and I added clear glitter gel on top of that. The squares and diamonds were cut with the same border sizes and I used some die cut images from the Be Bold Blooms to create the floral cluster in the centre. A hot foiled sentiment was placed below the cluster. The lines on the flowers were brushed with a clear shimmer brush and a few silver glitter gems were added to finish off the card. 

Enjoy,

Alyson

Saturday, November 12, 2022

Hello Sunshine

 This was a lot of fun to create! 

I started with an alcohol inked background that was kind of a rainbow colour scheme. I die cut the leaf background from both black and the alcohol inked piece and inlaid the leaves back into the black background. The sentiment was die cut from teal glitter paper and adhered at the top. I added some teal gems around the leaves to finish off the card.

Enjoy,

Alyson

Friday, November 11, 2022

Poinsettia Ornament

 The poinsettia below is actually a tree ornament. 

The leaves were die cut from white cardstock, inked, shaped and then brushed with clear Stickles. That's a way to make sure they keep their shape, even if the ornament is flattened for storage. I die cut the branches and stacked them a few times before also brushing them with Stickles. The gold berries were added under the flower. I placed all the pieces on a die cut circle and then die cut three additional circles to stack behind the first one. Before adding the bottom one, I added some gold metallic thread to hang the ornament. 

The ornament is pictured on the gift below as well. 


Enjoy,

Alyson

Thursday, November 10, 2022

Winter Deer

 I saw this beautiful card design on Facebook and wanted to recreate it. 

It took me two attempts to get the result I wanted. I will post my first attempt further down... I ended up adding too much dark ink and the lines from the glow of the moon were lost. 

Three shades of blue ink were used to create both the sky and the ground. The ground was masked with printer paper and ink was added afterwards. The deer was die cut in both white and black and layered slightly offset. I splattered the background with white craft paint and added a sentiment inside the card. 

Here is my first attempt - I added a sentiment at the top since the lines were barely visible. 

Enjoy,

Alyson