Monday, August 9, 2021

Hello Flowers - Colouring on Patterned Paper

The base paper for this slimline card is a gold foil patterned paper. The flowers are embedded in the paper with a gold foil and they are perfect for colouring! 

Before I coloured the images, I used two shimmer brushes to lightly splatter the background. A bright pink and green combination was used to colour the flowers and leaves. I used a light grey marker to outline each of the images as well. The sentiment was die cut from gold foil and some scrap cardstock several times so it could be stacked. The pink background was marker coloured and die cut as I didn't have any matching cardstock for the pink colour that I used. I added a bracket behind the sentiment and also added gold embellishing thread and gold glitter gems. 


Products used are Close To My Heart unless otherwise indicated: 

Paper: Gold Foil Cardstock, Gold Foil Paper, Clover Cardstock, White Slimline Cards and Envelopes 

Stamps; none

Inks: none

Accessories: Stitched Scalloped Brackets Thin Cuts, Phrase Builder - Hello (PFS), Gold Glitter Gems, Green Apple Shimmer Brush, Evergreen Shimmer Brush, Touch Markers (misc.), Gold Thread (misc.)

Enjoy,

Alyson


Sunday, August 8, 2021

Rose Blossom Layering Stencils x 4 Cards

One of the latest releases from The Ton Stamps is a set of six layering stencils and two edge dies. I used both of those items to create the set of four cards below. 

The stencils create a background that is approx. 5-1/2" x 6". The coordinating dies cut along the two outside sections so the centre of the stencilled area can be cut in half, leaving two beautiful panels. I created two different panels and cut both in half, allowing me to make four cards. 

Pink and emerald combination

I lightly inked the background of each card and die cut the base piece using a stitched rectangle die. Both backgrounds were also embossed (the top one is very subtle). The floral layers were stacked and added to the front. I stamped and die cut some sentiments and added pink and turquoise flat backed gems to each card. The yellow centres of the flowers were also brushed in gold. I love how these turned out! 


Orange and blue combination 

I inked the backgrounds for both cards and embossed one of them. They were also die cut using a stitched rectangle die. I stencilled on one background using white Pop of Colour (similar to Liquid Pearls). I tried that on the second background using a pair of layering stencils (plaid background) but the stencil was a little too thick and I ended up creating a big mess. Once both pieces were dry, I stacked the floral die cuts, added a sentiment and added clear flat backed gems on one and dotted the other with Liquid Glass. The yellow flower centres were also brushed in gold. 


Products used are as follows: 

Paper: White Daisy Cardstock, White Cards and Envelopes

Stamps: Easy Expressions plus coordinating dies (The Ton Stamps)

Inks: Various Pink Fresh Studio inks, Various Distress inks, Archival Black, Versamark (both CTMH)

Accessories: Rose Blossoms Layering Stencils and Dies (The Ton Stamps), Stitched Rectangle Dies (GMD), Artbooking Cricut Collection, Stencil Sheets, Stitched Circle Embossing Folder, Gold Shimmer Brush, Liquid Glass, Gold Embossing Powder, Heat Tool (all CTMH), Subtle Embossing Folder (SU), White Pop of Colour (scrapbook.com), Thin Foam Tape, Flat Backed Gems - Ocean Breeze, Glacier, Bubblegum (PFS)

Enjoy,

Alyson


Saturday, August 7, 2021

Sending Hugs Blended Background

I created this card to submit to a design team opportunity for CAS on Friday (although the link goes by CAS on Sunday)... 

The background was created by blending three Distress Oxide inks in a diagonal direction with a mask around the outside of the card base. Once the inks were dry, I stamped a garden image in black and added a sentiment at the top. 

The inside of the card is also finished with a blended strip along the side and a sentiment stamped beside the strip. 

Products used are as follows:

Paper: White Cards and Envelopes (CTMH)

Stamps: Wild Blossoms (Gina K. Designs), Beautiful Inside (Altenew) 

Inks: Archival Black (CTMH), Distress Oxide Inks - Mustard Seed, Carved Pumpkin, Abandoned Coral (Ranger) 

Accessories: Rectangle Stencil (created on Cricut)

Enjoy,

Alyson

Friday, August 6, 2021

Christmas with Distress Oxide Sprays

I am slowly working on some Christmas cards in addition to the design team work and other projects that I have on the go. I recently watched a superb video as part of a weekend cardmaking event and was inspired to try something new to me! 

Distress Oxide sprays are a medium that I had not used until I did these cards. This technique can also be done using Distress Oxide inks but the sprays are much more fun - and considerably messier! 

I used three colours that are similar - Salvaged Patina, Peacock Feathers and Mermaid Lagoon. I started with the two lightest colours and sprayed them on a media mat and then smooshed the paper into the sprays. I did this several times, drying the paper between each session. I added the darkest colour and did more smooshing until most of the paper as covered. I used a letter size sheet of heavy duty watercolour cardstock for this. I also splattered some of the sprays and some water on the paper. 

Once the paper was dry, it was cut into 4 sections, each a perfect A2 card size. I embossed a vine image in white on each piece and then trimmed them down by an eighth of an inch. I inked the outside edges of each pice and mounted them on a top folding card base so there was a small border. The sentiment pieces were stamped on black and embossed in white. They were cut and adhered to the cards. I love the end result!

Products used are as follows: 

Paper: Black Cardstock (CTMH), Distress Watercolour Cardstock (Ranger), Neenah Solar White Cardstock 

Inks: DO Sprays - Salvaged Patina, Peacock Feathers, Mermaid Lagoon (Ranger), Versamark, Lagoon (CTMH)

Stamps: Merry Christmas to All (SU), Winterberry Background (PFS)

Accessories: White Embossing Powder (Ranger), Heat Tool (CTMH)

Enjoy,

Alyson

Thursday, August 5, 2021

Triple Point Cards

I have seen several images of Triple Point Cards - the idea is one that has been around for a while and this is a variation of the original. 

I followed a video by Jan B. to create my cards. They aren't difficult but they do require some careful measuring to make sure the pieces are aligned. 

There are two cards here to share - and I am in the process of creating a third about which I will explain a little further down the post. The first one was done using the Boutique paper pack. I really like the patterns in these papers. 

I chose a birthday sentiment for the center so I didn't need any other sentiment piece on my card. You certainly could place a small banner at the top if necessary. I die cut the circles using a Nestabilites scalloped die and a stitched circle die. 


The second card uses the same measurements and style and I used the Blue Skies paper collection for this one. I switched the "busy" pattern to the front. I prefer the busier pattern in the back as I think it takes away from the sentiment a little bit when it is on the front. The third card I am making will have the same papers but the flower and star pieces will be reversed. For this one, I used  a different Nestabilites die for the outline and a stitched circle die for the inside.


Products used are Close To My Heart unless otherwise indicated: 

Paper: Boutique Paper Pack, Blue Skies Paper Pack, White Daisy Cardstock, Peacock Cardstock, Sugarplum Cardstock, Mint Cardstock, Sapphire Cardstock, Canary Cardstock 

Stamps: You Brighten My Day, Birthday Greetings

Inks: Sapphire, Peacock

Accessories: Stitched Circle Thin Cuts, Stitched Circle Dies (GMD), Layered Flower Dies (Nestabilities), Open Scalloped Circle Dies (Nestabilities), Daisy Meadows Dots 

Enjoy,

Alyson

Wednesday, August 4, 2021

AH 432 - This is Your Day

Welcome to Atlantic Hearts Sketch Challenge 432!

I stayed true to the sketch this week, adding only some flowers on top of the inside section. 

Woodgrain paper with a grey undertone was perfect for what I had in mind. Those pieces were cut to fit within a stitched rectangle. I decided on green as the background as it matched the stems on the flowers. That green cardstock was embossed with a woodgrain embossing folder and sanded to bring out the white core. I stamped and coloured the flowers - since Lilies of the Valley are white, I shaded the flowers lightly with a grey marker to add some interest. I tied a ribbon around the base of the flowers and added a sentiment at the bottom. The flowers were brushed with a shimmer brush and I added some gold Stickles around the card. 

Come and join us at Atlantic Hearts and show us how you interpret the sketch shown above. 

You have until Sunday evening to link up your project. 

We can’t wait to see what you create!

Products used are as follows: 

CTMH: Woodgrain Paper Pack, White Daisy Cardstock, Willow Cardstock, Charcoal Cardstock, Woodgrain Embossing Folder, Stitched Rectangle Thin Cuts, White and Gold Skinny Ribbon, Clear Shimmer Brush, Goldenrod Stickles, Charcoal Ink, Willow Ink, Versamark, Gold Embossing Powder, Heat Tool

Gina K. Designs: May Flowers stamp and dies 

SSS: Intense Black ink pad

The Ton: Easy Expressions stamp and dies 

Misc: Copic Markers, Touch Markers 

Enjoy,

Alyson

Tuesday, August 3, 2021

Corner Fold Card Revisited

I love this card - it folds flat for mailing and really packs a punch! 

Some bold papers were used for this card. The Lagoon background really brings out the colours in the patterns. I stamped some flowers from an old stamp set and die cut them. The sentiment was stamped in two parts - the smaller part along the edge of the flowers and the larger part on the inside of the card. I added a white panel on the back for a place to write a message. A few gems were coloured to match the papers. 


Products used are as follows: 

Paper: White Cardstock, Lagoon Cardstock, Black Cardstock, Flamingo Cardstock (all CTMH), Bold and Blooming Paper Pack (Gina K. Designs) 

Stamps: Simple Florals with Thin Cuts, Boutique Cardmaking (both CTMH)

Inks: Candy Apple, Canary, Flamingo, Fern, Lagoon (all CTMH)

Accessories: Bitty Sparkles, Clear Sparkles (both CTMH), Sharpie Marker 

Enjoy,

Alyson

Monday, August 2, 2021

Heart 2 Heart - Full Circle

Welcome to this week's Heart 2 Heart challenge!

We are going full circle this week - make sure you use circles on your project. 

I used several circles - the background pattern, the sentiment shapes and the centre of the flower are all circles. 

This card is based on a gorgeous card created by Susan Opel for Scrapbooks and Cards Today. I loved her design and wanted to try it in a different colour scheme. 

The background was created using a circle stencil (die cut from the Artbooking Cricut cartridge) on black cardstock with Black Diamond Stickles. That piece was mounted on craft foam and then on Blue Belle glitter paper. I cut the centre out of the Blue Belle glitter paper as only the edges show - no point in wasting all that great paper! 

The sentiment was stamped and die cut with the Stitched Circle Dies and the outline was die cut with the next largest circle. I cut some strips of patterned paper and dovetailed the edges. They were placed side by side. The flower and leaves were stamped in black and and left uncoloured. I added some shimmer on the flowers and leaves using the Clear Shimmer Brush. 


Come and join us at Heart 2 Heart and show us how you interpret the Full Circle challenge! 

You have until the end of August to link up your project. 

We can’t wait to see what you create! 

Products used are Close To My Heart unless otherwise indicated: 

Paper: Mix-In Paper Packs, Wander Paper Pack, White Daisy Cardstock, Black Cardstock, Blue Belle Glitter Paper, Neenah Solar White Cardstock 

Stamps: Daisy Meadows Scrapbooking, Chelsea Gardens Cardmaking, You Brighten My Day 

Inks: Black

Accessories: Cricut Artbooking Collection, Stitched Circle Thin Cuts, Basic Circle Thin Cuts, Daisy Meadows Scrapbooking Thin Cuts, Chelsea Gardens Cardmaking Thin Cuts, Black Diamond Stickles, Daisy Meadows Dots, Clear Shimmer Brush, Craft Foam (not CTMH)

Enjoy,

Alyson


Sunday, August 1, 2021

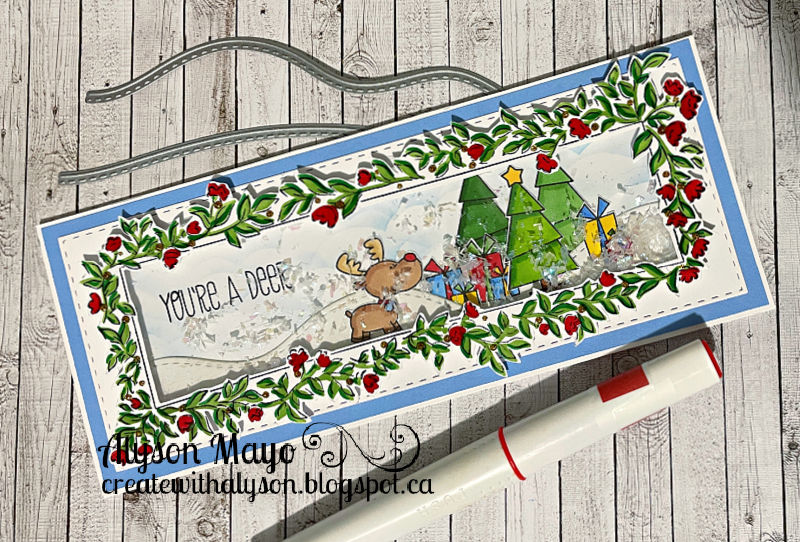
Double Trouble 90 - Baby Reindeer Slimline

Welcome to Double Trouble Challenge 90! 

This week, it's all about baby animals... and puns if you so choose. The small graphic is below - please visit the Double Trouble Challenge Blog for detailed information. 

Baby animals... that's a tough one for me as I just don't have any regular stamps with baby animals - none! I pulled out my Christmas stamps and found a reindeer that looks like a baby reindeer so that is what I chose to use. 

I stamped all the inside images, coloured and fussy cut each of them. The frame was stamped and then I used the coordinating layering stencils to add colour to it. I don't have the die for that set so I fussy cut around both the inside and the outside of the frame. I also die cut a stitched slimline rectangle and arranged the pieces inside the frame to form a winter scene. I stencilled some clouds at the top and die cut some borders to use as snow at the bottom. The flowers on the frame were brushed with a red shimmer brush and I also added some gold Stickles around the leaves and flowers. The card was set on a light blue background and then on the slimline card base. 


Come and join us at Double Trouble and show us how you interpret this week's challenge. 

You have until Aug. 19 to link up your project. 

I am also paying along with the "Mew and Your Paw-some Pet" challenge at Double Trouble. My doggie, Mika, just turned eight (EIGHT... I can’t believe it!). She is snuggly, playful, gentle, loving and adorable all in one! 

I am also linking up my card with the 2 Crafty Critter Crazies challenge. 

We can’t wait to see what you create! 

Products used are as follows: 

Paper: White Daisy Cardstock, Carolina Cardstock, White Slimline Cards and Envelopes (all CTMH)

Stamps: Incredibly Grateful (Pink Fresh Studio), Santa's List (Your Next Stamp)

Inks: Intense Black (SSS), Pewter, Green Apple, Clover, Candy Apple, Carolina (all CTMH)

Accessories: Incredibly Grateful Layering Stencils (Pink Fresh Studio), Stitched Slimline Rectangle Dies (Pink and Main), Fancy Border Thin Cuts (CTMH), Cloud Stencil (MFT), Tri-Blend Markers (CTMH), Touch Markers (misc.), Red Shimmer Brush (CTMH), Goldenrod Stickles (CTMH), Snow Filler (misc.), Foam Tape (misc.), Acetate (misc.)

Enjoy,

Alyson

Christmas in Three Styles

I have been watching several videos lately for ideas for Christmas cards. It's always neat to try something new! 

These three cards are all very different in style. They all use forms of mixed media and I am always learning new ways to use those types of elements. 

The first two cards are CASEd from Chelsea Vorosmarty. She is a master of mixed media techniques and makes it really easy to try the techniques yourself. 

The first card is a poinsettia card - one of my favourites for Christmas.The poinsettia components were Cricut cut and then swiped in Distress Oxide inks spritzed with water. The branches were sponged with dye ink. When the flowers were dry, they were shaped by simply scoring down the center and turning up the sides. I also brushed each of the flower pieces with some Diamond Stickles. The pieces were assembled and a trio of gold gems were placed in the centre. The background was created by stacking several layers of the Multi Circle Window Thin Cut with a piece of White Glitter Paper behind. I love the effect! 

The second card has a very different feel... a night scene was created using various Distress Oxide inks and splattered with a mixture of White Liquid Pearls and water. The backgrounds and the sleigh were Cricut cut and the main background was clear embossed for a shiny effect. I added a die cut sentiment. I tried to emboss a sentiment in white but forgot to use the anti-static pouch and ended up with embossing powder stuck to everything... such is life. 

The last card was inspired by Justine Hovey. The background was created using Distress Oxide inks and I created a city scene on the Cricut. That was applied using Black Soot DO ink. The snowflakes were added using a stencil and then a star stencil was used with Gold Liquid Pearls to create the shiny stars. I brushed some ink over a die cut to create the snowbanks and a sentiment was embossed in the bottom corner. 

At least I have a start on a few Christmas cards - many more to make in the weeks ahead! 

Products used are as follows: 

Paper: White Daisy Carsdstock, Black Cardstock, White Glitter Paper, White Cards and Envelopes (all CTMH) 

Stamps: Festive Trees (CTMH)

Inks: Black, Candy Apple, Evergreen, Clover, Versamark (CTMH) DO Inks: Candied Apple, Tattered Rose, Lucky Clover, Evergreen Bough, Black Soot, Chipped Sapphire, Seedless Preserves, Mustard Seed, Antique Linen, Blueprint Sketch

Accessories: Cricut - City Sidewalks, Artbooking, Flower Market, Misc. Cricut Shapes, Fancy Border Thin Cuts, Basic Circle Thin Cuts, Gold Glitter Gems. Gold Liquid Pearls, White Liquid Pearls, Diamond Stickles, Gold Embossing Powder, Clear Embossing Powder, Heat Tool (all CTMH), Merry Christmas Borderline Die (Creative Expressions) 

Enjoy,

Alyson