Friday, March 8, 2024

Cut It Up 299 - Floral Window Card

Welcome to Cut It Up Challenge 299! 

The theme for this challenge is colours of spring. 

With spring around the corner here, I wanted to make a spring-like card using pink, purple and yellow flowers. I stencilled some clouds and covered that piece with vellum. I die cut a ton of tiny pieces to go with the white frame and many of them were inked for dimension. I  arranged the flowers and greenery around the frame and that was set on a brick embossed background that was a lightly brushed with grey ink so the bricks would stand out. I added a small sentiment at the bottom and decided to also add a bird to reflect spring. I added clear Stickles to the centres the flowers and also to the dots on the pink berries. Love how this turned out! 

Come and join us at Cut It Up and show us your colours of spring projects. 

You have two weeks to link up with this challenge. 

We can't wait to see what you create!

Enjoy, 

Alyson

MTTC 529 - Gnome Fun Fold Card

Welcome to My Time to Craft Challenge 529!

The theme for this challenge is fantasy. 

Fantasy requirements are always difficult for me as I don't have a lot of stamps or dies with fantasy-type images. For this card, I pulled out one of my very few gnome stamp sets.

The image was stamped and coloured. I used an ususual colour scheme for me - the idea came from the Color Cubes that I have (digital version). The gnome was coloured in shades of tan and brown and die cut, along with the sentiment. I folded a card so a piece of coloured vellum hangs over the right side. The gnome was adhered to a piece of inked and embossed cardstock and I added some metallic thread and gold sequins to finish it off. 

Come and join us at MTTC and show us your fantasy-related projects. 

You have two weeks to link up with the challenge. 

We can't wait to see what you create!

Enjoy, 

Alyson

Thursday, March 7, 2024

LST - Class Cards

 I subscribe to the Let's Stamp Together program and every two months, a wonderful package of supplies is sent to the participants. The last one had so many dies, a stamp set, embossing folder and stencils - with many possibilities. 

I always like to do the cards as the instructor does them the first time around - I can play with the products myself later. 

These are the three cards that were made in class. The sunburst was embossed and then stencilled - such a pretty effect! 

Enjoy,

Alyson

Wednesday, March 6, 2024

Planting Seeds Layout

 I don't do much scrapbooking any longer - I used to create many layouts but time has changed things. One in a while, though, there is an occasion that does call for a layout and this was one of those times. 

A former music student of mine invited me to attend a music festival where two of his ensembles were performing. I spent the day in Toronto with him and his groups - I had not seen him since June of 1997 when he finished grade 8. It was the most amazing experience - getting to know him as an adult and seeing him work with his students was so very rewarding. 

He has told me on many occasions that I am the reason he decided to teach intermediate music - and that alone warms my heart. As a teacher, that is what we hope for - that we make a difference in students' lives. 

I screenshot the post I put on Facebook along with his reply. This is why I became a teacher - this is truly what matters! 

Enjoy, 

Alyson

Tuesday, March 5, 2024

TSOT 642 - Purple Flowers

 Welcome to Try a Sketch on Tuesday Challenge 642! 

This sketch has a lot happening - diagonal stripes, a horizontal strip, a centre focal point and a sentiment. It took me a while to plan my card with each of the elements. 

I die cut a stitched floral background from medium grey cardstock and then die cut three long strips with a leaf pattern. They were adhered across the card front and I added a strip of silver shimmer tape just below the centre line. The flowers and leaves were stamped, stencilled and die cut and added according to placement on the sketch. The sentiment was hot foiled and placed at the top. Some iridescent gems were added to the card front and I adhered the card front to a white mat and then a dark purple base. The centres of the flowers were brushed with clear Stickles to add some shine. 

Come and join us at TSOT and show us how you interpret this week's sketch. 

You have two weeks to link up your project. 

We can't wait to see what you create!

Enjoy,

Alyson

Monday, March 4, 2024

Leaf Fun Fold Card

 This card is from the 30 Minute Cardmaking Stash and Dash. 

The parameters for this week's challenge were as follows: Type of Card: anything except an A2 card, Colours: black and white with a pop of colour, Embellishment: leaves and Technique: heat embossing. 

I chose to make an easy fun fold card that folds flat for mailing. The papers are old ones from my stash and I die cut the leaves in three shades of green. I used one of the leaf images on the base of the card and cut apart the others and arranged them along the sides. The sentiment was embossed in green and added to the front. I brushed the leaves with a clear shimmer brush - and done! 

Enjoy, 

Alyson


Sunday, March 3, 2024

DD March Challenge - Slimline Skunks


Welcome to Dragonfly Dreams March challenge! 

The theme this month is to use circles. 

I pulled out an old circle die and cut it twice - once from white cardstock and a second time from green cardstock, The larger white pieces were placed back into the outline and I stamped the skunks and images in the open areas. The images were coloured and I also stamped a sentiment. I ink blended a background with Distress Oxides and splattered that with water before die cutting it with a stitched slimline die. The multiple circle die cut was placed on top and the coloured pieces plus all the tiny pieces between the circles were pieced back into the outline. I added the sentiment at the right side. No embellishments were added to this card as it was busy enough already! 

Come and join us at Dragonfly Dreams and show us your circle creations. 

You have until the first weekend of April to link up your project. 

We can't wait to see what you create! 

Enjoy,

Alyson

Saturday, March 2, 2024

Friend Wreath

 I recently bought the wreath die on this card and this is my first try with it. 

The background was die cut with a stitched leaf background die and then ink splattered. I  die cut the wreath from three shades of green cardstock and added ink to parts of them before layering them together. The flowers were die cut and arranged on the wreath. I used Liquid Pearls for the centres of the flowers but in hindsight, I would have chosen something else after seeing how that worked (or didn't work...) Some gold metallic thread was placed under the flowers and I added gold sequins around the wreath. The sentiment was embossed in white and added across the centre of the wreath. 

Enjoy,

Alyson

Friday, March 1, 2024

DT 161 - Thinking of You

 Welcome to Double Trouble Challenge 161!

It's all about green for this challenge. The small graphic is below - please visit the Double Trouble Challenge Blog for detailed information. 

Since we are pairing with the Festive Friday challenge, I chose three components from their board. Those were: use green, use gold and make a fancy fold card. 

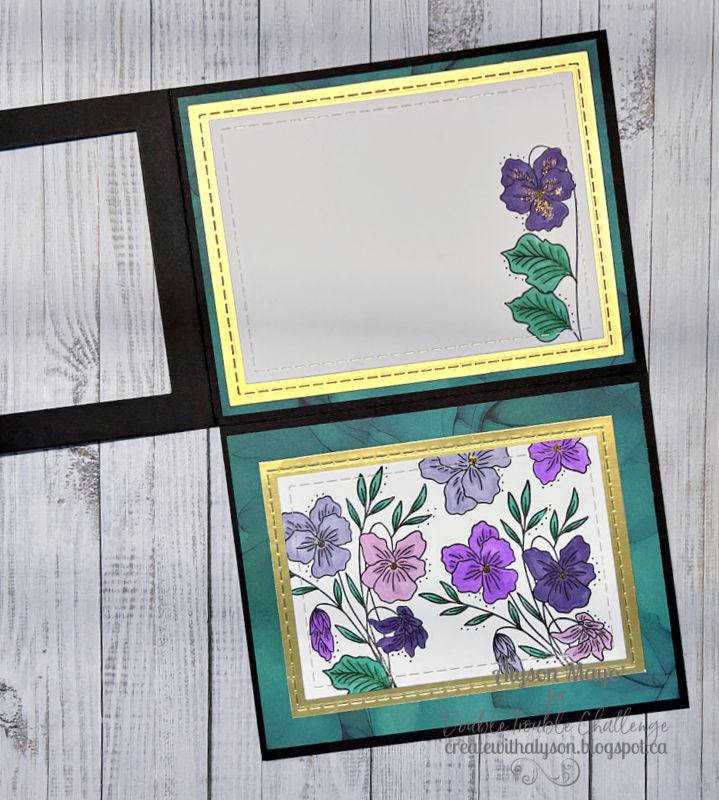
I chose some green alcohol inked patterned paper and gold foil to adhere to a black card base. The card opens to the left and then folds down to reveal a place to write a message and a second image. The front panel is cut away so the first inside panel shows through. I stamped and coloured floral images using the same shade of green and lots of purple shades. I didn't add any embellishments to this card - it folds flat for mailing. 


Come and join us at Double Trouble and show us how you interpret this challenge. 

You have two weeks to link up your project. 

I am also linking up my card with the Festive Friday Challenge

We can't wait to see what you create!

Enjoy,

Alyson


MTTCC 81 - Joy to the World

Welcome to My Time to Craft Christmas Challenge 81!

The theme for this challenge is buffalo plaid. 

I only had one patterned paper in my stash with red and black plaid and it worked well for this card. The trees, deer and ground were die cut and arranged on a red background. That piece was adhered to a black mat and then to the plaid background. I added a heat embossed sentiment and used Stickles to create a glittery base under the deer. 

Come and join us at MTTCC and show us your buffalo plaid creations. 

You have two weeks to link up your project. 

We can't wait to see what you create!

Enjoy, 

Alyson