Showing posts with label My Creations Products. Show all posts

Saturday, February 28, 2015

March SOTM Bloghop - Choose Happy


Welcome to March's Stamp of the Month Blog Hop! This month, we are featuring the stamp set "Choose Happy" - a set of 14 stamps. There are frames, flourishes and sentiments in this stamp set, and many uses for this set as the bloggers along this tour will show you, so sit back and enjoy the tour. You should have arrived here from Wendy Coffman's blog. If you get lost, a list of all blogs can be found here

The stamp set looks like this.


I chose to create some gift bags for my project this month. The frames in this stamp set lend themselves perfectly to this type of project. 

The first photo shows the Slate Paper Bags with White Daisy Cardstock stamped with a couple of the frames. I used our ShinHan markers to give the frames a little bit of detail. Our Mini Stapler is perfect for sealing these bags! 


My second set of bags are the Muslin Drawstring Bags. I stamped directly on the bags with Pigment Inks and then added some of the White Enamel Stars, coloured with our ShinHan markers, along with some Bitty Sparkles. They are perfect little gift bags for something small but meaningful. 


I hope you enjoyed my projects. The next blog on the hop is Nancy Womersley's blog. I'm sure she has something wonderful to share with you! 

You can get this beautiful stamp set for just $5 this month with only a $50 purchase. Visit my shopping site here. Remember this stamp set is only available until March 31st! 


Products used are all Close To My Heart

Paper: White Daisy Cardstock
Stamps: Choose Happy
Inks: (all Pigment Inks) Gypsy, Pear, Lagoon, Thistle, Sunset, Pacifica
Accessories: Muslin Drawstring Bags, Slate Paper Bags, Mini Stapler and Mini Staples, Corner Rounder, ShinHan Markers (Marigold, Cerulean Blue Light, Peacock Green, Peony Purple, Leaf Green), Bitty Sparkles, White Enamel Stars

Enjoy, 
Alyson


Thursday, February 19, 2015

Card Kit for a Special Friend

This card kit was created for a special friend who is is need of a little TLC at the present time. I'm hoping that it gives her a bit of a lift and cheers her up at least a bit :)
The kit is based on Lisa Stenz's awesome monogrammed card kit from a few years back - I just used a different holder for the cards and created eight cards instead of four.

Although this photo shows only four cards, there are four additional cards that look exactly the same as these ones. 

Here is a close up of one of the cards. 

This shows the lined envelopes and the seals for the envelopes. 

And finally, the box that holds it all! 

Products used are Close To My Heart unless otherwise indicated: 

Paper: Heartstrings Paper Pack, Cranberry Cardstock, White Daisy Cardstock, Whisper Cardstock, Bulk White Daisy Cards and Envelopes
Stamps: Perfect Fit - Frames, Monogram C
Inks: Lagoon
Accessories: Art Philosophy Cartridge, Journaling Cards Box, Foam Tape, Thin Foam Tape, Pleated Grey Ribbon (not CTMH) 

Enjoy, 
Alyson


Friday, July 25, 2014

Sneak Peek at New Papers - Pathfinding Cards...

This gorgeous set of cards in such a beautiful box is a gift set for which I cannot take credit - I wish I could! However, these gorgeous cards were created by my friend and fellow consultant, Lisa Stenz. She is so incredibly talented and you can click on her name to access her blog (which is incredible!) I completely lifted her work and just added one additional card to the collection that she had created. This collection uses the soon to be released Pathfinding paper pack (just one sheet from the collection), along with three new stamp sets. I LOVE everything about this - the paper, colours, stamps - EVERYTHING - and I am giving this set to a dear friend of mine in a few days.


Products used are all Close To My Heart

Paper: Pathfinding Paper Pack, White Daisy Cardstock, Chocolate Cardstock, Glacier Cardstock, White Daisy Cards and Envelopes
Stamps: Spring Banner, Timely Tidings, Lifetime of Happiness, It's the Little Things (Nov 2014 SOTM)
Inks: Glacier, Chocolate
Accessories: Art Philosophy Cartridge, Scallop Punch, Floral Embossing Folder, Journaling Cards Box, Bling Gems Gold Assortment

Enjoy, 
Alyson

Monday, May 19, 2014

Mini-Album Complete - Goodbye to Our Choir Director :(

As I mentioned in an earlier post, our beloved choir director at church is retiring this June. I have completed the mini-album for him... I just wish I had more time to put into this project but I also have to do a complete 12x12 album in the next 2 weeks for a minister who is also leaving! 

So, with that in mind, I did this album using the Pro Player Paper Pack and some co-ordinating embellishments. There is no stamping but I did use my Cricut a fair bit. Each page is shown, including the cover. I used two Cricut cartridges in addition to the CTMH cartridges for some musical images. Those cartridges are identified in my supply list in case you are looking for the details. 

The front cover is shown first, followed by each of the facing pages in the album. 


I hope he enjoys this album of memories from the choir. He has certainly made a huge impact on each of the members who has worked under him. We will miss him dearly. 

Products used are Close To My Heart unless otherwise indicated: 

Paper: Pro Player Paper Pack, Black Cardstock, White Daisy Cardstock, Ruby Cardstock, Pacifica Cardstock, Slate Cardstock, Whisper Cardstock
Stamps: None
Inks: Black, Ruby, Pacifica
Accessories: Cricut Cartridges - Art Philosophy, Artbooking, Musical Notes (not CTMH), Quarter Note (not CTMH), Tiny Type Epoxy Alphabet, Baker's Twine - Red and Blue (not CTMH), Kraft 3-Ring Album, Music Notes Embossing Folder (not CTMH), Black Journaling Pen, Corner Rounder, Ruby Mini-Medley Collection, Black Mini-Medley Collection, Base and Bling Black Jewels, Pro Player Assortment, Slate Mini-Medley Collection (ret.), Cork Colour-Ready Alphabet (ret.), Irresistible Dots Colour-Ready Alphabet (ret.)  

Enjoy, 
Alyson

Monday, March 31, 2014

April SOTM Blog Hop - Bracket Frame

 
Welcome to the Stamp of the Month Blog Hop! We will be featuring April's SOTM, "Balloon Talk", a set of 24 stamps.  If you have come here from Wendy's Blog, you are on the right path! The blog hop is a great big circle, so you can start here and work your way all around. A complete list of bloggers can be found here.  
This month we have approximately 55 Close To My Heart Consultants sharing their creations using this month's SOTM and fabulous Close To My Heart products on their blogs. Just click on the link at the end of the post on each blog to move to the next one!

Here is a picture of the images in this stamp set. 

I had a hard time deciding how to use this stamp set. I knew that if I created a card, that I would only use one, maybe two of the images from this stamp set. Therefore, I would have to create many cards to show off the set. I didn't have a scrapbook page ready to create yet so I decided to go with a bracket frame instead. 
My little puppy, Mika, is now 8 months old. Someone - I am not sure who - recently sent her this gorgeous dress as a gift and I am still trying to figure out who that individual might have been... However, the dress is beautiful on her. I decided to use that photo as my focus for the frame. I used paper from both the Balloon Ride and Lollydoodle Paper Packs as well as our Pink Glitter Paper. 
Unfortunately, my camera did not pick up the print of the stamped images very well. They are stamped on Champagne Cardstock using Sky and Cotton Candy Pigment Ink. They do show up much better in person than in the photos.
Below the frame, I have enlarged the stamped portion so you can better see what I did do with the Stamp of the Month. 

Products used are all Close To My Heart

Paper: Lollydoodle Paper Pack, Balloon Ride Paper Pack, Pink Glitter Paper, Sky Cardstock, Champagne Cardstock
Stamps: Balloon Talk
Inks: Cotton Candy Pigment Ink, Sky Pigment Ink, Topiary Reinker
Accessories: Art Philosophy Cartridge, Artiste Cartridge, Bracket Frame, Burlap Ribbon, Pink Glitter Gems, Foam Tape

 Now "hop" on over to Dana's Blog to see her work! Be sure to visit all the consultants at their blogs to get some great crafting ideas and other fun ideas! Remember, the April SOTM is only available until the last day of April! 
Click here to see how you can get this stamp set for 
just $5 this month!

Enjoy, 
Alyson

Monday, August 19, 2013

Extravaganza Artwork - Miscellaneous Items

Today's items to show you from Extravaganza range from some that were mounted on my display boards to another that was on display on my table. 

The first items are our pillow boxes. I realized very quickly that if I filled them with anything other than cotton balls, they would be to heavy to attach on the display boards... I also used these for one of my giveaways, containing the most amazing smelling (and tasting) tea imaginable! The were simply created using strips of paper from the Huntington paper pack, then decorated a bit with Jute Ribbon or Baker's Twine and I used the Huntington Stickease for the sentiment. 
I love our Muslin bags and for the purpose of my boards, they too, were just filled with cotton balls to keep them light. I did my demo using these bags to show how easy it is to mix Pigment Inks. (and actually stamped one upside down... oops....) and then included a Monsters Inc Disney Pin. People seemed to like that. For these ones, I used a lot of the images from the Artbooking stamps that come with the Artbooking Cricut cartridge (particularly the "Sweet and Lovely" set) Everything is stamped using Pigment ink. 
The last item today is simply a collection of flowers made using the Artbooking Cartridge, mixed with some branches and pine cones. I added a few pieces of Jute Ribbon for interest. The container is just a plant pot I had around the house and I just wrapped it with matching paper. Before I placed anything inside, I cut a foam piece to sit high in the pot and covered it with grey stones although you can't even see any of that. I also added some Mocha Opaques to the center of each flower. Very simple and easy but it makes a nice fall centerpiece. 

Products used are all Close To My Heart unless otherwise noted: 

Paper: Huntington Paper Pack, Autumn Terracotta Cardstock, Barn Red Cardstock
Stamps: Artbooking Stamp Sets, Love This
Inks: Barn Red, Pigment Inks: Barn Red New England Ivy, Olive, Autumn Terracotta, Cocoa, Alcohol Markers: Barn Red, Autumn Terracotta
Accessories: Pillow Boxes, Muslin Bags, Jute Ribbon, Bronze Shimmer Trim, Huntington Assortment, Huntington Stickease, Neutral Baker's Twine, Rosewood Mini-Medley, Mocha Opaques, Clear Sparkles, Quilling Tool, Ceramic Container (not CTMH), Branches and Pine Cones (not CTMH), Foam and Grey Rocks (not CTMH)

Enjoy, 
Alyson

Saturday, August 17, 2013

Extravaganza Artwork - Star, Pie, 6x6 LO

I think if I group my last items into three posts, I can get them all posted by Monday! 

One of today's items includes a star created using Huntington products. When I made this star, I wanted to use the damask paper as it is one of my favourites in the paper pack. The picture is not the greatest as the sun was shining in on one side... I also used the Pearl Flourishes and the Sarita Textiles to add some finishing touches.
 The pie, created using the Artiste Cartridge, was not difficult to make and since it was so light, I was able to display it on one of my boards. There are two photos here - a straight on photo that shows the top of the pie and one that shows the side of the pie so you can see the details of the pieces.
The last item is the final layout that I created This is actually a 6 x 6 layout so it is quite small. The photos are from a visit to the Queen Charlotte Islands off the northwest coast of British Columbia. I was sitting on a piece of driftwood, playing my clarinet when my older sister took these photos. I love the Artbooking overlay for this layout and I wanted to use the greys in the Huntington paper pack to show that you can mix other colours with it as well. I chose to use blues. The Sarita Textiles were perfect for this layout and I ended up adding Autumn Terracotta just because it worked so well with the shades of blue. 

Products used are all Close To My Heart

Paper: Huntington Paper Pack, Outdoor Denim Cardstock, Sky Cardstock, White Daisy Cardstock, Autumn Terracotta Cardstock, Cocoa Cardstock, Barn Red Cardstock, Green Glitter Paper
Stamps: None (surprisingly..)
Inks: Desert Sand
Accessories: Artbooking Cartridge, Artiste Cartridge, DE Framework, Huntington Stickease, Floret Paper Shapes, Scalloped Punch, Foam Tape, Mocha Opaques, Pearl Flourishes, Baker's Twine - Harvest Assortment, Sarita Textiles, Jute Ribbon, Huntington Assortment, Sparkles Flourishes - Small, Clear Sparkles, Silver Shimmer Trim, Trinkets Wooden Shapes

Enjoy, 
Alyson

Thursday, August 1, 2013

Unit Blog Hop - Featuring New Products!

For the Brae-er's Unit Blog Hop, we are all presenting something using the new products from the Fall/Winter 2013 Idea Book. You should have arrived here from Michelle's site

Since I had the good fortune this summer to teach at Close To My Heart's annual Convention as an Extravaganza presenter, the paper pack that I worked with was Huntington. I love the autumn season so this was right up my alley. 

My choice for this blog hop is one of the new decor pieces. It is the Colonial White chicken wire frame. When I arrived at Convention, I saw several of these frames and not one of them was totally covered like mine... it just never even occurred to me NOT to cover the wire but there are so many possible uses for this frame that I have already ordered another one! 

This photo shows you the entire frame. I used a lot of different techniques. The background paper is from the Huntington Paper Pack and the stamp I used is the new Happy Autumn stamp set. The textiles are the Goldrush from the new Sarita collection but the olive green fabric is from the For Always textile collection. I filled some spray pens with rubbing alcohol, water and reinker and sprayed the white polka dotted fabric until it was the right colour for my project. The far left side is very carefully pleated and taped down. You can see that better in the detailed photo below. 


 Then I taped a piece of the sprayed textile around itself until I had a flat edge and no rough edges were showing as I needed to cover the pleats of the Sarita textiles. After that came the stamped images and the pine cones and sticks - all attached with hot glue.


 The great thing about this frame is that I can exchange pictures whenever I want. I have about 6 different autumn photos, all mounted on the same size of cardstock and all I have to do is carefully loosen the clips, slide out the original photo and slide the new one in. You could add several photos to a layout like this if you wanted. This is just one other photo that I have to use in this frame...


The products I used are as follows: 

Paper: Huntington Paper Pack, Olive Cardstock, Colonial White Cardstock
Stamps: Happy Autumn
Inks: Pigment Inks: Barn Red, Autumn Terracotta, Olive, New England Ivy, Olive Reinker
Accessories: Designed Decor Colonial White Frame, Hook Clips, Sarita Textiles, For Always Textiles, Spray Pens, Rubbing Alcohol, Water, Pinking Shears, Needle and Thread, Foam Tape, Hot Glue Gun, Glue Dots, Pine Cones, Sticks 

The next Consultant's site to visit is Heather S's site. I'm sure she has something awesome planned for you to see as usual! If you started here, be sure to check out the rest of our team's awesome creations as you travel around the full circle! 


Enjoy, 
Alyson

Tuesday, April 23, 2013

Brae-er's Team Blog Hop - Kraft Containers and Muslin Bags

Welcome to our Team Blog Hop featuring products and techniques. We hope that you will take the time to leave comments on our posts, as we love to get feedback from our viewers, whether it was something that you really liked or some new technique that was used that you would like to learn to do. By leaving us comments, we get to hear what you like and what you want to see. Now on to our hop!

If you have just hopped onto my blog, you can start here as this is a circular hop, but if you get lost, you can find your way by going to Brae's blog at http://thebrae-er.blogspot.ca/ for a full list of participants. If you came from  Heather's blog at 
then you are in the right place!

I chose to use the Kraft Containers and Muslin Bags as the basis for my projects for this hop.The Dream Pop papers were also my choice of paper and that is the upcoming promotion for the month of May. The paper pack is GORGEOUS! The colours are so bright and cheerful and I paired them with some black and white accessories
On the Kraft Containers, I simply cut out parts of the Dream Pop paper and wrapped it around the containers and then added some accessories to add some interest. I love turquoise (anyone who knows me knows that about half my wardrobe is turquoise!) and so I took advantage of that colour from the paper pack! 
 
On the Muslin Bags, the fabric is from the For Always Textiles and is simply pleated on one of the bags using Liquid Glass. The word "Friend" was stamped with Black Pigment Ink but it came out looking more brown than black... maybe something to do with the pink background. 
 To make the flower on another bag, I just cut three circles of the fabric and then hand-sewed a running stitch about halfway inside of each circle and gathered up the thread to create the ruffle, then tied the loose ends together and layered them. 
 Pigment ink was used on the bags and I did use a Sharpie Marker to colour my sparkles as I found that our Alcohol markers just didn't give me a deep enough colour.
The products I used were Close To My Heart unless otherwise indicated and are listed below: 

For the Kraft Containers:
Paper:Dream Pop Paper Pack, Slate Cardstock
Stamps:None
Inks: Black
Accessories: Artiste Cartridge, Art Philosophy Cartridge, Black Sharpie Marker (not CTMH, Turquoise Sharpie Marker (not CTMH), Kraft Containers, Petals Paper Flowers (ret.), Flutter Paper Shapes, Washi Tape, Clear Sparkles, Antiqued Gold Mini-Medley, For Always Textiles, Needle and Thread (not CTMH)

For the Muslin Bags:
Paper: None
Stamps: Thanks, For a Friend, Life is Tweet (ret.)
Inks: Slate Pigment Ink, Honey Pigment Ink, Lagoon Pigment Ink, Black Pigment Ink
Accessories: Muslin Bags, Spray Pen, Cotton Candy Re-inker, For Always Textiles, Needle and Thread (not CTMH),  Turquoise Sharpie Marker (not CTMH). Pink Sharpie Marker (not CTMH), Bitty Sparkles, Clear Sparkles, Liquid Glass, Honey Alcohol Marker, Lagoon Alcohol Marker, Cotton Candy Alcohol Marker, Licorice Opaque Adhesive Gems
Your next stop on the hop is Lucy's blog at 
http://lucyscreativeexpressions.blogspot.com/2013/04/scrapping-with-for-always-fabric_23.html

Thanks for hopping along with us - we hope we were able to inspire you to create your own projects using some of the designs and paper seen along the way. Join us again next month when we will be featuring inspirational ideas from Pinterest. 

Enjoy, 
Alyson

Sunday, March 31, 2013

SOTM April Blog Hop

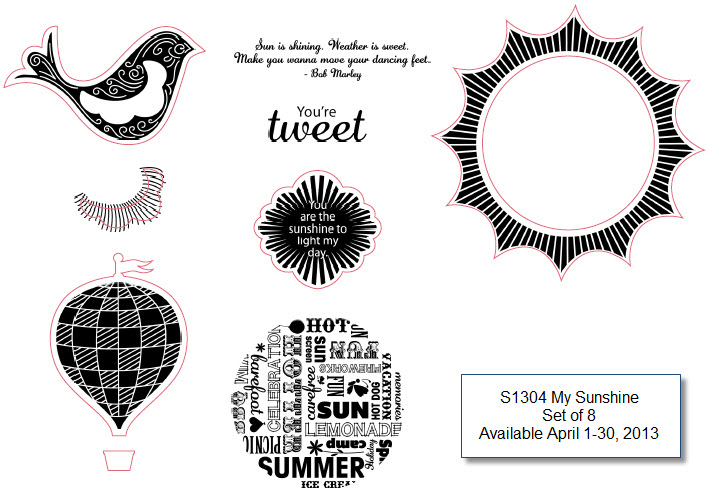
Welcome to our Stamp of the Month Blog Hop! We will be featuring April's SOTM, which is "My Sunshine", a set of 8 stamps. If you have come here from Nikka's Blog, you are on the right path! The blog hop is a great big circle, so you can start here and work your way all around. If you get lost along the way, you’ll find the complete list of participating consultants at Helen's blog.

This month we have approximately 50 Close To My Heart Consultants sharing their creations using this month's SOTM and other great CTMH products on their blogs. This is simple to do - just click on the link at the end of the post on each blog to move to the next one! Here we go!
A picture of the stamp set is shown here: 


I chose to create a hinged display tray using this month's SOTM. I love the For Always paper and Lagoon is my favourite colour in our palette so I combined the two, using some Silver Glitter Paper as well. I absolutely love the way this turned out! I got my owl pictures off Pinterest.
I have included close-up photos so you can see some extra details. I used the Cricut cartridges to cut the branches out of the glitter paper for the birds to sit upon and I used foam tape to raise the two birds' wings as well. 


I hope you enjoyed my project. 
Supplies used are listed below. 

Supplies used are all Close To My Heart

Paper: For Always Paper Pack, Lagoon Cardstock, White Daisy Cardstock, Black and Grey Glitter Paper
Stamps: April SOTM - My Sunshine 
Inks: Lagoon, Lagoon Pigment Ink
Accessories: Art Philosophy Cartridge, Artiste Cartridge, Hinged Display Tray, Silver Shimmer Trim, For Always Assortment, Claire Assortment, Foam Tape, Licorice Opaque Adhesive Gems, Clear Detail Embossing Powder, Heat Tool

Now "Hop" on over to Georgia's Blog to see her work! Be sure to visit all the Consultants at their blogs to get some great crafting ideas and other fun ideas! Remember, the April SOTM is only available until the last day of April! Contact me or click here to see how you can get this stamp set at a discount! 

Sunday, March 17, 2013

Extravaganza Entry 3 - Growth Chart

I had a lot of fun with my three "other" entries this year for Extravaganza. I thought I was going to have a hard time deciding what to do since so many people have done so many different things with our wonderful products but these ideas were ones that I had thought of long ago and really wanted to try. When CTMH came out with fabric in the new catalogue, my mind was made up right away!

This Growth Chart is designed for two little girls. It is created using the Chantilly Paper Pack and the Chantilly Textiles. This project was a real stretch for me in many ways as I am NOT a sewer but I learned a lot and enjoyed putting it together. Each little package (the old Ribbon Round Containers...) contains 12 tags with places to record the child's name, age and height and colored safety pins. Those safety pins were a nightmare in themselves. I tried everything to colour those pins - pigment ink (wouldn't stay on, even after heat setting), our alcohol markers - they just rubbed off, mixing reinker with Pearl Paint but the paint would flake off as soon as the pin was opened or closed. I finally called the corporate office and was told I could use office products in this case since I had tried all possible CTMH routes and nothing was working... so Sharpie markers finally worked. There are two sets of tags and pins - one in pink and one in yellow. 

The growth chart itself runs from 2 feet to 6 feet in height. I used the Pixie Glitter Alphabet for the height markers, after sewing every half inch on the burlap. That was then sewn onto our Chantilly Textiles. The top has a bamboo skewer with the hemp from the Wooden Mini-Medleys sewn onto it for hanging purposes. I couldn't fit that all in one photo.

It all fits nicely in one of our recipe boxes, which has been decorated both on the inside and the outside. 

Enjoy, 
Alyson

Products used are all Close To My Heart unless otherwise indicated:

Paper: Chantilly Paper Pack, Cotton Candy Cardstock, Buttercup Cardstock, White Daisy Cardstock
Stamps: None
Inks: Cotton Candy, Cotton Candy Pigment Ink, Pear Pigment Ink
Accessories: Art Philosophy Cartridge, Artiste Cartridge, Recipe Box, Chantilly Textiles, Pixie Glitter Alphabet, Hollyhock Zipper Lace, Colour Ready Seam Binding, Silver Shimmer Trim, Hook and Loop Dots, Burlap Ribbon, Mini-Medley Accent Collection - Wooden, Tiny Type Epoxy Alphabet, Outdoor Denim Alcohol Marker, Ribbon Round Containers (ret.), Computer Font - Pink (CTMH - ret.), Computer Font - Buttercup (CTMH - ret.), Sewing Machine with White and Bamboo Thread (not CTMH), Bamboo Skewer (not CTMH), Safety Pins (not CTMH), Sharpie Markers- Pink and Yellow (not CTMH), Hole Punch (not CTMH)

Friday, January 11, 2013

Whoo's Your Valentine - Cards, etc.

The current campaign is just SO awesome! The Whoo's Your Valentine kit has so many possibilities beyond the treat tubes. Here is one more treat tube plus three little cards that you could send to just about anyone who melts your heart. And you have to LOVE that glitter paper, especially knowing that more of it is coming in the new catalogue on February 1st! I can't wait for my order of new products to arrive next week so I can play with all the new stuff :) 

To get your very own Whoo's Your Valentine Kit, all you need to do is place a $35 order from the current catalogue and your can purchase this fun kit for just $10!
Contact me to place your order or go to my shopping site by clicking on the first link on the top left side of my blog!
Enjoy, 
Alyson

Products used are all Close To My Heart

Paper: Whoo's Your Valentine Kit (all paper comes with kit)
Stamps: Whoo's Your Valentine (comes with kit)
Inks: Ruby, Hollyhock, Blush
Accessories: Artiste Cartridge


Tuesday, December 4, 2012

Perpetual Calendar

This Perpetual Calendar was made using the guide created by fellow consultant, Lisa Stenz. If you are not familiar with Lisa's work, be sure to check out her blog at http://lisascreativecorner.blogspot.ca. Lisa creates some of the most beautiful artwork I have ever seen and she has taught at every Convention I have been to (4 in total so far, 5 this summer as I have already registered for the one at Disneyworld and can't wait!) She willingly shares her templates and this is one of them. I have created several of these calendars as Christmas gifts and have used several other templates of hers as workshops and to create other Christmas gifts as well. 

I had to create one of these calendars for myself - in Lagoon of course - my most favourite colour. Some of you know that when I was packing for Convention last summer, as I was putting my outfits together, I noticed that every single outfit that I had packed was turquoise, white and black. How can you tell that these are my three favourite colours?? I am seriously considering painting my craft room turquoise. All my accessories are white - it would match perfectly! 

This photo was taken yesterday... and the one part of this project that you don't see is that the calendar can also lean back if you choose by attaching the back of the card box to the top of the box. You can see those details on Lisa's blog. 

Enjoy, 
Alyson

Products are all Close To My Heart

Paper: Dotty For You Paper Pack (ret.), White Daisy Cardstock
Stamps: Casual Expressions, Glamour Lowercase Alphabet
Inks: Black, Lagoon
Accessories: Artiste Cartridge, My Creations Card Box, My Creations Blocks (2), Black Striped Grosgrain Ribbon, Hook and Loop Dots, Sponge Dauber, Cutting Knife

Monday, November 19, 2012

Christmas Star for H2H

The Heart 2 Heart Challenge this week is a Christmas Challenge. Anything Christmas is acceptable so I decided to create a Christmas Star. I love the way this turned out! Everything from the colours to the greenery just makes me think of Christmas. Our tree and decorations are up now and I have a special place on my wall for this star. 
Enjoy, 
Alyson

Supplies used are all Close To My Heart

Paper: Pear and Partridge Paper Pack
Stamps: None
Inks: New England Ivy
Accessories: Artiste Cartridge, Art Philosophy Cartridge, My Creations Star, Black Tulle Ribbon, Baker's Twine - Harvest Assortment, Bitty Sparkles, Adhesive Springs, Quilling Tool