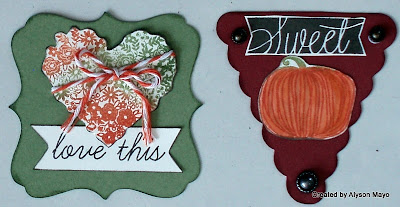
Showing posts with label Extravaganza. Show all posts

Tuesday, August 20, 2013

The LAST Extravaganza Items

Today marks the last post of Extravaganza artwork! You must be sick of Huntington papers by now!!

However, since I am headed to the hospital for major surgery in 2 days, I don't expect to be creating anything new for a while... when I do, though, you can be sure it will be posted here. 

The final two items are both banners - one is small and the other is very large.

The first one (the small one) was mounted on one of my boards. I love this little banner. I used the Jute Ribbon as the base to hold it all together and then used several elements from the Wooden Mini-Medley to dress it up. Each square is mounted on Olive Cardstock with Green Glitter Paper on top. I then coloured in our Irresistible Hexagons, alternating between Barn Red and Autumn Terracotta, but making sure I had 4 different designs. Our circle punch took care of making 4 perfect circles for me and the letters were stamped using the new Framework Alphabet. A "FUN" clothespin at the top, and it was all finished. 
The other banner is the one that I mounted across my table in my booth. It had to be mounted straight across and this took me a long time to do... I really wanted to get away from all the reds and oranges that I had been using and focus on the grays in this paper pack so I chose to use the greys along with the greens. Unfortunately, the photos of this (in order to show you the details) are split up. The banner reads the word "AUTUMN" but I could not take it all in one photograph so you will see it end to end but in parts. 
I chose to use our Slate Satin Polka Dot Ribbon as my base and add to it. I used some of the zip strips from the paper pack and scallop punched them. The stamp set I focused on was "You Only Live Once". The flowers and sentiments were all stamped in Pigment Ink and embossed with Clear Detail Embossing Powder. Clear Sparkles were used to highlight the banner and lots of Baker's Twine was used as well. I graduated the colouring on the letters (all from our DE Monogram Collection), starting with Whisper and gradually moving toward New England Ivy, using sponges. (and that button on the N is really green - my camera picked it up as orange for some reason..) So, here it is...

So, that ends my Extravaganza artwork for this year. I hope you have enjoyed viewing the items and I love hearing what you think so please leave me your comments! 

Products are all Close To My Heart

Paper: Huntington Paper Pack, Olive Cardstock, Colonial White Cardstock, White Daisy Cardstock,  Green Glitter Paper
Stamps: Framework Alphabet, You Only Live Once
Inks: Barn Red, Autumn Terracotta, Cocoa, Olive, Whisper, Slate, Olive, New England Ivy, Pigment Inks: Olive, New England Ivy, Slate, Olive Alcohol Marker
Accessories: Jute Ribbon, Wooden Mini-Medley Collection, Irresistibles Hexagons, Circle Punch, Mini Clothes Pins, Slate Satin Polka Dot Ribbon, Baker's Twine Neutral Assortment, Baker's Twine Harvest Assortment, Huntington Assortment, Clear Sparkles, Clear Detail Embossing Powder, Scalloped Punch, Dimensional Elements Monograms: A, M, N, T, U

Enjoy, 
Alyson

Monday, August 19, 2013

Extravaganza Artwork - Miscellaneous Items

Today's items to show you from Extravaganza range from some that were mounted on my display boards to another that was on display on my table. 

The first items are our pillow boxes. I realized very quickly that if I filled them with anything other than cotton balls, they would be to heavy to attach on the display boards... I also used these for one of my giveaways, containing the most amazing smelling (and tasting) tea imaginable! The were simply created using strips of paper from the Huntington paper pack, then decorated a bit with Jute Ribbon or Baker's Twine and I used the Huntington Stickease for the sentiment. 
I love our Muslin bags and for the purpose of my boards, they too, were just filled with cotton balls to keep them light. I did my demo using these bags to show how easy it is to mix Pigment Inks. (and actually stamped one upside down... oops....) and then included a Monsters Inc Disney Pin. People seemed to like that. For these ones, I used a lot of the images from the Artbooking stamps that come with the Artbooking Cricut cartridge (particularly the "Sweet and Lovely" set) Everything is stamped using Pigment ink. 
The last item today is simply a collection of flowers made using the Artbooking Cartridge, mixed with some branches and pine cones. I added a few pieces of Jute Ribbon for interest. The container is just a plant pot I had around the house and I just wrapped it with matching paper. Before I placed anything inside, I cut a foam piece to sit high in the pot and covered it with grey stones although you can't even see any of that. I also added some Mocha Opaques to the center of each flower. Very simple and easy but it makes a nice fall centerpiece. 

Products used are all Close To My Heart unless otherwise noted: 

Paper: Huntington Paper Pack, Autumn Terracotta Cardstock, Barn Red Cardstock
Stamps: Artbooking Stamp Sets, Love This
Inks: Barn Red, Pigment Inks: Barn Red New England Ivy, Olive, Autumn Terracotta, Cocoa, Alcohol Markers: Barn Red, Autumn Terracotta
Accessories: Pillow Boxes, Muslin Bags, Jute Ribbon, Bronze Shimmer Trim, Huntington Assortment, Huntington Stickease, Neutral Baker's Twine, Rosewood Mini-Medley, Mocha Opaques, Clear Sparkles, Quilling Tool, Ceramic Container (not CTMH), Branches and Pine Cones (not CTMH), Foam and Grey Rocks (not CTMH)

Enjoy, 
Alyson

Saturday, August 17, 2013

Extravaganza Artwork - Star, Pie, 6x6 LO

I think if I group my last items into three posts, I can get them all posted by Monday! 

One of today's items includes a star created using Huntington products. When I made this star, I wanted to use the damask paper as it is one of my favourites in the paper pack. The picture is not the greatest as the sun was shining in on one side... I also used the Pearl Flourishes and the Sarita Textiles to add some finishing touches.
 The pie, created using the Artiste Cartridge, was not difficult to make and since it was so light, I was able to display it on one of my boards. There are two photos here - a straight on photo that shows the top of the pie and one that shows the side of the pie so you can see the details of the pieces.
The last item is the final layout that I created This is actually a 6 x 6 layout so it is quite small. The photos are from a visit to the Queen Charlotte Islands off the northwest coast of British Columbia. I was sitting on a piece of driftwood, playing my clarinet when my older sister took these photos. I love the Artbooking overlay for this layout and I wanted to use the greys in the Huntington paper pack to show that you can mix other colours with it as well. I chose to use blues. The Sarita Textiles were perfect for this layout and I ended up adding Autumn Terracotta just because it worked so well with the shades of blue. 

Products used are all Close To My Heart

Paper: Huntington Paper Pack, Outdoor Denim Cardstock, Sky Cardstock, White Daisy Cardstock, Autumn Terracotta Cardstock, Cocoa Cardstock, Barn Red Cardstock, Green Glitter Paper
Stamps: None (surprisingly..)
Inks: Desert Sand
Accessories: Artbooking Cartridge, Artiste Cartridge, DE Framework, Huntington Stickease, Floret Paper Shapes, Scalloped Punch, Foam Tape, Mocha Opaques, Pearl Flourishes, Baker's Twine - Harvest Assortment, Sarita Textiles, Jute Ribbon, Huntington Assortment, Sparkles Flourishes - Small, Clear Sparkles, Silver Shimmer Trim, Trinkets Wooden Shapes

Enjoy, 
Alyson

Friday, August 16, 2013

Extravaganza - Cards 3

This is the last group of cards that I created for my Extravaganza boards. The first one I really like because it is such a simple idea. It is just a bunch of flower petals layered and then some greenery behind. I have actually given this one away already and I dressed it up a bit by adding some additional greenery and some opaques, just for some additional emphasis.
The next card is one of the first I created and masking is not always easy when you are dealing with detailed stamps like this one.. I love the look of the Jute ribbon around the bottom of the card.
 The next card is one that I really like with all the layered flowers. A few pieces of Baker's Twine wrapped around the card and some Rosewood Mini-Medley pieces finish this off nicely. 
The last large card shows that even though this is Huntington paper, we don't always have to stick to the colour scheme... I stamped each flower in a bold colour of pigment ink and embossed it with Clear Detail Embossing Powder mixed with Prisma Glitter. The flourishes add that extra touch of shimmer. 
The last set of 4 cards are little, bitty cards. I had some extra space on my boards to fill and these fit the bill.They are each approx. 2 1/2 x 2 1/2 inches.

Products used are all Close To My Heart

Paper: Huntington Paper Pack, Colonial White Cardstock, Barn Red Cardstock, Olive Cardstock, Desert Sand Cardstock, Autumn Terracotta, Cardstock, Cocoa Cardstock, Champagne Cardstock, New England Ivy Cardstock, Slate Cardstock, Honey Cardstock, Green Glitter Paper
Stamps: Count Your Blessings, Happy Autumn, Love This, You Only Live Once, Artbooking Stamp Sets
Inks: New England Ivy, Cocoa, Barn Red, New England Ivy Pigment Ink, Cranberry Pigment Ink, Buttercup Pigment Ink, Honey Pigment Ink, Gypsy Pigment Ink, Alcohol Markers: Autumn Terracotta, Honey, Barn Red, Olive
Accessories: Artbooking Cartridge, Artiste Cartridge, Art Philosophy Cartridge, Clear Detail Embossing Powder, Prisma Glitter, Foam Tape, Sparkles Flourishes, Sparkles Clear Assortment, Huntington Assortment, Artisan Studs, Mocha Opaques, Harvest Baker's Twine, Neutral Baker's Twine, Rosewood Mini-Medley Collection, Jute Ribbon

Enjoy, 
Alyson


Thursday, August 15, 2013

Extravaganza Artwork - Cards 2

Today's selection of cards is an eclectic mixture from a variety of stamp sets. I spent a lot of time on Pinterest before I even received my supplies, printing patterns that I liked, since that is how I prefer to create. One of the cards - the first one - is almost a direct copy of a card that I found on Pinterest but instead of using a stamp for the branches, I chose to us real branches instead. The majority of the  remainder are based on patterns.  

So, here is that first card, using real branches. I also used our new Green Glitter Paper as my photo mounts. 
The next card was created using the arrows in the Stickease package. I wanted them to be various widths so I just cut them down. However, I needed a couple of packages to get the length I needed. A couple of leaves cut from the Artbooking Cartridge and detailed with our markers and some Baker's Twine and a very simple card came together very easily.
The Happy Autumn stamp set is one of my favourites and I love taking individual images from it and building on them like on this next card. I just continued to stamp the flowers beside each other until I ran out of room. The stitching guide gave me this gorgeous outline on the top and bottom. 
This next card is one that is from a pattern that I found that is in my "will definitely use again" file. It was a lot of fun to make! The stamp is You Only Live Once, one of our Hostess Stamps. I love the way the hexagons kind of peek out from the sides and some of the flowers in the Floret collection of flowers and leaves go so well with the Huntington papers, too! 
I found myself using a lot of New England Ivy with this paper pack. Although it calls for Olive, I like the darker tone of the New England Ivy, especially when I needed more than one green.
The last card is a pattern I have used a few times before. The sentiment comes from the Love This stamp set and the only embellishments I added were from the Slate Mini-Medley Collection. 

Products used are all Close To My Heart unless otherwise noted: 

Paper: Huntington Paper Pack, Champagne Cardstock, New England Ivy Cardstock, Barn Red Cardstock, Colonial White Cardstock, Olive Cardstock, Honey Cardstock, Autumn Terracotta Cardstock, White Daisy Cardstock, Cocoa Cardstock, Green Glitter Paper 
Stamps: Happy Autumn, You Only Live Once, Love This, Count Your Blessings
Inks: New England Ivy, Autumn Terracotta, Desert Sand, Cocoa, Barn Red, New England Ivy Pigment Ink, Alcohol Markers - Olive, Honey, Barn Red, Autumn Terracotta
Accessories: Artbooking Cartridge, Artiste Cartridge Cartridge, Art Philosophy Cartridge, Huntington Stickease, Slate Mini-Medley Collection, Harvest Baker's Twine, Foam Tape, Bronze Shimmer Trim, Stitch Guide and Foam Mat, Dark Brown Embroidery Floss (not CTMH), Irresistibles Hexagons, Floret Paper Shapes, Clear Detail Embossing Powder, Heat Tool, Jute Ribbon

Enjoy, 
Alyson

Wednesday, August 14, 2013

More Extravaganza Artwork - cards

Today, I am showing you some of the cards that I created for my Extravaganza boards. I decided to do only card fronts for the purpose of the boards and that way, the cards didn't keep flipping open when people wanted to photograph them. I figured when I removed them later, I could add the full card base to the card at that time and use them later. 

These are just four of several cards. I will post more in the next few days. My goal is to have all my artwork posted before I go to the hospital for major surgery on August 22nd. I don't know how long I will be in the hospital but it will be at least 3-4 days if not longer and I don't expect to be up to much for at least a few weeks after returning home.

This card was created with the idea of new neighbours in mind. Obviously in the shape of a house, I used a Stickease shape that read Family and then a Dimensional Elements arrow to point to the word for emphasis. A little bit of natural hemp added the finishing touch, along with an elements from the Rosewood Mini-Medley Collection. The roof was created by using the new Scalloped Punch and just layering each piece.
The second card used one of the new Hostess Reward Stamps, "You Only Live Once". I also used the DE Hexagon shapes and coloured them with Olive ink. The Huntington Canvas Assortment provided a nice background as well.
For the third card, I used my favourite paper in this paper pack, the damask paper, as the background. The new DE shapes provided a perfect background for the floral stamp from the "Happy Autumn" stamp set, which is also where the sentiment come from.
The last card today is one of my favourites. It is based on an old Mojo Monday sketch. The stamp set is "Love This" and is designed to work with the Bluebird: My Crush Album. As you can see, I used our new Scalloped Punch on all 4 cards - I LOVE that product! I just used embroidery floss for the buttons and more of the Rosewood Mini-Medley.
Hopefully, more cards will be posted tomorrow!

Products used are all Close To My Heart unless otherwise indicated: 

Paper: Huntington Paper Pack, Colonial White Cardstock, Cocoa Cardstock, Champagne Cardstock, Desert Sand Cardstock, Olive Cardstock, Autumn Terracotta Cardstock, Barn Red Cardstock, Whisper Cardstock
Stamps: Vogue Alphabet, Happy Autumn, Love Life, You Only Live Once
Inks: Barn Red, Olive, Autumn Terracotta, Cocoa, Barn Red Alcohol Markers, Autumn Terracotta Alcohol Markers
Accessories: Art Philosophy Cartridge, Dimensional Elements Snapshots, Dimensional Elements Signage, Scalloped Punch, Rosewood Mini-Medley Collection, Foam Tape, Huntington Stickease, Natural Hemp, Sponge, Irresistibles Hexagons, Huntington Assortment, Baker's Twine - Harvest Assortment, Mocha Opaques, Green Embroidery Floss (not CTMH)

Enjoy, 
Alyson
Saturday, August 10, 2013

Extravanagza Artwork - A Second Layout using Huntington

Unlike the previous layout that used the Huntington papers, this one is totally different. I took a much more feminine approach and decided to use a half overlay from the Artbooking Cartridge, along with a lot of floral embellishments. I also did not stick to just one key. I checked out a number of different keys. 

I like the way this turned out - I usually like to fill up my scrapbooking pages but I also like the blank space on this page. I love to stitch on my layouts and I just used my machine and did a random stitch around the exterior, crossing over itself a few times. 

The flowers were just "scrunched" and the rolled ones were rolled quite tightly. It's almost hard to believe that this layout is made from the same paper as the last one!


Products used are all Close To My Heart unless otherwise noted: 

Paper: Huntington Paper Pack, Autumn Terracotta Cardstock, New England Ivy Cardstock, Olive Cardstock, Barn Red Cardstock, Champagne Cardstock
Stamps: None
Inks: New England Ivy Marker
Accessories: Artbooking Cartridge, Clear Sparkle Flourishes - Small, Sparkles - Clear Assortment, Sewing Machine and Barn Red Thread (not CTMH) 

Enjoy, 
Alyson

Monday, August 5, 2013

Extravaganza Layout - Artbooking

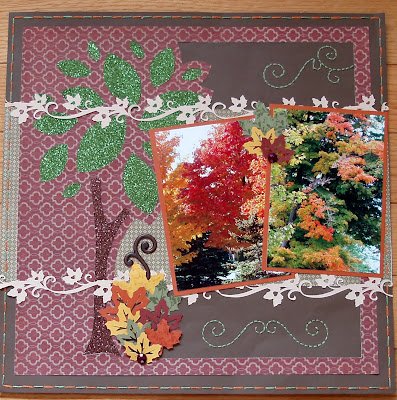
This was one of the layouts that I created for my Extravaganza boards using the new Artbooking Cricut Cartridge. I used only the "B" key and, true to the design, printed almost everything out at the same size (I believe it was 11.5 inches). I wanted my photo mats to be a little larger, though, as I already had a layout design in mind.

I love the autumn season in Ontario - the colours on the tress cannot be matched by anything else in nature and I love to get out there with my camera and find the most colourful ones. We see tourists from all over the world in this area for the leaf viewing, especially in late September and early October. I wouldn't give up living here for anything - the change of the four seasons is amazing! 

On this layout, for the tree overlay, I actually flipped it as it was supposed to sit in the opposite direction. I cut it out a second time on glitter paper so I could fill in the blanks using that paper. The borders had to be cut several times as they are not long borders but had to be pieced together. 

I love stitching on my cards and layouts and the stitching around the outside of this layout was done in two alternating colours. I used the stitching guide for 3 of the other 4 flourishes and the 4th one, I used one of the pearl flourishes as my base. That was a lot more difficult than I anticipated! 

The leaves were stamped with either "Happy Autumn" or "Love This" just to add some interest. The Rosewood Mini-Medley Collection gos perfectly with the Huntington paper and I used a lot of those little decorative ornaments on this layout.

The entire layout is shown first, followed by each individual page. 


Supplies used are all Close To My Heart (unless otherwise noted):

Paper: Huntington Paper Pack, Champagne Cardstock, Autumn Terracotta Cardstock, Cocoa Cardstock, Barn Red Cardstock, Desert Sand Cardstock, Honey Cardstock Cardstock, Olive Cardstock, Green Glitter Paper, Brown and Tan Glitter Paper
Stamps: Happy Autumn, Love This
Inks: Honey, Barn Red, Autumn Terracotta, Olive
Accessories, Artbooking Cartridge, Stitch Guide and Foam Mat, Bronze Shimmer Tape, Piercing Tool, Foam Tape, Rosewood Mini Medley, Embroidery Floss (Olive, Autumn Terracotta - not CTMH)

Enjoy, 
Alyson

Friday, August 2, 2013

Extravaganza Artwork - Huntington - Centerpiece and Napkins

For Extravaganza this year, we were given some of the Base and Bling items to work with. I KNEW this was not going to be a strength for me jewellery-wise, so I decided to use them in a completely different way. 

The centerpiece was created using 4 candles with the headband used as a decorative element. For the two napkin rings, I used the 2 wrist cuffs, tightened them up and used them to secure the napkins. Using the Huntington Paper Pack, along with our burlap and jute twine, I stamped the floral image multiple times from the stamp set "Love This", and used Barn Red and Autumn Terracotta markers to colour them in. A little bit of Bronze Shimmer Tape, some sticks and pinecones attached with hot glue and some Mocha Opaques and it was all done. The images are mounted inside the new dimensional elements that come with the Artbook Cricut package.

I had to ship this item as there was no way I could safely travel with it... and it was my donation to the Operation Smile auction as well, so I wanted to make sure whoever bid on it also had a safe way to get it home so I made sure the box was kept, along with all the popcorn packaging for the bidder.   


Here is the top view of the centerpiece. 


And the napkins...


Yes, the sticks and pinecones came from my backyard.... 

All decorative products used are Close To My Heart

Paper: Huntington (to line the inside base of the tray), Colonial White Cardstock, Barn Red Cardstock
Stamps: Love This
Inks: Barn Red, Autumn Terracotta, Barn Red Alcohol Marker, Autumn Terracotta Marker
Accessories: Artbooking Cartridge, Dimensional Elements - Framework, sponge, Base and Bling Headband, Base and Bling Cuffs (x2), Mocha Opaque Adhesive Gems, Bronze Shimmer Trim, Irresistible Hexagons, Burlap Ribbon, Jute Ribbon, 4 candles of varying height, 2 linen napkins, ceramic tray, pinecones, dead sticks

Enjoy, 
Alyson


Thursday, August 1, 2013

Unit Blog Hop - Featuring New Products!

For the Brae-er's Unit Blog Hop, we are all presenting something using the new products from the Fall/Winter 2013 Idea Book. You should have arrived here from Michelle's site

Since I had the good fortune this summer to teach at Close To My Heart's annual Convention as an Extravaganza presenter, the paper pack that I worked with was Huntington. I love the autumn season so this was right up my alley. 

My choice for this blog hop is one of the new decor pieces. It is the Colonial White chicken wire frame. When I arrived at Convention, I saw several of these frames and not one of them was totally covered like mine... it just never even occurred to me NOT to cover the wire but there are so many possible uses for this frame that I have already ordered another one! 

This photo shows you the entire frame. I used a lot of different techniques. The background paper is from the Huntington Paper Pack and the stamp I used is the new Happy Autumn stamp set. The textiles are the Goldrush from the new Sarita collection but the olive green fabric is from the For Always textile collection. I filled some spray pens with rubbing alcohol, water and reinker and sprayed the white polka dotted fabric until it was the right colour for my project. The far left side is very carefully pleated and taped down. You can see that better in the detailed photo below. 


 Then I taped a piece of the sprayed textile around itself until I had a flat edge and no rough edges were showing as I needed to cover the pleats of the Sarita textiles. After that came the stamped images and the pine cones and sticks - all attached with hot glue.


 The great thing about this frame is that I can exchange pictures whenever I want. I have about 6 different autumn photos, all mounted on the same size of cardstock and all I have to do is carefully loosen the clips, slide out the original photo and slide the new one in. You could add several photos to a layout like this if you wanted. This is just one other photo that I have to use in this frame...


The products I used are as follows: 

Paper: Huntington Paper Pack, Olive Cardstock, Colonial White Cardstock
Stamps: Happy Autumn
Inks: Pigment Inks: Barn Red, Autumn Terracotta, Olive, New England Ivy, Olive Reinker
Accessories: Designed Decor Colonial White Frame, Hook Clips, Sarita Textiles, For Always Textiles, Spray Pens, Rubbing Alcohol, Water, Pinking Shears, Needle and Thread, Foam Tape, Hot Glue Gun, Glue Dots, Pine Cones, Sticks 

The next Consultant's site to visit is Heather S's site. I'm sure she has something awesome planned for you to see as usual! If you started here, be sure to check out the rest of our team's awesome creations as you travel around the full circle! 


Enjoy, 
Alyson

Tuesday, April 9, 2013

The News Is In!

Well, after patiently waiting for a few weeks, I received the email from Close To My Heart that I have been waiting for... I have been selected to teach at the annual Convention again this summer! I am doubly surprised this year as only 18 Consultants were selected whereas there were 32 last year. Judging from the agenda that has been posted for Convention, it appears that there are some major changes on the way and I am really anxious to find out what those changes are but that will all come in time. I expect that the timeline this year will be really tight, though. 

However, I am up to the challenge and ready to go! I don't expect to have much of a life come mid-May through to Convention, especially since those of us who are teaching are not allowed to share ANYTHING that we are working on - that's part of the agreement. I am also really interested to find out who else has been selected to teach - I only know of two others at the present time. 

So, if you are coming to Convention, be sure to come and visit me - I would LOVE to see you! And if not, shortly after Convention, I will be posting my artwork on my blog. 

Alyson

Tuesday, March 19, 2013

Extravaganza Entry 5 - Lantern

My final entry for Extravaganza is this lantern. This project requires some explanation, so bear with me. I have been wanting to do something like this for ages but had never had the nerve to try it until now. I actually started this early in January by explaining this to my husband who gave me a brief idea as to how to get started. Since we cannot use products other than CTMH products and we have to build items ourselves, I knew I was in for a real challenge with this project and I cannot tell you how many times I wanted to crush this whole project to pieces and go with something else entirely. This led to more frustration than I think I have ever experienced with any other project. I came so close to abandoning this project and doing something else...

It is built using 22 gauge wire. I had to create 7 circles to begin with (or as rounded circular shapes as I could make) and solder them together. Then, with the circles laid out, I had to cut wire pieces approx. 3-4 inches above the height of the lantern and start soldering them onto the circular pieces for stability. This was REALLY hard. It took about 5 very steady hands to hold everything in place and I don't know about you, but I don't have 5 hands... And that soldering iron is incredibly hot. Once the first piece was in place, I added another piece across from the first piece. Of course, you realize, these weren't even close to being straight... And bending them caused the points where they were soldered to break. By the time 4 or 5 wires had been added, I was able to start forming somewhat of a shape but resoldering had to be done to replace the broken spots - this had to be done time and time again. All in all, about 60 wires had to be placed for stability. And MANY had to be resoldered and bending had to be done many times over to try and get the shape to sit relatively straight, breaking more of the already soldered bonds. This was so much more difficult than I ever anticipated. The top 2 circles weren't even added until the lower 5 circles had been done. Then the top 2 circle were added later. There were still gaps that were too large and I had to manually add thinner wire to fill in the gaps as I would need those spots in order to be able to glue my paper later and I couldn't have those gaps there. 

When I finally had a shape that sort of resembled a lantern, I started gluing the teardrop shapes on, starting at the bottom. I realized that if I covered the entire shape in paper, my light wouldn't shine through, so I knew I had to do something to allow some light to get through. So then I coloured some of our seam binding ribbon and attached that, then covering that with more of the paper, but allowing the paper to just sit on top of the ribbon, allowing some of the ribbon to show, therefore allowing some space for the light to shine through. I did that again at the top, allowing the ribbon to show. 

I wish now that I would have taken a photograph of the interior so you could have seen what the inside looked like and all the soldered wires along with the wrapped ribbon. It was SO much work to get that together. I had to take the lantern down to my crawl space in the basement to get the dark shot to show what it looks like when the light is placed under it and the light is shining.

So, here is the photo of the finished lantern and 2 photos in the dark to show what the lantern looks like when it is lit up.  
Enjoy, 
Alyson

Products used are all Close To My Heart unless otherwise noted. 

Paper: Later Sk8R Paper Pack, Surf's Up Paper Pack, Lagoon Cardstock
Stamps: None
Inks:Lagoon Pigment Ink
Accessories: Art Philosophy Cartridge, Paradise Paper Flowers, Mini-Medley Accent Collection - Antiqued Gold, Pearl Opaque Adhesive Gems, Baker's Twine Paradise Assortment, Colour Ready Seam Binding, 22 Gauge Wire (not CTMH), Mini Flashlight (not CTMH), Soldering Gun (not CTMH)


Monday, March 18, 2013

Extravaganza Entry 4 - Burlap Mini Album

Of all the entries that I submitted, this one took me the longest time to plan because I wanted it to be as interactive as possible. I had a vision to begin with but I couldn't seem to make it a reality for the longest time. I had sewn the burlap pieces together and it sat there, waiting to be worked on but I just couldn't figure out exactly what I wanted to do but once I got started, it was like a fire had been lit under me and I couldn't stop! 

There are many photos for this entry to show you all the interactive elements. I chose to use a camping theme as my husband and I are avid canoe trippers. We have been doing this for almost twenty years and we do both flat water and whitewater canoe trips. Our excursions involve both drive to and fly-in destinations. 

To begin with, I took three pieces of burlap and sewed them together. From there, I attached four of those pieces (each was almost a foot in length), using our Black Striped Grosgrain Ribbon. I purposely offset the burlap within the album as you will see by the photos below for the interactive elements. 

Front of the Album - a photo inserted into a pocket
 The photo pulled out of the pocket (my favourite campsite)
The second page (you can see how it is slightly offset from the first page)
The left side is an interactive display of some of our whitewater canoe surfing experiences. It opens up more in the following photo.  
The right side of the page is my husband cooking a meal (if I had to cook, 
everything would be burned or raw...)
Over to the next page...
 Inside this page, between the burlap pieces is a journaling card 
(I have it partly pulled out so let's take a look)
This is on the front of the journaling card. 
This is on the back of the journaling card.
Now let's return to the album. You saw the page where the journaling spot came from. It had a flip flap on it. Here is what is under that flip flap. It talks about the realities of portaging on canoe trips...
I apologize for the photo quality... Anyways, on the right side is another pocket but this one is attached using hook and loop dots. When opened it looks like this. 
More flip flaps! The first set contains a photo that if you actually turned it upside down, the only way you would be able to tell that is was upside down is the front of our canoe in the very bottom of the photo as the water was so clear at 5am that morning. We'll get to the far right side in a moment.
The other two photos are of a special island where we buried our dog's ashes a few years ago as she was our camping dog and this was one of her favourite spots to camp. The other is of a gorgeous rainbow (photos don't do it justice). The right side photo is of a moose we encountered while paddling last year. His legs go WAY beneath what you see in this picture and we were just about 12 feet away. We have seen hundreds of moose on our trips. 
Under the flip flap on the far right - yes, that is a moose walking in front of our tiny, little tent. 
The next page has an accordion flip card of my husband's camping faces - pull on the bottom of the card and flip through his faces. 
Kind of like this...
The right side just has another journaling card and some additional photos of one of our favourite spots. The loon is a symbol of Canada and they can be seen and heard regularly on northern lakes.
 This is the journaling card from that same page. It is double-sided. 
The final page is a photo of a sunset taken through some trees on a beautiful campsite.

I hope you enjoyed looking through my album! It took me a lot of thought to create and assemble it but it sure brought back a lot of memories (and it was fun to do)!

Enjoy, 
Alyson

Products used are all Close To My Heart unless otherwise noted:

Paper: Dakota Paper Pack, Black Cardstock, Pacifica Cardstock, Whisper Cardstock, Black Glitter Paper
Stamps: Camping Delights, A Journey
Inks: Black Staz-On
Accessories: Art Philosophy Cartridge, Artiste Cartridge, Burlap Ribbon, Black Striped Grosgrain Ribbon, Corner Rounder, Keyboard Kraft Alphabet, Posh Journaling Spots, Sparkles - Black and Grey Assortment, Green and Blue Epoxy Bubbles, Bitty Sparkles, Embossing Stylus, Flip Flaps - Small Assortment, Hook and Loop Dots, Computer Font - Black (CTMH - ret.), Sewing Machine and thread (not CTMH), Black Sharpie Marker (not CTMH)