Thursday, June 17, 2021

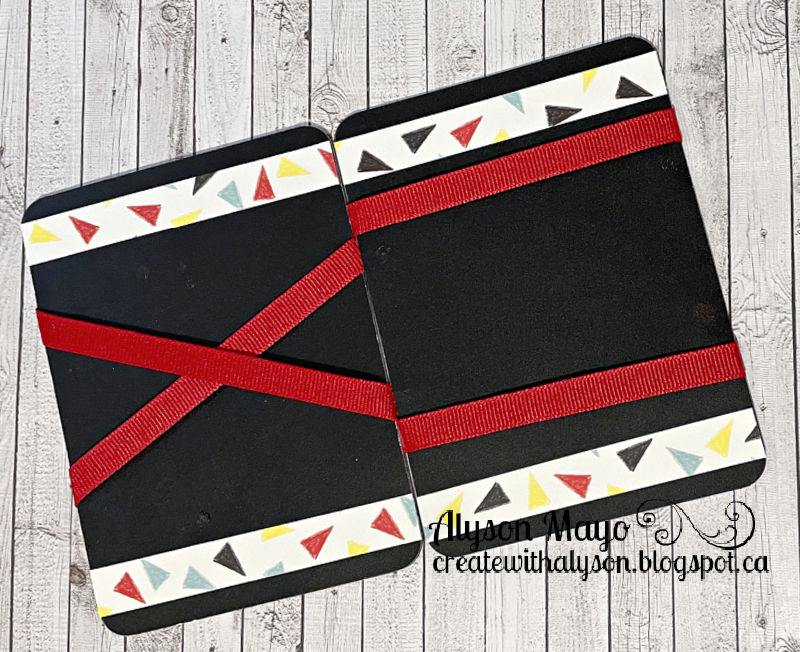
Flip Over Gift Card Holder

There are a lot of videos out there that show how to create this type of card. I call this a Flip Over Gift Card Holder but it is also known as a Jacob's Ladder Card. 

It appears to be magic when the card is flipped over in the same direction - the gift card moves from side to side. The video shows this much better than I can explain it. 

I used a colour scheme of black, white, red, yellow and blue. I kept the patterned papers the same on both sides so the magic continues with every flip. The sentiment was also adhered in the same spot for that reason. 

Check out the photos and the video of the card below. 


Products used are Close To My Heart unless otherwise indicated: 

Paper: Happiest Place Paper Pack, Black Cardstock, White Daisy Cardstock

Stamps: Word Up (Reverse Confetti)

Inks: Archival Black

Accessories: Corner Rounder, Red Ribbon 

Enjoy,

Alyson

Wednesday, June 16, 2021

Smiles with Roses - Craft Roulette

I like to play along with Craft Roulette on Friday evenings and you have until Sunday evening to link up a project. 

There are always 4 parameters for each challenge. Last week, those parameters were as follows: 

    - card using patterned paper

    - any 4 colours

    - smile or smiles

    - tone on tone

I pulled out one of my favourite new stamp sets from The Ton Stamps and stamped these gorgeous roses in shades of pink. The leaves were stamped in two shades of green. All pieces were die cut and set aside until I had the base ready. That was splattered with the same Shimmer Brush colours - Black, Raspberry and Green Apple. I added strips of paper along the left side - two of them are tone on tone patterns. The roses were added and a sentiment was die cut from black and white papers. I added some pink Pops of Colour around the roses and brushed the darkest part of the flowers with the Clear Shimmer Brush. 

Craft Roulette can be found on You Tube every Friday evening (730pm ET) and it's a lot of fun to watch the guests create a card using the parameters. 

Products used are Close To My Heart unless otherwise indicated: 

Paper: Misc. Patterned Paper, White Daisy Cardstock, Black Cardstock, Green Apple Cardstock, Neenah Solar White Cardstock

Stamps: Rose Labels (The Ton Stamps)

Inks: Ballerina, Pixie, Raspberry, Green Apple, Clover

Accessories: Rose Labels Dies (The Ton Stamps), Sending Dies (Pink Fresh Studios), Black and White Dots, Pop of Colour - Pink (scrapbook.com), Shimmer Brushes - Clear, Black, Raspberry, Green Apple 

Enjoy,

Alyson

Tuesday, June 15, 2021

Try Stampin' on Tuesday - 3-D Flower Card

Welcome to Try Stampin' on Tuesday Challenge 511!

In addition to the sketch, the optional theme this week is "beach".

I am not at all a beach person so I decided to focus on the sketch only for this challenge.  I have had  these flower dies for a while and this was my chance to try them out. There are three sizes of the flower and two leaf sizes. All pieces were die cut from white cardstock and then I used Distress Oxide inks to colour the edges of the pieces. A green spot was inked in the centre of each flower piece. The flowers were then sprayed with water which caused the ink to spread and they were shaped and left to dry. Once they were completely dry, they were reshaped and placed in layers to create a 3-D flower. Some clear seed beads were added in the center of each flower. 

The leaves were also inked and shaped and I die cut some white berry branches. Once the patterned paper was placed on the card, the flowers, leaves and berry stamps were added. I stamped a sentiment using two shades of green ink and finally added some holographic sequins to the card. 


Come and join us at TSOT and show us how you interpret the sketch shown above. 

You have two weeks to link up your project. 

We can’t wait to see what you create! 

Products used are Close To My Heart unless otherwise indicated: 

Paper: Bright Stack Paper Pack, White Daisy Cardstock, Evergreen Cardstock, Woodland Textures Paper (SU), Neenah Solar White Cardstock

Stamps: Sentiment Collection (Penny Black)

Inks: Green Apple, Clover, Espresso, Distress Oxide Inks - Kitsch Flamingo, Picked Raspberry, Mowed Lawn, Lucky Clover

Accessories: Floral 1 Dies (Elizabeth Craft Designs), Frosted Bouquet Dies (SU), Seed Beads (misc.), Holographic Sequins 

Enjoy,

Alyson

Monday, June 14, 2021

Birthday Cascading Gatefold Card

I posted a cascading gatefold card a while ago and this is the second one I have made. They aren't difficult... more time consuming than anything else. 

This one was created with the Party Time paper pack and the related stickers. I almost never use stickers but they came with the paper pack and I thought it was a good way to use them up. The base of the card is green and this particular paper pack has two colour schemes within the papers. I chose the blue/green/yellow colour scheme. 

The inside cascading piece has a variety of birthday images and the centre piece is an oval "hip, hip, hooray" message. I used the same oval dies to cut the sentiment on the belly band. Since this card is thick already, I only brushed the images with the Clear Shimmer Brush, rather than adding any bulky embellishments. 


Products used are all Close To My Heart:

Paper: Party Time Paper Pack and Stickers, White Daisy Cardstock, Green Apple Cardstock, Lemonade Cardstock, Sapphire Cardstock

Stamps: Wishing You Everything

Inks: Lagoon, Green Apple, Sapphire, Lemonade

Accessories: Wishing You Everything Thin Cuts, Basic Oval Thin Cuts, Stitched Oval Thin Cuts, Tri-Blend Markers, Clear Shimmer Brush

Enjoy,

Alyson

Sunday, June 13, 2021

I Just Miss You... in Yellow

Back to the same layering stencils for a second card... I love these stencils! 

Yesterday, I posted a card using the same stencils but done in blue. Today, it's a yellow card. I stencilled the flowers using Canary and Sundance inks and the greenery with Fern and New England Ivy inks. The outline image was stamped in black. I stamped the sentiment and added a small piece of New England Ivy cardstock underneath. Some White Liquid Pearls were placed around the images. 

Products used are Close To My Heart unless otherwise indicated: 

Paper: White Daisy Cardstock, New England Ivy Cardstock

Stamps: Miss Your Smile (Pink Fresh Studios) 

Inks: Archival Black, Canary, Sundance, Fern, New England Ivy

Accessories: Slim Stitched Rectangle Essentials Dies (Pink Fresh Studios), Miss Your Smile Layering Stencils (Pink Fresh Studios), White Liquid Pearls

Enjoy,

Alyson

Saturday, June 12, 2021

Miss Your Hugs Slimline

I love layering stencils and this one from Pink Fresh Studio is designed for slimline cards. It has two layers for the flowers and two layers for the greenery. 

The colours I used were Bluebird and Sapphire for the flowers and Green Apple and Clover for the greenery. Once the image was stencilled, I stamped the outline in black. The first part of the sentiment was stamped on white cardsotck and I added a small piece of Bluebird cardstock underneath. The word "hugs" was die cut from Green Apple (x3) and Black and the top part was stacked to add some dimension.

The entire card front was die cut using a stitched slimline rectangle and I added some White Liquid Pearls around the flowers. I love the intensity of these colours!

Products used are Close To My Heart unless otherwise indicated: 

Paper: White Daisy Cardstock, Black Cardstock, Green Apple Cardstock, Bluebird Cardstock 

Stamps: Miss Your Smile (Pink Fresh Studio)

Inks: Archival Black, Sapphire, Bluebird, Green Apple, Clover 

Accessories: Slim Stitched Rectangle Essentials (Pink Fresh Studio), Phrase Builder - Sending (Pink Fresh Studios), Miss Your Smile Layering Stencils (Pink Fresh Studios), White Liquid Pearls 

Enjoy,

Alyson

Friday, June 11, 2021

Top Fold Card #2

I posted one of these cards several days ago... I created another one using the You Are Enough papers but with a completely different colour scheme. 

This time, I focused on the blues and greens in the paper collection. I die cut the large butterfly in three layers and that is on the first inside section of the card. I didn't add anything to the top flap this time as the paper was fine on its own. I suppose you could use that space to write more than in just the designated writing section. 

A belly band was created and one of the zip strips from the paper collection was wrapped around the band. I die cut the wreath and the two layered butterfly for the front. A few clear sparkles were coloured and added to the body of the butterfly.


Products used are all Close To My Heart: 

Paper: You are Enough Paper Pack, You are Enough Coordinating Cardstock, White Daisy Cardstock, Sapphire Cardstock, Glacier Cardstock Blue Belle Cardstock, Blue Belle Glitter Paper

Stamps: You are Enough

Inks: Sapphire, Sapphire Pigment Ink

Accessories: You are Enough Thin Cuts, Layered Butterfly Thin Cuts, Clear Embossing Powder, Heat Tool, Clear Sparkles, Tri-Blend Marker

Enjoy,

Alyson


Thursday, June 10, 2021

Floral Fun Fold Card - Roses

I love creating interactive cards or cards with special folds. This is another of those cards... 

Recently, I ordered a very cool stamp and dies set from The Ton Stamps. They have group layering stamps and that means that all the floral and leaf images are stamped as one unit and then die cut together as one piece. The flowers look so realistic! 

I chose a blue and green colour scheme for this card. The flowers were stamped with three shades of blue and the leaves with two shades of green. I had to stamp and die cut two sets to have enough flowers for this card. I used sentiments from a stamp and die set that I received as part of a weekend virtual crop a few months ago. The sentiments were stamped with Bluebird ink and die cut using stitched brackets. The back page has a place to write a message and that background was stamped with a stamp from the Strokes of an Artist stamp set. 

I brushed the darkest parts of the flowers with the Clear Shimmer Brush and then added some Stickles dots around the images. I'm really happy with how this turned out! 


Products used are Close To My Heart unless otherwise indicated: 

Paper: Mix-In Paper Packs, White Daisy Cardstock, Bluebird Cardstock, Green Apple Cardstock 

Stamps: Strokes of an Artist, Photoplay Special Stamp, Rose Labels (The Ton Stamps)

Inks: Carolina, Bluebird, Sapphire, Green Apple, Clover

Accessories: Rose Labels Dies (The Ton Stamps), Stitched Brackets, Stitched Fancy Brackets, Clear Shimmer Brush, Waterfall Stickles

Enjoy,

Alyson

Wednesday, June 9, 2021

AH 424 - You are Everything Wonderful


Welcome to Atlantic Hearts Sketch Challenge 424! 

I LOVE the sketch this week - wreaths are always so pretty and fun to create! 

I started by creating the background using two layering stencils. The flowers and leaves were stamped and die cut - those are 6 step stamping flowers! The wreath was die cut twice to provide a little more fullness. It barely fit on the card front - I was going to leave a larger border around the outside but the wreath was wide enough that I had to leave just a small border instead. I stamped the sentiment on vellum and embossed it in silver. The centres of the flowers were brushed with the Clear Shimmer Brush and I added a few Silver Glitter Gems and some Silver Embellishing Thread to finish off the card. 


Come and join us at Atlantic Hearts and show us how you interpret the sketch shown above. 

You have until Sunday evening to link up your project. 

We can’t wait to see what you create! 

Products used are Close To My Heart unless otherwise indicated: 

Paper: Charcoal Cardstock, Pewter Cardstock, Neenah Solar White Cardstock, Vellum

Stamps: Beloved Daisy (Altenew), Greetings Mix 1 (SSS) 

Inks: Versamark, Pebble, Pewter, Altenew Inks (Firefly, Grass Field, Shadow Creek, Wisteria, Hydrangea, Ultraviolet), Pink Fresh Studio Inks (Sunshine, Sweet Mustard, Marigold, Coral Reef, Passion Fruit, Berrylicious, Sparkling Rose, Bubblegum, Raspberry Bliss)

Accessories: Beloved Daisy Dies (Altenew), Stylish Frame Trio Dies (Memory Box), Diagonal Plaid Stencils (Pink Fresh Studio), Clear Shimmer Brush, Silver Glitter Gems, Silver Embellishing Thread, Silver Embossing Powder, Heat Tool 

Enjoy,

Alyson

Tuesday, June 8, 2021

Cascading Gatefold Card - Friendship

You may have looked at the title and wondered how a gatefold card and a cascading card could be used together... Check out this video for more information. 

I used the Lovely paper pack and coordinating cardstock to create my card. My first attempt at this ended up tossed out as I forgot to cross the cascading pieces and consequently adhered the patterned paper to the wrong side of half of it. The second attempt was much better! 

The base of the card is Canary cardstock and I used the Florals and Flutters stamp and die set to create the images (flowers, leaves, hearts, butterflies). Those were all coloured and die cut. Rather than using patterned paper for all the inside pieces, I embossed some Blue Belle cardstock using a floral embossing folder. The sentiments are from the Friendship is a Blessing stamp set. This card folds down into a 6x6 square with a belly band. I purposely didn't add any bulky embellishments for mailing purposes.


Products used are Close To My Heart unless otherwise indicated:

Paper: Lovely Paper Pack, White Daisy Cardstock, Canary Cardstock, Blue Belle Cardstock, Sage Cardstock 

Stamps: Friendship is a Blessing, Florals and Flutters

Inks: Intense Black, Charcoal

Accessories: Florals and Flutters Thin Cuts, Stitched Bracket Thin Cuts, Basic Oval Thin Cuts, Stitched Oval Thin Cuts, Flower Garden Embossing Folder, Tri-Blend Markers, Copic Markers (not CTMH), Touch Markers (not CTMH)

Enjoy,

Alyson