Sunday, June 30, 2024

Mountain Scene Congratulations

This card was totally CASEd from one made by Heidi Baks. I loved the style and it was perfect for the occasion in question. 

The mountain scene was created using stamps and I masked the mountains to blend a sky at the top. The stamped frame was adhered to an outline frame on a woodgrain embossed background. A set of trees were stamped, die cut and adhered to the side. Some twine was wrapped around the card and added under the trees and the sentiment was added with foam tape. 

Enjoy,

Alyson 

Saturday, June 29, 2024

SS 754 - Bird on Branch

 Welcome to Sketch Saturday Challenge 754!

This week, we invite you to choose a sketch from the archives. It can be any sketch - the optional twist is to choose a sketch from 2019. All the past sketches can be found at the top of the Sketch Saturday Blog

I chose Sketch 554 from 2019. 

I liked the multiple elements on the sketch and decided to use a fence, branch and bird image. The images were stamped (or embossed), stencilled and die cut. I arranged the bird and branch on the fence. The background was hot foiled and I added a piece of gold shimmer tape across the centre. A piece of burlap patterned paper was used behind the main image and I chose to add a small sentiment instead of a bow. 

Come and join us at Sketch Saturday and pull out one of your favourite sketches from the past! Please be sure to show us which sketch you used! 

You have two weeks to link up your project. 

We can't wait to see what you create!

Enjoy, 

Alyson


Friday, June 28, 2024

Colour Dare 607 - Geometric Hello

 Welcome to Colour Dare Challenge 607!

It's a tic tac toe board this week - chose any row, column or diagonal line. You may use other colours but they must be on the tic tac toe board. 

I chose the bottom row (Glacier, Journey and Royal) plus a diagonal (Glacier, Lagoon and Wisteria). I also used silver. 

The stencil I used for the background is one of the oldest stencils I have... I stencilled the background using Glacier, Lagoon and Journey. The sentiment was die cut from both Wisteria and Royal cardstock and I offset the letters to create a shadow. The word was adhered on a piece of vellum across the card and I added thin silver strips above and below the word. I brushed the letters with a clear shimmer brush. Some clear gems were placed around the sentiment and the card front was adhered to a Royal mat and then a Journey card base. 

Come and join us at Colour Dare and show us how you interpret this challenge. 

You have two weeks to link up your project. 

We can't wait to see what you create!

Enjoy,

Alyson

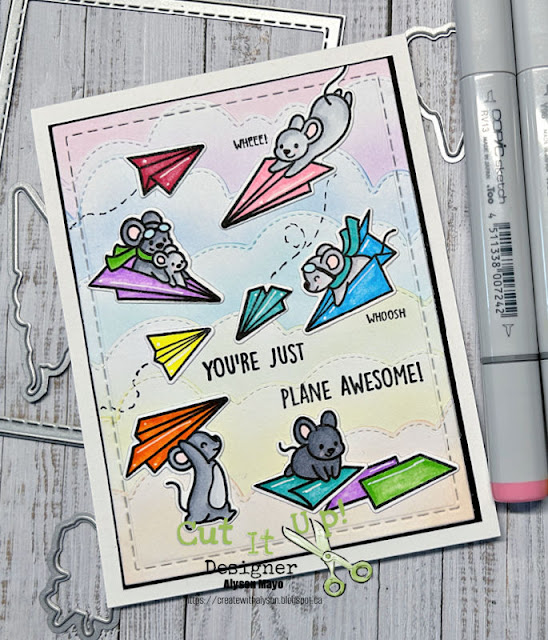
Cut It Up 307 - Plane Awesome

 Welcome to Cut It Up Challenge 307!

The theme for this challenge is to use critters (real or fantasy).

I have a Lawn Fawn set of paper airplane flying mice that was perfect for this challenge. I stamped, coloured and die cut several of the images and determined ahead of time where I wanted to place them so they were coloured in a sort of rainbow order. The clouds were die cut and inked in a rainbow colour scheme coming down the card. Once all the clouds were adhered, I die cut the card front with a stitched rectangle die. The images were arranged and I stamped the large sentiment plus two tiny sentiments on the card. I also used a black marker to draw some flight lines. The card front was adhered to a black mat and then a white card base. 

Come and join us at Cut It Up and show us how you interpret this challenge. 

You have two weeks to link up your project. 

We can't wait to see what you create!

Enjoy, 

Alyson

MTTC 537 - Shine Bright Floral Cluster

 Welcome to My Time to Craft Challenge 537!

The theme for this challenge is summer florals. 

Flower in the summer are often bold and bright in colour so I chose pinks and purples plus yellow for my flowers. I die cut several floral and leaf images and adhered the smaller pieces together. The background was die cut and adhered to a piece of gold foil. I added a stitched border around the outside and arranged the flowers around a hot foiled sentiment. I used pink Liquid Pearls to add a dot in the centre of each circle on the background. 

Come and join us at MTTC and show us your summer florals. 

You have two weeks to link up your project. 

We can't wait to see what you create!

Enjoy,

Alyson

Thursday, June 27, 2024

Magnolia Celebration

 This card is from the 30 Minute Card Making Stash and Dash. 

The parameters for this challenge were as follows:

Type of card - square

Colour - yellow 

Element - shiny 

Technique - embossing 

Sentiment - anniversary

I chose a magnolia stamp and embossed it in black. The image was stencilled using primarily yellow inks with a touch of orange. I trimmed that panel down and adhered it to a black mat, then a gold mat (shiny) and finally to the white card base. I added a hot foiled sentiment (celebrate - it works for anniversary, right?) along the side and some gold gems around that piece. 

Enjoy,

Alyson

Wednesday, June 26, 2024

Envelope Card

This card is one that I saw in a Facebook group and I wanted to try it myself. 

The card folds up into a cute envelope. It took me longer to decorate this card than it did to figure out the measurements and make it! I used a creative set from Altenew that includes a 3D embossing folder, a stamp set, dies and co-ordinating stencils. I did all that work first and had the pieces ready to go. 

Inside the card, there are fold-out panels in the centre. These could be used for photos if this was made into a mini album. Those panels fold out to reveal two more sections. There is an envelope on the bottom panel and I put a piece of white cardstock there for a place to write a message. I also added ribbon coming out of the top and bottom panels so the card can be tied together. 


Enjoy, 

Alyson

Tuesday, June 25, 2024

Poinsettia Cascading Pleat Fold Card

 It's June but I have to start thinking about Christmas cards now since I send over 200 of them. 

This fold was not hard to do and there are several instructional videos available. I chose to make a landscape card with a poinsettia theme. 

The flowers and greenery were stamped and die cut and I also cut some twigs from silver foil. The card base is a medium blue colour and I used dark blue cardstock for the mat layer and then grey patterned paper for the fronts. Each panel was decorated and some twigs and berries show behind the front panel, which is fine. In hindsight, I would cut the writing panel down a bit so it doesn't show when the card is folded. I added some flat silver gems but nothing dimensional so the card folds flat for mailing. 


Enjoy, 

Alyson

Monday, June 24, 2024

Blended Circle Card

 This was a fun card to make! The circle was die cut from masking paper and I stamped several wildflower images on white cardstock underneath and embossed them. Keeping the masking paper in place, the circle was blended with four oxide ink colours. A small sentiment was added inside the circle and the larger sentiment was placed at the bottom. Some gold gems finished off this pretty card. 

Enjoy, 

Alyson

Sunday, June 23, 2024

Cry, Laugh, Remember

 This card was from the 30 Minute Cardmaking Stash and Dash. 

The parameters for this challenge were as follows: Type of card: crafter's choice, Colours: use 3 colours, Embellishment: border, Technique: dovetail, Sentiment: sympathy.

I embossed a light green background and added it to a white card base. The image was stamped and sort of roughly coloured. I die cut that piece and created a frame to go around it. Before I die cut the white piece, I die cut two pierced borders along the bottom.The sentiment was dovetailed and added at the bottom along with some silver metallic thread and silver gems. 

Enjoy,

Alyson

Saturday, June 22, 2024

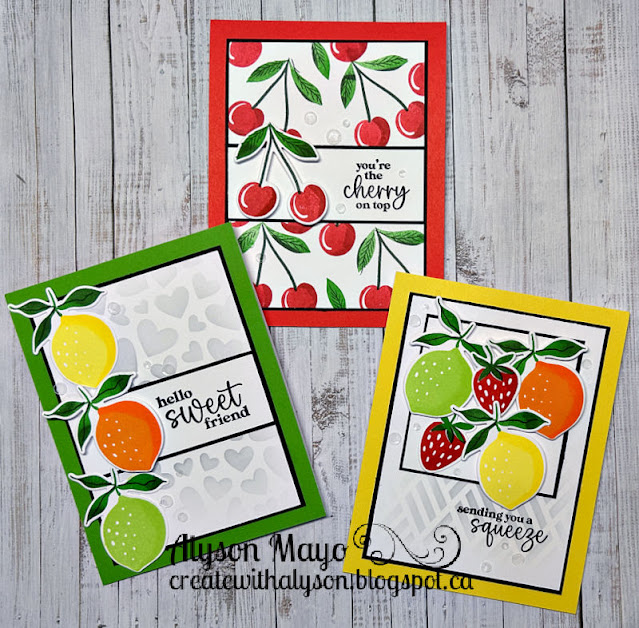
Fruit Cards

 This trio of cards is the latest Let's Stamp Together class (LST). I think they are simply adorable!

The pieces of fruit were each shaded using the rock and roll stamping technique - something I haven't done for ages. The backgrounds for two cards were lightly stencilled and the cherry card background was randomly stamped. The sentiments are just so SWEET!

Enjoy,

Alyson

Friday, June 21, 2024

MTTCC 89 - JOY

Welcome to My Time to Craft Christmas Challenge 89!

The theme for this challenge is music (music notes, carols/songs). 

I chose a music note background and die cut three circles to fit the word JOY. The poinsettias and greenery were die cut and added around the circles and I placed a gold sequin in the centre of each flower. Easy! 

Come and join us at MTTCC and show us your music-related projects. 

You have two weeks to link up your project. 

We can't wait to see what you create!

Enjoy, 

Alyson

Thursday, June 20, 2024

Rainbow Love

 This card looks much more difficult to make than it really was - the paper did all the work! 

I die cut the black frame and adhered it to a piece of patterned paper. The sentiment was also cut from black cardstock and adhered in the centre. A script word "love" was die cut from a piece of the yellow section of the paper and placed across the block letters. I added coloured Stickles to each of the circles to provide some shine on the card. 

Enjoy,

Alyson

Wednesday, June 19, 2024

Magnolia Spotlight Card

 There are many versions of spotlight cards out there - this one focuses on three areas within a background. 

I stamped the magnolia image twice using my Misti so the images would be in the same spot. Stencils were used to ink some of the florals and greenery. Using three circle dies, I cut three circles from areas where there was colour (this image is not designed to be completely coloured - just selected sections). The inked panel was placed on a piece of turquoise cardstock and the die cut panel was added on top with foam tape. A sentiment was stamped on the same turquoise cardstock and adhered at the bottom along with some metallic thread.

Enjoy, 

Alyson

Tuesday, June 18, 2024

TSOT 649 - Bunny Birthday

 Welcome to Try a Sketch on Tuesday Challenge 649!

This is an interesting sketch that can take many forms. I pulled out an adorable Lawn Fawn stamp and die set for my card. 

The brick base was embossed and I dragged an ink pad over the top to highlight the bricks. The cloud pieces were die cut and inked with a light blue ink before being assembled above the brick wall. The little bunnies were stamped, coloured and die cut and I chose appropriate birthday sentiments for each of the speech bubbles. A sun with a sentiment was added in the top corner. 

Come and join us at TSOT and show us how you interpret this sketch. 

You have two weeks to link up your project. 

We can't wait to see what you create!

Enjoy,

Alyson


Monday, June 17, 2024

DT 169 - Trio of Flowers Slimline

 Welcome to Double Trouble Challenge 169!

This week, it's all about skinny cards - slimline or mini slimline. The small graphic is below - please visit the Double Trouble Challenge Blog for detailed information. 

My slimline card is large - 4 x 9 - because I used a Pinkfresh Studio die and that is larger than a standard slimline (3.5 x 8.5). It still fits in a standard business envelope so all is good! 

I chose a brick background and also die cut green rings to go around each opening to define them a little more. The flowers were stamped, coloured and die cut and I inked a white panel behind the openings with a light blue ink before arranging the flowers in each of the openings. The sentiment was embossed on grey cardstock and split in two sections. I added silver Stickles to the dots around the circles and a silver gem to each of the flower centres. 

Come and join us at Double Trouble and show us how you interpret this challenge. 

You have two weeks to link up your project. 

I am also linking up my card with the I Spy with My Little Eye challenge

We can't wait to see what you create!

Enjoy, 

Alyson

AH 582 - Birthday Corner Flowers

 Welcome to Atlantic Hearts Sketch Challenge 582!

I LOVE this sketch - I can see myself coming back to this sketch many times for various cards. 

I die cut two blanket stitched rectangles from white cardstock. The larger one was inked using cling wrap and three shades of blue ink. The smaller one was the panel on which I stamped and stencilled the flowers. I also die cut a border outline for that piece and dragged an ink pad across it to customize the colour. I did the same thing with the centre strip of cardstock. A sentiment was stamped and I added three hot foiled vellum butterflies around the card. 

Come and join us at Atlantic Hearts and show us how you interpret this week's sketch. 

You have two weeks to link up your project. 

We can't wait to see what you create!

Enjoy, 

Alyson

Sunday, June 16, 2024

Washi Tape Card Sets

 I recently purchased three rolls of washi tape and when it is layered, it creates beautiful images. At a recent crop, I completed 64 cards using this product (yep - 64!) to make 8 sets of 8 cards each. 

Each of the cards has a washi tape image on the front which was matted on coordinating cardstock. There is an embossed panel mounted to a coloured piece and then to the card base. The image was placed at the top and I added a gold foiled sentiment at the bottom. Cutting the paper and embossing took the longest time - once that was done, the assembly was quick and easy. 

Enjoy, 

Alyson

Saturday, June 15, 2024

SS 753 - Winter Tag Card

 Welcome to Sketch Saturday Challenge 753!

The optional theme for this challenge is to use non-traditional holiday colours (for any holiday). 

I chose shades of blue and grey for a Christmas card. The background was assembled and I splattered it with white paint. The tag image is from an old SU paper pad and I die cut a diagonal border at the bottom before adding a sentiment just above that part. I adhered the tag to dark blue cardstock and also die cut a small tree from that same paper. The edges of the tree were embossed in silver and I brushed it with a shimmer brush as well. A bow was placed at the top of the tag. 

Come and join us at Sketch Saturday and show us how you interpret this week's sketch. 

You have two weeks to link up your project. 

We can't wait to see what you create!

Enjoy, 

Alyson
Friday, June 14, 2024

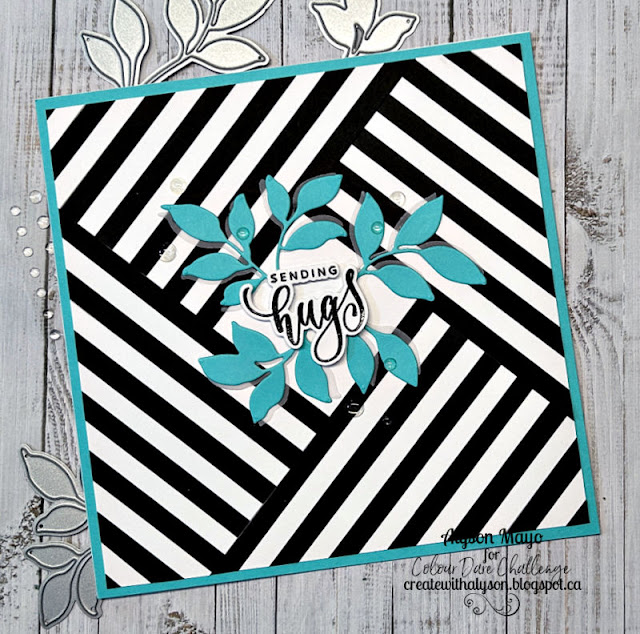
CD 605 - Leafy Hugs

 Welcome to Colour Dare Challenge 605!

Choose ONE colour and use black and white. Metallics and neutrals are free to use. 

I chose Turquoise - big surprise! 

The background was created by alternating black and white strips of cardstock around a diamond in the centre. That piece was cut down to fit on a 6x6 card with a border. The leaves were die cut along with a second set in vellum.The vellum was placed under the leaf pieces, slightly offset. The leaves were adhered under a black embossed sentiment. Some clear dew drops were added around the leaves. 

Come and join us at Colour Dare and show us how you interpret this challenge. 

You have two weeks to link up your project. 

We can't wait to see what you create!

Enjoy, 

Alyson

Cut It Up 306 - Rare Bloom in Blue

 Welcome to Cut It Up Challenge 306! 

The theme for this challenge is "feeling blue". Use predominantly blue in your project. 

I die cut a postage frame and using a stencil, I inked each section in three shades of blue. Once the ink was dry, I stamped a variety of wildflowers in each section. I had to emboss them as black stamping on Distress Oxides doesn't stay black. Once the wildflowers were done, I removed the stencil and stamped a few postage images so the images would cross the die cut lines. I also embossed a sentiment on dark blue cardstock. I attached the sentiment and adhered the postage panel to dark blue cardstock. This card is flat with no added embellishments so it is perfect for mailing. 

Come and join us at Cut It Up and show us how you interpret this week's challenge. 

You have two weeks to link up your project.

We can't wait to see what you create!

Enjoy, 

Alyson

MTTC 536 - Hello Winter

 Welcome to My Time to Craft Challenge 536!

The theme for this challenge is winter. 

Where I live, we are into the beginning of summer, so making a winter card was a little strange to me. I pulled out an old stamp set and stamped this adorable snowman image and coloured him. I have a die that makes a snow globe so I turned it into a shaker card. The snowflake background was stencilled with blue ink on blue cardstock and I added a glittery paste on top. Once that was dry, I die cut the snow globe and inserted the shaker piece inside the opening. The snowflake background was adhered with foam tape to keep the layers even. I added a sentiment in the corner and some iridescent gems around the globe. 

Come and join us at MTTC and show us your winter projects. 

You have two weeks to link up your project. 

We can't wait to see what you create!

Enjoy, 

Alyson

Thursday, June 13, 2024

Triangle Border Card

I saw a border like this and wanted to try it myself. This card ended up being very thick due to the layers. The green borders were die cut and inked in shades of green. I attached each to a piece of white cardsock and then added gold foil in the inside corners. I layered them along the bottom in three rows. I had to place a piece of white cardstock across the top and added a thin gold ribbon across that piece. I stencilled and die cut a floral image and adhered that to a gold splattered background and a hot foiled sentiment was added at the top. I adhered the card front to two mat layers and placed some gold gems on the front. 

Enjoy, 

Alyson


Wednesday, June 12, 2024

Triangle Pop-Up Card

 There are many versions of this fun fold card and I have made this card style several times before today. This one has a pair of magnets at the bottom that hold the base pieces together. 

I used several colours of cardstock for the flowers and leaves and created a mini-easel inside the triangular section. It folds flat for mailing and I also decorated the reverse side so when the card is folded up, there is an image on the back. 

Enjoy,

Alyson

Tuesday, June 11, 2024

Die Cut Shaped Card

 This technique has been around for ages - it was time to revisit it!

I embossed a floral image and stencilled it to add colour. I chose colours based on the patterned paper that I used. I used the coordinating die to make a partial cut on the front panel of the card base and then lightly inked the top and bottom with light pink ink. I also splattered it with gold paint. The patterned paper was adhered along the left side and another piece was placed inside the card. The floral image was adhered to the front of the card and I lined it up with the die cut part. A stamped sentiment was placed in the bottom corner on the inside of the card so it shows when the card is closed. A few gold gems were added to finish off this pretty card. 


Enjoy, 

Alyson

Monday, June 10, 2024

Just a Note Blooms

These two cards were made using the same set of stencils and the same hot foil plate. One was set slightly offside and the other has a ribbon across the bottom. Both were spattered with black ink and adhered to a green card base. 


Enjoy,

Alyson

Sunday, June 9, 2024

Diamond Thanks

 This is another card made for a leader of a group - large in size to allow for many messages to be written inside the card. 

I cut several square pieces from alcohol inked patterned paper and arranged them along the left side. That was much harder than it looks... I had to make sure all the pieces were equally spaced apart and lined up! I ink blended a piece of cardstock with blue inks, leaving the darker colours on the outside and a lighter shade of blue in the centre and die cut the sentiment before adhering it to a silver border. The card front was splattered with blue ink and adhered to silver and then blue cardstock. I added blue metallic thread and flat sequins around the sentiment.

Enjoy, 

Alyson

Saturday, June 8, 2024

Thank You Scene

 This card was made as a thank you for the leader of a group. I purposely made it large (6x6) to allow for many messages to be written inside. 

The scene is a piece of patterned paper that was cut to size. I embossed a piece of peach cardstock and dragged a gold ink pad over the top to highlight the embossed section. Those two pieces were adhered together with a thin strip of gold paper between the sections. I double matted the image and added a hot foiled sentiment at the bottom along with metallic thread and some flat sequins. 

Enjoy, 

Alyson

Friday, June 7, 2024

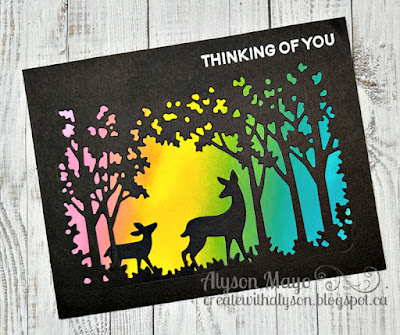
MTTCC 88 - Deer in Woods

Welcome to My Time to Craft Christmas Challenge 88! 

The theme for this challenge is a northern lights sky. 

I have made a lot of cards with the northern lights technique over the years... this challenge took me forever. I tried FIVE times to blend a sky that looked right... all of those ended up trashed. I finally did something a little different by using an overlay instead. I had everything done when I realized this was a CHRISTMAS challenge - I had embossed "thinking of you" on the card and used a summer tree and grass overlay... So it was back to the drawing board to create yet another sky. This one was covered with a birch tree overlay and I added a deer behind the trees. I also tore a piece of white glitter paper and placed that behind the trees. A sentiment was placed in the top corner and I used a white gel pen to add stars to the sky. 


Just for fun, this is the original card that I created... with the wrong sentiment! 

Come and join us at MTTCC and show us how you interpret this week's challenge. 

You have two weeks to link up your project. 

We can't wait to see what you create!

Enjoy,

Alyson

Thursday, June 6, 2024

Spellbinders Weekender Cards

 I recently did a virtual event with Spellbinders - it was busy, but a lot of fun, with many different ideas. 

These are the cards that I completed. Some are 5x7 in size (the bicycle ones) but the others are all A2 except one mini slimline size card. 


Enjoy,

Alyson