Saturday, November 30, 2024

SS 765 - Merry and Bright

 Welcome to Sketch Saturday Challenge 765!

This week, we are asking you to choose a sketch from the vault. Past sketches can be found on the Sketch Saturday Challenge Blog

The optional twist is to choose a sketch from 2014. 

I chose Sketch 310 which is from 2014. 

I cut four squares of patterned paper and light yellow cardstock and lined them up on a red background. A dark green line was drawn around those pieces. The centre panel was embossed in gold and coloured. I added some small poinsettia sprays in opposite corners and placed a sentiment across the centre with metallic thread underneath. I put a gold sequins in the centres of the flower to finish off this card. 

Come and join us at Sketch Saturday and show us which sketch you use for this challenge.

You have two weeks to link up your project. 

We can't wait to see what you create!

Enjoy, 

Alyson 

Friday, November 29, 2024

CD 629 - Mosaic Strips Birthday

Welcome to Colour Dare Challenge 629!

I used all the colours in the graphic plus black and white. 

 The strips of coloured cardstock were placed on black cardstock and cut apart. They were then adhered to another piece of black cardstock but offset to form a mosaic pattern. I die cut a birthday sentiment from yellow and black cardstock and also stamped and die cut some candles. Those pieces were adhered to holographic paper in the centre of the card. Holographic paper is so difficult to photograph... The first photo shows the card in the usual format I use - and the holographic paper looks purple (!) but the second one shows it from a different angle and that is what I used, thinking it would photograph better. Ah, such is life. 


Come and join us at Colour Dare and show us how you interpret this challenge. 

You have two weeks to link up your project. 

We can't wait to see what you create!

Enjoy, 

Alyson

Cut It Up 318 - Poinsettia with Sparkle and Shine

 Welcome to Cut It Up Challenge 318!

The theme for this challenge is sparkle and shine. 

I love both sparkle and shine so this was fun! I inked a stencil with shades of blue and turquoise, making it lighter at the edges. The stencil was covered with clear glitter paste and once the stencil was removed, that panel was left to dry. The greenery pieces were inked with grey inks and some were splattered with a mix of Perfect Pearls and water to add shine. The poinsettia was inked with the same colours I used for the background - teals and blues - and also spritzed with that shimmery mix of Perfect Pearls and water. Once everything was dry, I cut down the background and adhered it to a dark blue mat, a turquoise mat and then to a white card base. The poinsettia with the greenery was assembled in the centre of the card. A hot foiled sentiment was placed across the centre of the image. 

Come and join us at Cut It Up and show us how you interpret this challenge. 

You have two weeks to link up your project. 

We can't wait to see what you create!

Enjoy, 

Alyson

MTTC 548 - Rainbow Tag

 Welcome to My Time to Craft Challenge 548!

The theme for this challenge is anything but a card. 

I chose to make a tag and this was simple and easy! I stencilled the image onto white cardstock using eight Distress Oxide inks and die cut the top using a scalloped die. I used the same die to cut a piece of holographic paper and lined up the pieces at the top before cutting the rest of the outline A small sentiment was stamped across the bottom and some white ribbon was threaded through the hole at the top. I used some Liquid Pearls to add dots of the same colours around the image. 

Come and join us at MTTC and show us your non-card projects.

You have two weeks to link up your project. 

We can't wait to see what you create!

Enjoy, 

Alyson

Thursday, November 28, 2024

Four from One Card Set

 I have seen this idea several times in the last few weeks - it's an idea that has been around for a while but has made a comeback. 

The same image was stamped four times on a piece of letter size cardstock. I used a stamp with stencils so I could colour the images fairly quickly. Once that was finished, the cardstock was cut into four even pieces for card fronts. 

I used green cardstock for the bases and trimmed down the stamped images. I also embossed each of the stamped panels with a 3D embossing folder. Sentiments were stamped and added to each card along with some gems and ribbon for a few of them. This is a great way to make several cards from one design. 


This shows the design for stamping (although it has the finished cards already, the visual is there). 

Enjoy, 

Alyson

Wednesday, November 27, 2024

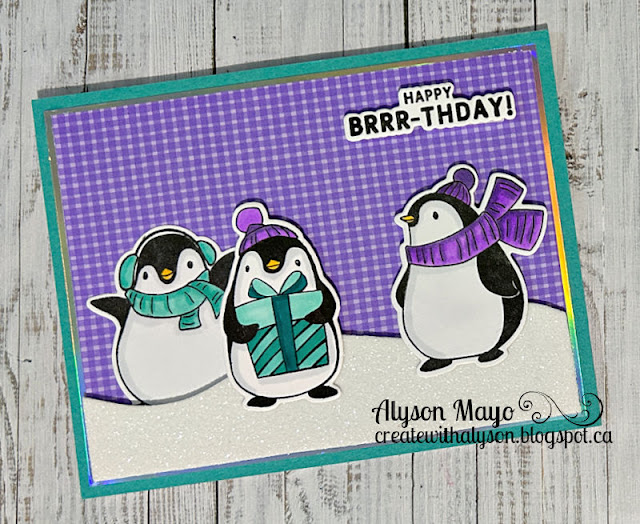
Penguin Flip Card

 This card design is one that I made as part of the last Crop and Create event. The design is very easy and I chose to use penguins for a winter birthday card. 

The penguins were stamped, coloured and die cut and I chose a purple and teal colour scheme. I arranged them on the front, placing one behind the snowbank and the others in front. A sentiment was placed at the top. 

Inside the card, there is a pop-up penguin - so cute! 

Enjoy, 

Alyson

Tuesday, November 26, 2024

Diorama Floral Card

 I first made this type of card during a recent online event and loved it so much that I wanted to make a different version of it. 

I chose some old CTMH papers to work with a blue and mint colour scheme. The leaves on the front were stamped, coloured and die cut. They were adhered with a ribbon at the base. 

Inside the card, there is a gorgeous coneflower that appears to be suspended. I die cut that in white and inked and water splattered the pieces. Once they were assembled, the flower was attached to two strips of acetate behind a circle opening. A sentiment was stamped inside the card but there is still plenty of room to write a message. 

Enjoy, 

Alyson

Monday, November 25, 2024

Modern Art Card

 My friend, Monica Hayward, recently taught this card style as part of her monthly online crop - this idea is so cool!

I used shades of blue and red to create the circles on the card and then stamped the black image on top. A sentiment was stamped at the bottom and I added some silver gems. Since the gems are flat, the card is totally flat for mailing. 

Enjoy, 

Alyson

Sunday, November 24, 2024

Tri-Fold Hidden Door Card - 49 and Market

 I made another card like this recently - used the video from Iced Images. The finished size is 5x7 but it folds flat for mailing. For this card, I chose some products from 49 and Market. As much as I love their products, I often find them a bit difficult to use as they tend to be a vintage style and that usually isn't my choice of papers. 

This card was made using the Moonlit Garden and Charcoal collections. I created a large focal image for the front and used various papers to decorate the inside. There is a spot to write a message way inside the card and it stands up beautifully for display. 


Enjoy, 

Alyson

Saturday, November 23, 2024

Rainbow Birthday Card

 This card is from the 30 Minute Card Making Stash Dash event. 

The parameters were as follows: Type of card: slimline or mini slimline, Colour: rainbow, Embellishment: ribbon or string, Technique: colouring and Occasion: birthday or get well.

I ink blended a rainbow on a diagonal on the card base. The cake image was stamped, coloured (using all the rainbow colours) and die cut. That was adhered to a black circle and then a white circle. I embossed a sentiment in white and adhered it across the card. Some silver and white ribbon was added above and below the sentiment. Yellow gems were placed around the sentiment and I used clear Stickles on the flame and smaller elements of the cake. 

Enjoy, 

Alyson

Friday, November 22, 2024

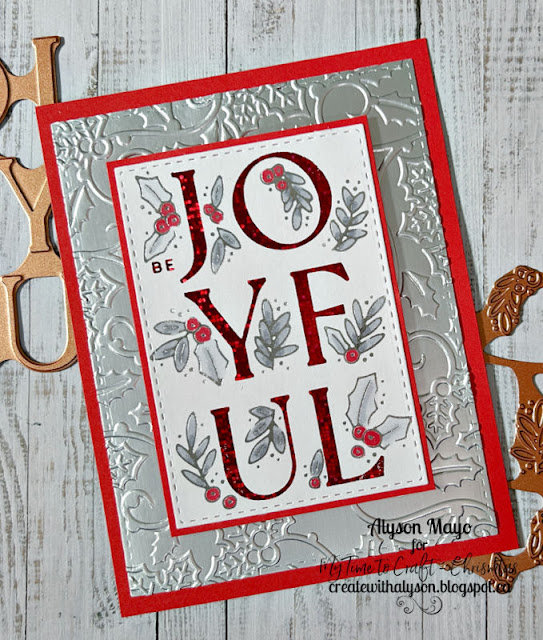
MTTCC 100 - Be Joyful


Welcome to My Time to Craft Christmas Challenge 100!

For this celebration, the theme is red and silver! Minimal other neutrals may be used but we ask that the majority of your project is red and silver. And since this is a Christmas challenge, the theme must be Christmas! 

I hot foiled a piece of white cardstock with red letters and silver greenery. I chose to colour the greenery in shades of grey. That piece was die cut with a stitched rectangle die and I also die cut a larger rectangle from silver foil. The silver piece was embossed with a holly and berry pattern and the front was added with foam tape. 

Come and join us at MTTCC and show us your red and silver projects. 

You have two weeks to link up your project. 

We can't wait to see what you create!

Enjoy, 

Alyson


Thursday, November 21, 2024

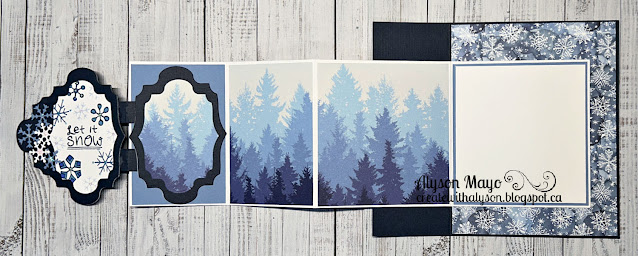
Snowflake Pull Tab Accordion Card

 This cute card idea is one from a video that I watched by Lynn Dunn. She used a specific hinge die for the front pull section but I made my own instead. 

I chose a snowflake theme for my card. The accordion pull out section was decorated with patterned paper that allowed a continuous scene to run across the sections. There is a message panel at the end of the accordion. For the front piece, I die cut some frame pieces and stamped some snowflakes and a sentiment on one of them. A tab was added to the side to make it easier to lift the panel. Some clear Stickles were placed on the snowflakes but no other embellishments were added. 


Enjoy, 

Alyson

Wednesday, November 20, 2024

Double Heart Card

 This is another card I found on Pinterest and wanted to recreate it. 

There are several layers on this card, alternating between blue and white. The top white layer was embossed and a heart was die cut from that piece. A piece of blue cardstock was embossed with a small pattern and placed behind the opening. The white die cut heart was adhered with foam tape and I added some open leaves and pink flowers to that piece. The sentiment was stamped and added to the front. The rest of the sentiment says "since I'm not there for the real thing" and was stamped inside the card. 

Enjoy, 

Alyson

Tuesday, November 19, 2024

TSOT 659 - Hello Flowers

 Welcome to Ty a Sketch on Tuesday Challenge 659!

This sketch has so many possibilities. I chose a floral theme since our Canadian Thanksgiving is long over now and we are headed to the winter season. 

The background was embossed and I added a piece of black and white patterned paper across the centre. The flowers were die cut in white, inked and assembled. I added them to a lightly inked background with a sentiment stamped at the top. I had some old flourish elements in my stash that I used for the opposite corners. 

Come and join us at TSOT and show us how you interpret this challenge. 

You have two weeks to link up your project. 

We can't wait to see what you create!

Enjoy, 

Alyson

Monday, November 18, 2024

DT 180 with Atlantic Hearts - Two for One

 Welcome to both Double Trouble and Atlantic Hearts. 

Double Trouble is pairing with Atlantic Hearts for a two week period and since I am on both design teams, it made sense to combine the posts. 

The small graphic for Double Trouble is below. Please visit the Double Trouble Challenge Blog for detailed information. 

The sketches for Atlantic Hearts are also below. Please note the dates for these challenges - 604 is for the first week (Nov 18-24) and 605 is for the following week (Nov 25-Dec 1).


The first card is for Sketch 604 - I actually made two cards as one was finished before I knew that these challenges were partnering together. 

I foiled a piece of white paper with teal foil and cut that down to fit on a stitched background. I used a smaller rectangle to die cut another stitched piece and cut openings in each side to slide a piece of white cardstock through the middle. A sentiment was stamped and I added gems on each side. 

The first card I made for the same challenge was totally different - I completely changed the colour scheme to get away from the visual image of Santa's belt. I adhered a piece of white snowflake vellum over black cardstock, The sentiment was stencilled in shades of turquoise and blue and die cut. I also stamped a smaller sentiment across the word Christmas. That was adhered to a shimmery white cardstock piece and I added some gems to the centres of the snowflakes. 

For my second card for Atlantic Hearts (Sketch 605), I used patterned paper for the background and added a metallic gold strip and stitched border to the front. The floral image was stamped, stencilled and die cut and I used a white gel pen to add some details. The sentiment was adhered at the bottom.

Come and join us at both Double Trouble and Atlantic Hearts and show us how you interpret these challenges. 

You have two weeks to link up with Double Trouble 

Please note that each sketch challenge is open for only one week. 

We can't wait to see what you create!

Enjoy, 

Alyson

Sunday, November 17, 2024

Fence Card

 I saw a card like this on Pinterest and wanted to try it myself. 

The fence pieces were embossed on white cardstock and then inked with several colours until they looked sort of old and worn. I cut them apart and arranged them on a white card base and added a cross piece with two brads. 

The flowers and leaves were die cut and arranged at the bottom of the fence and I added a white sentiment over the greenery. 

Enjoy, 

Alyson


Saturday, November 16, 2024

SS 764 - Birthday Flowers

 Welcome to Sketch Saturday Challenge 764!

The optional theme (in addition to the sketch) is to distress something. 

I chose not to do any distressing - it's not a look I particularly like. I stencilled and die cut a gorgeous floral image and adhered that to a leaf embossed panel of black cardstock. I added two thin strips of green glitter paper to enhance the black. The sentiment was stamped on green cardstock and adhered under the flowers. I added some iridescent gems around the card to finish it off.

Come and join us at Sketch Saturday and show us how you interpret this sketch. 

You have two weeks to link up your project. 

We can't wait to see what you create!

Enjoy,

Alyson

Friday, November 15, 2024

CD 627 - Skating Polar Bear

 Welcome to Colour Dare Challenge 627!

The colour graphic is below - please take note of the neutrals and metallics that are allowed.

I ink blended a sky backgound on the card base using the light and dark turquoise colours. I used a lighter hand with the darkest colour to get the blend and then splattered that with white paint. The polar bear was stamped, coloured and fussy cut. I also die cut three small trees. The hill was fussy cut and I aligned and stamped the sentiment at the bottom, masking the left side so I had part of a loop to align with the skates on the bear. The trees were adhered to the back of the hill piece and I added the bear to make it look like he etched the sentiment into the ice. 

Come and join us at Colour Dare and show us how you use the colour grid shown above. 

You have two weeks to link up your project. 

We can't wait to see what you create!

Enjoy, 

Alyson

CIU 317 and MTTC 547 - Grateful for All You Do

 Welcome to two challenges - Cut It Up Challenge 317 and My Time to Craft Challenge 547!

Since both of these challenges were being posted the same day, I thought I would combine them as the themes were easy to integrate. 

The theme for Cut it Up is to use your favourite colour. 

The theme for My Time to Craft is thank you. 

I chose to make my card in turquoise, silver and grey. The background was hot foiled with a striped foil plate and that was die cut using a stitched rectangle. The cardstock was die cut with a hexagon shape and I also hot foiled the sentiment. The image was stamped and die cut twice (stacked) before being offset on a piece of vellum. The sentiment was added across the bottom and I added some silver gems in the centres of the flowers and around the card. 

Come and join us at the following challenges. Each is open for two weeks. 

Cut It Up Challenge 317

My Time to Craft Challenge 547

We can't wait to see what you create!

Enjoy, 

Alyson

Thursday, November 14, 2024

Poinsettia Card Sets

 It's that time of the year... making sets of Christmas cards to give away. 

Here are two sets of four cards each. I chose some non-traditional colours as well as red and green. Some of the images were foiled and others were embossed. These didn't take a lot of time so I made several sets of each over a few days. 


Enjoy, 

Alyson

Wednesday, November 13, 2024

Anniversary Block Card

 I rarely make cards on commission but this is one of them. A friend of mine asked for an anniversary card for some special friends. 

I chose a design that I have made before. I used green and gold papers and some leaf and branch die cuts to decorate the front. No embellishments were added so the card folds flat for mailing. There is a space on the back for a message. 

Enjoy, 

Alyson

Tuesday, November 12, 2024

Card Sets 2

 This is the second post for the CARE-ing cards for my church to send to members who need a pick-me-up. Simple designs - each photo shows four cards but there are four more underneath for set of eight of each design.


Enjoy, 

Alyson

Monday, November 11, 2024

Card Sets 1

 I make sets of cards when I attend crops as I can do a lot of advance preparation, resulting in having to take minimal supplies with me. 

The CARE-ing team at my church is a group of church members who send cards to others when they are ill, have lost a loved one or simply can't attend the services. I supply the team with cards for that purpose. I like to keep the cards simple and usually with few, if any, embellishments. 

These two sets were made at a recent crop day. Four cards from each set are shown but there are another four underneath for a set of eight of each design. 


Enjoy, 

Alyson

Sunday, November 10, 2024

Strip Background Tulip

 This pretty card was made with a set of layering dies from Honey Bee Stamps. I inked each of the pieces, spritzed them with water and assembled them when they were dry. 

The background was created by die cutting a thin rectangle border and thin strips of white cardstock, The strips were adhered to the back of the frame and that was adhered to a white card base. The tulip was added to the front along with a sentiment and gold metallic thread. Some clear dew drops were placed on and around the flower. 

Enjoy, 

Alyson

Saturday, November 9, 2024

Two for One Stamped Cards

 These two cards were made from a combination of two stamped backgrounds. 

The same image was stamped on blue cardstock and again in the same place on white cardstock. The white one was coloured and I heat embossed the same sentiment twice. I also die cut two "hello" sentiments from gold foil. The stamped pieces were cut at the same place and they were combined to make two cards. I added some gold gems to finish off each card. 


Enjoy, 

Alyson

Friday, November 8, 2024

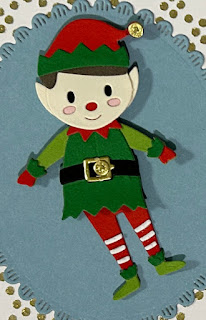
MTTCC 99 - Have your Elf a Merry Christmas

 Welcome to My Time to Craft Christmas Challenge 99!

The theme for this challenge is elves. 

I have only one elf in my collection and it's a set of dies - TINY dies! And yes, the title of my post is correct - it is supposed to say "elf" and not "self".

I die cut the pieces for the elf and assembled him. The background was covered with gold paste through a stencil and once that was dry, I added the die cut oval and the sentiment. The elf is kinetic, meaning his legs swing from side to side. I am including two additional photos that show that. 


Come and join us at MTTCC and show us your projects with elves. 

You have two weeks to link up your project. 

We can’t wait to see what you create!

Enjoy, 

Alyson