Monday, March 27, 2017

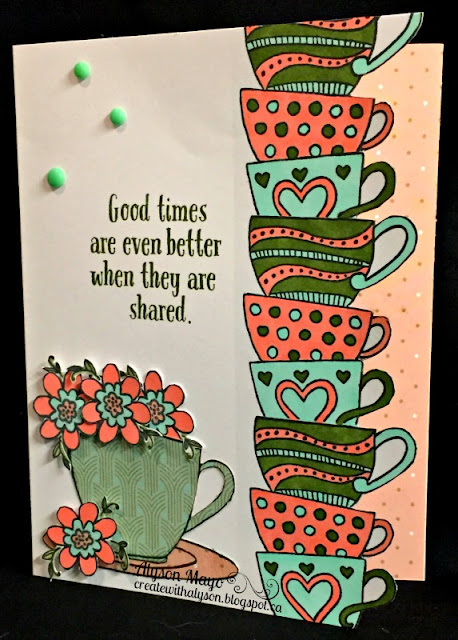
Heart 2 Heart - Tea Time

The theme this week at Heart 2 Heart is Tea Time - a perfect theme to match Close To My Heart's Stamp of the Month, "Tea-rrific"!

I chose to used the colour scheme from the Hello Lovely paper pack - primarily greens with Sorbet, a light orange colour. That way, I was able to use some of the patterned paper for my main teacup and saucer and also as a background strip behind my stacked teacups since they were cut along the handles of the cups, leaving an uneven border at the side of the card. I stamped the flowers and cut them out to place them in and around the teacup. 


The Tea-rrific stamp set can be seen below. Isn't is adorable? You can order it on my OBA or by contacting me directly (see the Contact Me link at the top). 


Be sure to join us at Heart 2 Heart! This challenge closes on March 31 as do all the March Heart 2 Heart challenges so make sure you link up your artwork with the appropriate challenge by that time. Use of at least some Close To My Heart products is required in all entries. 

Products used are all Close To My Heart

Paper: Hello Lovely Paper Pack, White Daisy Cardstock
Stamps: Tea-rrific
Inks: Tuxedo Black Memento Ink, New England Ivy
Accessories: Aqua Dots (ret.) Thin Foam Tape, ShinHan Markers, Clear Shimmer Brush

Enjoy, 
Alyson


Friday, March 24, 2017

Colour Dare 236 - Fabulous Friend Card

The challenge at Colour Dare this week is as follows: 
- White Daisy
- Black
- Pacifica
- Emerald
(ALL and ONLY these colours)

I found these colours to be a little bit of a struggle to combine... It led to some interesting attempts and at the bottom of my post, I am going to show you what I originally tried to do. That's for later, though. 

After thinking long and hard about this combination, I really wanted something with flowers - so I decided to pull out an older stamp and die set called Springtime Wishes. The background paper is from Dreamin' Big and since I wanted some sort of interest on the flowers, I chose to die cut them in black and emboss the pattern on them in white. The leaves were cut in Emerald and also stamped in the same colour. The Pacifica background is a Stampin' Up die cut. I also finished the inside of the card. 


Join us at Colour Dare, using ALL and ONLY the colours shown. 
You have until Thursday evening at 10pm EST to link up your project. 

Products used are Close To My Heart unless otherwise indicated: 

Paper: Dreamin' Big Paper Pack, White Daisy Cardstock, Black Cardstock, Pacifica Cardstock Emerald Cardstock
Stamps: Birthday Sparkles, Springtime Wishes (ret.), Say it All (ret.)
Inks: Pacifica, Emerald, Versamark
Accessories: Flower Market Cartridge, Springtime Wishes Thin Cuts (ret.), SU Die Cut (not CTMH), White Embossing Powder, Heat Tool, Blue Dot Enamel and Glitter Duos, Thin Foam Tape, White Gel Pen (not CTMH)

Enjoy, 
Alyson

--------------------------

My friend, Sue Reynolds, is also on the Colour Dare design team. She and I were chatting one evening and we had both watched a video about stencilling and wanted to try our hand at it. We also both wanted to do it for this challenge. However, she mentioned it first so I didn't want to do the same thing. I tried it first, however... I sent her a picture of the BACKGROUND only of the card shown below... It was looking not too bad - until I added the birds. The mixture of colours and the pattern just didn't seem to match - it somehow looked like more of an underwater scene than trees to me. 


So, this one didn't make the cut... It will remain in my files - but will likely eventually make it into the circular file, I think. My birds appear to be drowning rather than sitting on trees like I intended... 

Maybe my next stencilling project will be more successful. 


Monday, March 20, 2017

Atlantic Hearts 204 - Birthday Roses

I love the sketch this week at Atlantic Hearts - but then again, I really enjoy creating with sketches all the time! I decided to stick with the flowers as my focus in the lower left corner although you could certainly choose to use whatever element you want. 

I actually played around with three different types of flowers and decided to go with these ones as they had a less formal appearance than the others I tried. I wanted very bold colours for the flowers and leaves so I went with a muted background of triangles from the Sugar Rush paper pack. Once again, photographing the silver tape was such a  problem... between light and shadows, it either ends up with various colours, some even being blue, or it ends up looking black like it does here. It really is silver! The background isn't ideal but I ended up taking the picture when it was dark outside so the lighting was very hard to work around - overhead lights shine down and make that tape look all sorts of colours! 


Join us at Atlantic Hearts and show us your interpretation of the sketch shown above. You have until Sunday evening to link up your project. 

Products are all Close To My Heart

Paper: Sugar Rush Paper Pack, White Daisy Cardstock
Stamps: Hello Lovely - Scrapbooking, Holiday Tags (ret.)
Inks: Willow, Pixie, Raspberry
Accessories: Silver Tape, Small Sparkles Flourishes (ret.), Sugar Rush Gems, Foam Tape, Thin Foam Tape

Enjoy, 
Alyson


Saturday, March 18, 2017

Mother Layout

As I mentioned in a previous post, Close To My Heart has a heritage scrapbooking contest happening for Consultants this month. I completed a layout of my father and have finally completed the complementary layout of my mother which will go beside the layout of my father.

This was a very difficult layout for me - as any of you who follow my blog know, my mother passed away last November. The loss is still very fresh and difficult for me. I miss her terribly and find myself reaching for the phone so often to call her and see how she is doing. The pieces for this layout sat on my desk for almost 3 weeks before I finally managed to put the layout together...

There is a little part of this that you cannot see... in the upper left corner, the twine that is holding the banner together is created from 3 single pieces of twine. That twine is braided - because when I was growing up, I had very long hair and my mom would braid it for me to keep it out of my eyes.
I also chose to journal on the back of the layout as I wanted to write a long letter to my mom, recalling some of our many conversations from her last 18 months as her health significantly declined and she was hospitalized and then moved to a seniors' home. Perhaps someday, if my family album is ever disassembled, someone will find the journaling on the reverse... 
if not, that's ok, too.


Products used are all Close To My Heart

Paper: Sugar Rush Paper Pack, Rustic Home Fundamentals, Uptown Fundamentals, Sea Glass Cardstock, Juniper Cardstock, Pixie Cardstock, Colonial White Cardstock
Stamps: none
Inks: Desert Sand, Sea Glass, Juniper
Accessories: Artbooking Cartridge, Artistry Cartridge, Flower Market Cartridge, Foam Tape, Thin Foam Tape, Rustic Home Ribbon Pack

Enjoy, 
Alyson


Thursday, March 16, 2017

Thin Cuts Blog Hop


Welcome to the Thin Cuts Blog Hop! There are several Close To My Heart consultants featuring the Close To My Heart Thin Cuts and I am sure that you will see some awesome ideas along the way! So, sit back, relax and let's get started. 

You should have arrived here from Michelle Loncar's blog.

If you get lost, a list of all blogs can be found on Melinda Everitt's blog

For this blog hop, I wanted to do a rainbow style card. I had an idea in my head but I wasn't exactly sure how it was going to work. As I played around with the butterfly Thin Cut from the Dreamin' Big Cardmaking stamp set, I figured out what I wanted to do - a rainbow circle with the butterflies around the outside... it seemed so easy. 
I chose colours that were bold and bright but that also ranged from yellow through the rainbow. Figuring that I needed between 10-12 butterflies, I stamped and then cut out each of the butterflies using the co-ordinating die. I ended up needing 11 butterflies in total. Using Cricut Design Space, I selected a sample butterfly and carefully measured it to be the same size for my sample as the ones I had cut using the die. Using a number of circles, I placed the butterflies around a centre circle on the square until I had 2 circles the sizes I needed and then sliced them to get my ring. That was the easy part! 


Placing the butterflies temporarily in place, I very lightly marked the 6x6 card base with pencil and began the task of inking each section using the same colour of inks with which I had stamped my butterflies.  Blending them was not terribly difficult in most cases but some combinations were more difficult than others (ex. New England Ivy and Lemon...) I did this using sponge daubers. A photo of this is shown below (not every card looks beautiful in the process of being created, as you can see here...)

Then came the addition of the black cardstock on top, followed by the exact placement of the butterflies. The sparkles - large and small - were individually coloured to match each of the butterflies. The larger ones are on the butterflies and the smaller ones are scattered on the centre piece of black cardstock, surrounding the white heat embossed sentiment that is taken from the same stamp set as the butterflies. After the black cardstock was on top, it was missing something... a coloured layer was definitely needed underneath. So, after carefully removing the outer piece of black cardstock, I had to slice off the smallest edges to accommodate a piece of Willow cardstock under the black - but it also needed the centre cut out of it for the rainbow to be seen.... the things we don't consider with last minute changes! 


This card took me an enormous amount of time but I am so happy with the final result. 

The next blog on the hop is Tracey Pierce's blog

I'm sure she has a wonderful project to share with you.

You can order any of the CTMH products from the Seasonal Expressions 1 Catalog or the Annual Expressions Catalog seen on this blog hop on my OBA or by contacting me directly.

Every single Thin Cut (individual or combined with a stamp set) is 25% off this month ONLY!
Get them while you can! 

Products used are listed below: 
Paper: White Daisy Cardstock, Black Cardstock, Willow Cardstock
Stamps: Dreamin' Big - Cardmaking (bundle with the Dreamin'' Big Thin Cuts) 
Inks: Versamark, Lemon, Tangerine, Blossom, Raspberry, Cranberry, Thistle, Pansy, Pacifica, Lagoon, Willow, New England Ivy
Accessories: Cricut - Insert Shapes, Dreamin' Big Thin Cuts, White Embossing Powder, Heat Tool, ShinHan Markers, Sharpie Markers, Sparkles, Bitty Sparkles, Sponge Daubers

Enjoy, 
Alyson


Monday, March 13, 2017

H2H - Tool Time

The theme this week at Heart 2 Heart is "Tool Time" - we are encouraging you to use either Thin Cuts or Embossing Folders on your project (or both). As an aside, when I hear "Tool Time", I think of Tim, the Tool-Man Taylor from Home Improvement... I loved that show! 

I chose to create a Centre Step Card for my project. It is so very easy to do with just a few simple cut and score lines. The instructions can be found at Splitcoast Stampers in the Tutorials section.

For the side sections, I just used Pixie and Sea Glass ink and blended the sections together as best as I could. I like the way they turned out. I used an embossing folder and two sets of Thin Cuts on my card. The flowers are from a retired Stamp of the Month stamp set and I used the full cluster plus sections of it cut out for smaller groups.


The post below shows a close up of the flowers - the shimmer doesn't show up in the main photo...


Join us at Heart 2 Heart and show us how you use Thin Cuts or embossing folders on your project. Be sure to use some Close To My Heart products. 
You have the entire month of March to enter this or any of the March challenges. 

Products used are Close to My Heart unless otherwise indicated: 

Paper: White Daisy Cardstock, Eggplant Cardstock, Pixie Cardstock, Sea Glass Glitter Paper
Stamps: Thoughtful Flowers (ret.) Wreath
Inks: Eggplant, Tuxedo Black Memento Ink, Pixie, Sea Glass
Accessories: Hearts Thin Cuts, Wreath Thin Cut, Simple Chevron Embossing Folder, ShinHan Markers, Clear Shimmer Brush, Bitty Sparkles, Sharpie Marker (not CTMH), Sponges

Enjoy, 
Alyson


SaveSave

Friday, March 10, 2017

Colour Dare 234 - Green Blended Vellum Card

The challenge this week at Colour Dare is to use greens along with White Daisy with the option of adding gold. What a great way to make some terrific choices! Close To My Heart has some 
FAB-U-LOUS shades of green! 

I chose my two favourite shades of green - the two newest ones - and combined them with an old favourite. That meant I used Willow, Emerald and Sweet Leaf. I chose to blend the three of them together from darkest to lightest. I used the Emerald cardstock to create a frame. White Daisy is the card background. I used plain vellum to cut my leaves to layer on top of the blended green background. The hardest part is finding a way to attach the leaves so adhesive doesn't show... It's great if they can be anchored under something but in this case, that wasn't possible. Leaving them free is kind of risky for when they are inserted into an envelope... I used just the tiniest part of a glue dot under just two of the leaves and it is almost completely hidden that way. I stamped my sentiment on the inside of the card. Love how this turned out :) 


Join us at Colour Dare and link up your project. You can use as many of the greens shown as you wish this week. The gold is optional. Usually, we don't give you a choice but this week is a little bit different. If you don't have Close To My Heart colours, use the closest that you have. You have until Thursday at 10pm EST to add your link. 

Products used are Close To My Heart unless otherwise indicated

Paper: White Daisy Cardstock, Emerald Cardstock, Vellum (not CTMH) 
Stamps: Birthday Sparkles (inside card) 
Inks: Emerald, Willow, Sweet Leaf
Accessories: Art Philosophy Cartridge (ret.), Foam Tape, Gold Glitter Gems, Uptown Ribbon Pack

Enjoy, 
Alyson


Monday, March 6, 2017

AH 202 - Happy Thoughts with Hello Lovely

The Hello Lovely Paper Pack has quickly become one of my favourites! I am usually not a huge fan of the Complement packages as I always end up with so many pieces that I don't end up using but the one for this paper pack is gorgeous - and contains so many terrific images - one that I chose to use on my card for this challenge. 

For the rectangle at the bottom of the sketch, I chose to use 3 grey patterned pieces from the paper pack and turn them into flags that were offset. I did the same with the sentiment. 


Join us at Atlantic Hearts and show us your interpretation of the sketch shown above. You have until Sunday evening to link up your project. 

Product used are all Close To My Heart

Paper: Hello Lovely Paper Pack, New England Ivy Cardstock
Stamps: Sending Smiles (Flower Market Cricut Bundle)
Inks: New England Ivy, Whisper, Sorbet
Accessories: Hello Lovely Complements, Gold Glitter Gems

Enjoy, 
Alyson


Saturday, March 4, 2017

Peace and Comfort Card

Sometimes there are just no words to express the right things... 

This card, along with some other items, will go in the mail tomorrow for a special friend who has suffered a tremendous loss. 


Products used are Close To My Heart unless otherwise noted: 

Paper: White Daisy Cardstock, Lagoon Cardstock, New England Ivy Cardstock
Stamps: Blended Bloom (not CTMH), Words of Comfort (ret.)
Inks: Lagoon, Versamark
Accessories: Art Philosophy Cartridge (ret.), ShinHan Markers, White Embossing Powder, Heat Tool, Diamond Embossing Folder (ret.), Lagoon Twine (ret.), Aqua Dots (ret.), Foam Tape, Thin Foam Tape, Clear Shimmer Pen, Corner Rounder

Enjoy, 
Alyson


Wednesday, March 1, 2017

March Stamp of the Month Blog Hop - Tea-rrific


Welcome to March's Stamp of the Month Blog Hop! This month, we are featuring the stamp set 
"Tea-rrific" - a set of 11 stamps. This is an amazing set of stamps - fun, whimsical and just so darned CUTE! I love the adorable teacups, the box of tea, the little flower and the oh so cute sentiments related to tea drinkers. I think this is one of my favourite stamp sets in a very long time! The bloggers along this blog hop will certainly show you many ways to use this awesome stamp set, so sit back and enjoy the tour. 

You should have arrived here from Jennifer Dykstra's blog.


If you get lost, a list of all blogs can be found on Melinda Everitt's blog

The stamp set looks like this.


I chose to use the little flower image in this stamp set to create a circular border around the main teacup. I just used a circle to lightly draw a guide for placement and then I stamped my flowers in Tuxedo Black Memento Ink. They were coloured using ShinHan markers. I decided to create two identical cards (well, almost identical except for the placement of the small embellishments...) That was because I couldn't decide which colour scheme I liked better. 


Which colour scheme do you like best? 


The next blog on the hop is Haley Dyer's blog.
I'm sure she has a wonderful project to share with you.

You can get this stamp set for just $6 this month with a $50 purchase. 

Visit my shopping site here


Remember this stamp set is only available until March 31st! 

Products used are all Close To My Heart

Paper: White Daisy Cardstock, Raspberry Cardstock, Lagoon Cardstock
Stamps: Tea-rrific
Inks: Tuxedo Black Memento Ink, Raspberry, Lagoon, Sorbet
Accessories: Aqua Shimmer Trim, White Shimmer Trim, Silver Shimmer Trim, ShinHan Markers, Foam Tape, Clear Shimmer Brush, Sugar Rush Dots, Purple Hearts Enamel and Glitter Duos

Enjoy, 
Alyson