Friday, May 31, 2024

CD 603 - Trio of Flowers

 Welcome to Colour Dare Challenge 603!

You must use all three colours shown - neutrals and metallics are free to use as desired. 

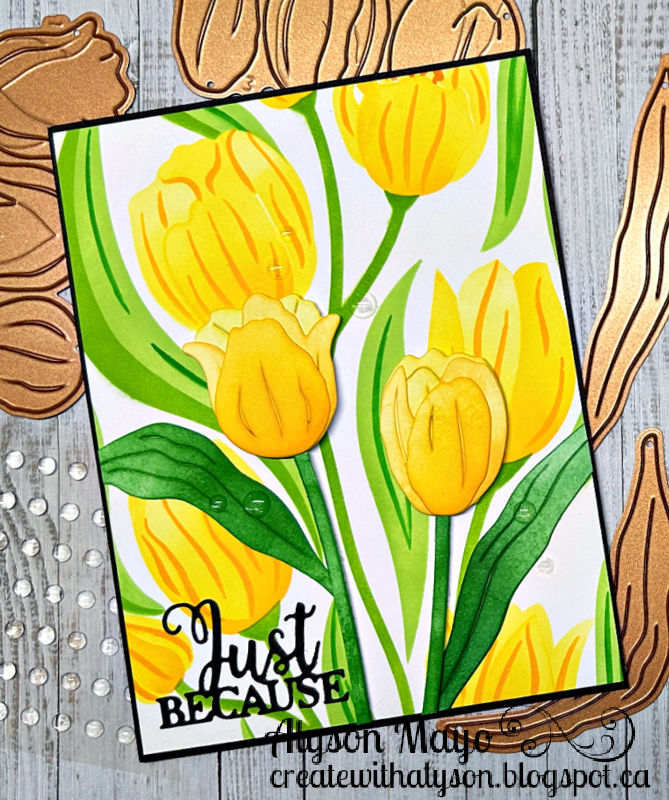
This is definitely not a go-to colour combo for me. I chose a layering stencil and used a light hand for the first layer of the flowers and leaves (Papaya and Seabrook). The second layer was inked with a heavier hand to provide the dimension. The background cardstock is Harbour and the insides of the flowers were also inked in Harbour ink. I stamped the sentiment with that same ink and added it at the bottom. Some iridescent gems were placed around the flowers. 

Come and join us at Colour Dare and show us how you interpret this week's challenge. 

You have two weeks to link up your project. 

We can't wait to see what you create!

Enjoy,

Alyson

CIU 305 - Rainbow Crocus Stems

 Welcome to Cut it Up Challenge 305! 

The theme for this challenge is anything goes! Since this is a die cutting challenge, your project must include a die cut. 

This card has a technique that I haven't done for ages. I started with a piece of dark grey cardstock and embossed it. I added black ink to the embossing folder and ran it through the machine again, adding black ink to the debosssed sections. I then took a dark grey ink pad and inked around the paper, leaving a lighter area in the centre. The crocus pieces were die cut and cut apart so I could ink them in a sort of rainbow colour scheme. I assembled them on the embossed front and added two sentiments. The embossed panel was adhered to a white card front. 

Come and join us at Cut It Up and show us your projects for this challenge. 

You have two weeks to link up your project. 

We can't wait to see what you create!

Enjoy, 

Alyson

MTTC 535 - Canoe and Mountains

Welcome to My Time to Craft Challenge 535!

The theme for this challenge is camping. 

This is a difficult theme for me as I don't have any real camping stamps or dies - but I do have a gorgeous die and stencil set that creates the mountain scene below. 

I stencilled the colours onto the die cut background and added a red canoe and paddle along the shore. The canoe is a symbol of camping for me as I used to do a lot of wilderness canoe tripping. I stamped a sentiment in the top corner - one that I think is very relevant to the outdoors. Some details were drawn onto the image using coloured pencils and a white gel pen. 

Come and join us at MTTC and show us your camping projects. 

You have two weeks to link up your project. 

We can't wait to see what you create!

Enjoy,

Alyson


Thursday, May 30, 2024

A World of Views and Dreams

 This card was inspired by one I saw online - I had the stencils and it was a matter of putting together a scene.

The "view" was stencilled and I had to wait a couple of times for things to dry (the snow on the mountains and the lights on the buildings) as they were stencilled using pastes. Once everything was dry, I cut the scene down to fit in the window opening. The background was embossed and I dragged a grey ink pad over the panel to enhance the bricks. A couple of plants were added to make it look like a view to the outside from the inside, if that makes sense. 

Enjoy,

Alyson

Wednesday, May 29, 2024

Double Flap Peony Card

 I have seen this card style around quite a bit lately - there doesn't seem to be a common name for it so I am calling it a double flap card. 

I stamped, stencilled and die cut the peonies first. The basket was die cut and inked for dimension. Once the card base was folded, I added coloured cardstock on the two front panels along with a white panel which was lightly inked in yellow. The basket with the peonies was arranged on the front and I added some peony images on the bottom of the second panel so it looks like the images continue over from the front panel. The first part of the sentiment was placed under the basket and the second part was placed on the inner panel. There is spot to write a message on the last panel and the card folds flat for mailing. 


Enjoy, 

Alyson

Tuesday, May 28, 2024

CAS Painted Card

 I saw a card like this on Pinterest and wanted to try it myself. It involved a form of watercoloring - definitely not my strength! 

I chose six ink shades in pastel colours and painted diagonal lines across a piece of watercolour paper, slightly overlapping each colour. Once that was dry, a die cut stem and a stamped sentiment were added and the card front was adhered to a card base using craft foam. Easy, but so pretty!

Enjoy,

Alyson

Monday, May 27, 2024

Perfect Pearls Thinking of You Card

 Perfect Pearls have been around for ages - I have some in my stash and decided to pull them out for this card. 

I used three colours - a bright pink, turquoise and purple. The leaf images were stamped with Versamark and the powder was added on top. Once all the leaves were done, I spritzed the panel with water and dried it. The sentiment was embossed in white and added at the side. It's a very simple card with tons of shimmer! 

Enjoy, 

Alyson

Sunday, May 26, 2024

Friends Make Life So Much Better

 This is the second card I made with a recent Pinkfresh Studio purchase - also in yellow. 

The background was die cut using a blanket stitched frame and splattered with black ink. The sentiment was stamped in the bottom corner and the floral image was added to the top of the card. I used clear Stickles in the centres of the flowers and added some iridescent gems around the image. Easy! 

Enjoy,

Alyson

Saturday, May 25, 2024

Let Your Smile Change the World

 I recently purchased a new set of products from Pinkfresh Studio and this was my first time playing with them. I based this card on one that I saw on the Pinkfresh website.

The flowers were stamped, stencilled and die cut and I stacked the image three times. I stencilled a few of the floral image using the same colours so I did make some other cards with the pieces. The frame was die cut in white, inked and adhered to a white card base. That was splattered with a blue shimmer brush and the image was added on top of the frame. The sentiment was heat embossed in white, stacked three times and placed at the bottom. So pretty!

Enjoy, 

Alyson

Friday, May 24, 2024

MTTCC 87 - Season's Greetings Skates

Welcome to My Time to Craft Christmas Challenge 87!

The theme for this challenge is winter snow/ice sports equipment. 

I chose to use skates - always a sign of winter here in Canada. 

A silver doily was adhered to a piece of snowflake paper and a stitched circle was placed in the centre. The skates were arranged on the circle and a piece of twine was used to make them look like they are hanging. I added a hot foiled sentiment at the bottom and adhered the snowflake paper to a white card base. 

Come and join us at MTTCC and show us how you interpret this challenge. 

You have two weeks to link up your project. 

We can't wait to see what you create!

Enjoy,

Alyson


Thursday, May 23, 2024

Enjoy the Little Things

 I continue to pull out my art journal to add pages with sentiments that I really like. This one was pretty easy - a piece of text paper with some die cut shapes for the ombre stamped sentiment, fabric tape, a fussy cut border for the bottom and a few rub ons to finish it off. I need to get inky with this again but I need some 60 hour days to make that happen! 

Enjoy, 

Alyson

Wednesday, May 22, 2024

Postage Collage Wildflower Cards

 I pulled out my postage collage products to play once again. These two cards were inspired by ones I found on Pinterest. 

For each of the cards, I ink blended a background with the stencil in place. Still leaving the stencil in the same spot, I stamped various images and heat embossed them in black. Once that was done, I removed the stencil, die cut the image and stamped a few more items that crossed the sections. One card is a birthday card and the other is just a fun card. Both were adhered to black card bases. 


Enjoy,

Alyson

Tuesday, May 21, 2024

TSOT 647 - You're in My Thoughts

 Welcome to Try a Sketch on Tuesday Challenge 647!

I made a very spring-like card for this challenge. The plaid paper determined the colours for my card. I random stamped flower outlines on a piece of green cardstock and placed that piece at the top with a strip of gold glitter paper below that. The flower was heat embossed in gold, stencilled and die cut. I added a gold ribbon under the flower and adhered the flower with foam tape. A hot foiled sentiment was added under the flower and I placed some gold glitter gems around the flower. 

Come and join us at TSOT and show us how you interpret this week's sketch. 

You have two weeks to link up your project. 

We can't wait to see what you create!

Enjoy,

Alyson

Monday, May 20, 2024

DT 167 - Birthday Roses

 Welcome to Double Trouble Challenge 167!

The small graphic for this challenge is found below - please visit the Double Trouble Challenge Blog for detailed information. 

I chose to make a birthday card for this challenge. The colours for my card were determined by the inspiration board at the Beautiful Blossoms challenge. I gold embossed the rose outline, some individual roses and leaves and stencilled them before die cutting them. The Kraft background was embossed with a rose embossing folder and I splattered gold paint on that piece. The roses were arranged on the front and I added two hot foiled sentiments in the top corner. The card front was added to a dark orange mat and then a green card base. Some gold sequins were placed around the flowers. 

Come and join us at Double Trouble and show us how you interpret this challenge. 

You have two weeks to link up your project. 

I am also linking up my card with the Beautiful Blossoms Challenge

We can't wait to see what you create!

Enjoy, 

Alyson

AH 578 - Pink Tulips

Welcome to Atlantic Hearts Challenge 578!

I stayed very true to the sketch. The pink polka dot paper is from my stash and I die cut the tulip images from white cardstock and inked them before splattering them with water. The angled rectangle was lightly inked in green and I splattered black paint on that piece before arranging the tulips on top of it. That was adhered to a silver glitter rectangle and I chose a sweet sentiment for the bottom. 

Come and join us at Atlantic Hearts and show us how you interpret this week's sketch. 

You have until Sunday evening to link up your project. 

We can't wait to see what you create!

Enjoy,

Alyson

Sunday, May 19, 2024

Yellow Tulips

Another post with tulips! The background was stencilled and I die cut two tulips and stems from white cardstock and inked them. They were adhered on top of the stencilled image with foam tape to add dimension. A die cut black sentiment was placed at the bottom and I added a black mat to my card. Some clear gems were placed around the die cut images. 

Enjoy,

Alyson

Saturday, May 18, 2024

SS 751 - Just Because

 Welcome to Sketch Saturday Challenge 751!

The optional element (in addition to the sketch) is to use a die cut shape. 

I usually flip horizontal sketches to make vertical cards but I stayed with the horizontal orientation for my card. 

I chose a silver hot foiled background and matted it on green cardstock and then a blue card base. The diamond and the circles were die cut and I stamped, stencilled and die cut the floral images. I added a piece of blue glitter tape under the diamond and the sentiment was placed on top of that along with some blue metallic thread. I used green Liquid Pearls to add a handful of dots around the flowers. 

Come and join us at Sketch Saturday and show us how you interpret the sketch. 

You have two weeks to link up your project. 

We can't wait to see what you create! 

Enjoy,

Alyson

Friday, May 17, 2024

CD 601 - Christmas Flowers

 Welcome to Colour Dare Challenge 601!

Choose ONE colour to go with Candy Apple. Please see the graphic below for details. 

I chose Jade - so a mix of red and green, which was perfect for Christmas.

It would have been a little easier if I could have used yellow as well but after I coloured everything, I fussy cut some gold foil paper to add a lighter colour to the centres of the flowers and the berries. The photo really picked up on those little foil pieces! I splattered the image with gold paint and added three mats on this card to give it some definition. Easy! 

Come and join us at Colour Dare and show us how you interpret this week's challenge. 

You have two weeks to link up your project. 

We can't wait to see what you create!

Enjoy,

Alyson

Cut It Up 304 - White Flowers

 Welcome to Cut It Up Challenge 304! 

The theme for this challenge is "send me flowers". 

I love working with florals and this card was made with the Spellbinders Kaleidoscope collection. I stencilled a grey background on light grey cardstock and matted that with dark green cardstock before adhering it to the card base. The flowers, leaves and kaleidoscope were all die cut and I stitched the lower section with yellow embroidery floss. The flowers were arranged around the kaleidoscope and I brushed the centres of the flowers with a clear shimmer brush. 

Come and join us at Cut It Up and show us your floral projects. 

You have two weeks to link up your project. 

We can't wait to see what you create!

Enjoy, 

Alyson

MTTC 534 - Woofing You a Happy Birthday

 Welcome to My Time to Craft Challenge 534!

The theme for this challenge is super cute. The possibilities are endless! 

I love dogs so I decided to make a dog-themed card. The background was embossed with a brick embossing folder and I dragged grey ink over top to enhance the pattern. The doggies were stamped, coloured and fussy cut and I arranged them along the bottom of the window to make it look like they are looking out the window. A birthday sentiment was placed at the top of the window and I adhered that piece to the card front with foam tape. 

Come and join us at MTTC and show us your super cute projects. 

You have two weeks to link up your project. 

We can't wait to see what you create!

Enjoy,

Alyson

Thursday, May 16, 2024

Two Sets of Cards

 When I attend crop events, I usually make sets of cards as it is easy to work on one design for several cards - plus I don't have to take a lot of stuff with me! 

These two sets each have eight cards in them, with four different sentiments in each set. I actually made two of each set, for a total of 32 cards. One of each set is pictured here. 

Enjoy,Alyson

Wednesday, May 15, 2024

You are Awesome Card

 This card was created with a technique that was new to me. It's messy but the effect is pretty cool!

I embossed a floral image with a 3D embossing folder and on the debossed side, I added ink to the images using small brushes. Once that was finished, I dragged a black ink pad over the top and it covered the raised areas, leaving the coloured images without (much) ink. I do like that some black ink was transferred to a few lines of the flowers and leaves. 

I kept the finished card simple - just embossed s sentiment and added it to a stitched oval. A few iridescent gems were placed around the sentiment. 

Enjoy,

Alyson

Tuesday, May 14, 2024

Tulip Trio

 Tulips are my favourite flower and I love this set of dies from Spellbinders with three tulips - had to try them out! 

The flowers were die cut in white and I inked them in three colours before assembling them. I used a hot foiled striped background and a black frame as the background for the flowers. A hot foiled sentiment was added at the bottom and some clear dew drops were placed on the the flower and leaves. 

Enjoy,

Alyson

Monday, May 13, 2024

Wedding Card

Two friends of mine are getting married in a few weeks - this is the card I made for them. The inspiration for this was found on Pinterest. 

I cut a large heart with a smaller heart opening using my Cricut machine. Using my scoring board, I scored two lines around the edge of the card front. The word "love" was die cut twice from white cardstock and adhered along the right side of the heart. I die cut several stems from green cardstock, silver foil paper and vellum and arranged them coming out of the small heart opening. A hot foiled sentiment was added at the bottom and the card front was adhered to the base using craft foam. 

Enjoy,

Alyson


Sunday, May 12, 2024

Tricorn Cards

 I have found a few versions of this card style and wanted to try it myself. It folds flat for mailing. I'm not sure where the name tricorn comes from... it's what this card fold is called. 

I used a yellow and turquoise colour scheme for my card. I chose turquoise patterned papers and stamped and coloured a floral image for the front. A hot foiled sentiment was added at the bottom and I lightly inked around the edges of the white oval. There are panels on the back to write a message. 

This was my first attempt... I used a dotted patterned paper and drew my cardstock colours from that. The birthday card and cake stand were stencilled and die cut and added to an oval image on the front of the card. There are two panels on the back for a place to write a message. 

Enjoy, 

Alyson

Saturday, May 11, 2024

A Timeless Sketch with Leaves

 I have seen a variety of sketches similar to this and it is one that is used over and over. I created this sketch myself and will use it as a guide in my teaching group. 

I created three cards based on this sketch. There is one each of silver, gold and copper. The leaves were created using the Better Press system and then stencilled using oxide inks and die cut. The sentiments were also pressed and die cut. Depending on the colours of the leaves and the circle/oval image, I added a bit of ink around the open area. The leaves were adhered around the sentiments and I did a bit of ink splattering on two of the sentiment pieces. The backgrounds were embossed before being added to a border and then the card base. Some gems were added to each card was well. 


Enjoy,

Alyson

Friday, May 10, 2024

MTTCC 86 - Deer in Trees


Welcome to My Time to Craft Christmas Challenge 86!

The theme for this challenge is silhouette scenes.

I ink blended a sunset background using four Distress Oxide inks. The birch tree background and the deer were die cut from black cardstock and I placed the deer behind the trees before adhering the background. A hot foiled sentiment was added at the top of the card. Easy! 

Come and join us at MTTCC and show us your silhouette projects. 

You have two weeks to link up your project. 

We can't wait to see what you create!

Enjoy,

Alyson


Thursday, May 9, 2024

Birthday Tri-Shutter Card

 Tri-Shutter cards have been around for as long as I have been making cards - probably around twenty years. I think this was the first fun fold card style I ever tried. It was time to revisit this style. 

I chose blue and goldrush colours for my card. The patterned papers made me look deep into my cardstock stash for the right goldrush coloured cardstock. 

The sections were covered with three different patterns and I stamped, coloured and die cut several floral images. The sentiment was stamped using two shades of blue ink and I adhered the flowers on various panels plus under the sentiment. Some flat gold gems were placed on the centre panel to allow the card to fold flat for mailing. 

Enjoy,

Alyson

Wednesday, May 8, 2024

AH 576 - You're Amazing

Welcome to Atlantic Hearts Sketch Challenge 576!

This is a fairly detailed sketch - I chose to stay close to the sketch idea as it worked for my card. 

The background was embossed on Kraft cardstock and I added black and gold stripes and an offset scalloped border. The flowers were stamped, coloured and die cut and added just above the scalloped border. A sentiment was placed over the flowers and I added a die cut bow under that. A few clear gems were placed around the card and the card front was adhered to a black mat and then a red card base. 

Come and join us at Atlantic Hearts and show us how you interpret this week's sketch. 

You have until Sunday evening to link up your project. 

We can't wait to see what you create!

Enjoy,

Alyson

Tuesday, May 7, 2024

TSOT 646 - Sending Hugs

 Welcome to Try a Sketch on Tuesday Challenge 646!

The square and rectangle pieces were all die cut with stitched dies and I embossed the green background using a leaf embossing folder. The images were stamped, coloured and die cut and added in the corners and at the top of the sentiment. I used black Stickles for the centres of the flowers and iridescent gems around the sentiment.

Come and join us at TSOT and show us how you interpret this week's challenge. 

You have two weeks to link up your project. 

We can't wait to see what you create!

Enjoy, 

Alyson